The current version (as of 5/11/2016) of the Dell Server Deployment Pack (DSDP) is 3.0 will install into ConfigMgr 1511 and 1602, and might let you import and create driver packages. But, as of right now (5/11/2016), we still cannot import the Dell ToolKit (DTK) to allow the rest of the Dell scripts to work and to create boot images. The current version of DTK is 5.3.
This is because ConfigMgr 1511+ requires ADK 10; and DTK is not yet compatible with ADK10.
From what I have been told, around the release time of Windows 2016 we should have OpenManage 8.4, which will include DTK 5.4 which will support ADK 10.
Showing posts with label SCCM. Show all posts
Showing posts with label SCCM. Show all posts
Wednesday, May 11, 2016
Thursday, May 14, 2015
How to update ConfigMgr 2012 R2 to SP1
***Edit: So it turns out that I really didn't need the SC2012_R2_SP1_Configmgr.exe package because that is only needed if you are upgrading from 2012 SP1, not if you are already at R2. Just ignore those parts below. Everything else looks like it worked correctly.
If you are currently at ConfigMgr 2012 R2, all you need is the SC2012_SP2_Configmgr_SCEP.exe file to update. If you are at ConfigMgr 2012 SP1, you will first run the SC2012_SP2_Configmgr_SCEP.exe file and then run the SC2012_R2_SP1_Configmgr.exe file to enable the R2 features.***
How I updated my ConfigMgr 2012 R2 lab to SP1:
Here are some helpful links on Planning for the update and what's new.
https://technet.microsoft.com/en-us/library/464a3ce6-3bbf-45d8-aeaa-0040f64214c5#BKMK_UpgradeVersions
https://technet.microsoft.com/library/mt131422.aspx
System Center Configuration Manager 2012 R2 Service Pack 1 comes with Configuration Manager 2012 Service Pack 2.
SC2012_R2_SP1_Configmgr.exe
SC2012_SP2_Configmgr_SCEP.exe
When you extract these to their default locations, which is a folder on the C: drive with the same name as the file, you will need at least 1.2GBs free just for the files.
If you try to run the C:\SC2012_R2_SP1_Configmgr\SMSSETUP\X64\Configmgr2012R2SP1.msi, you get an error saying "You must have local Administrator permissions to install this software."
It seems a little odd, but to install R2 SP1, you have to run the installer for non-R2 SP2, which is the second file that you downloaded. Open C:\SC2012_SP2_Configmgr_SCEP\SMSSETUP\BIN\X64 and run Setup.exe. The setup will create multiple logfiles in the root of the C: drive. The main log will be C:\ConfigMgrSetup.lo_ and ConfigMgrSetup.log. At the bottom of the installer will be a button for View Log. If you have CMTrace installed on your server, (why would you not have it?) you can watch the log as everything happens.
At the beginning of the installer it asks to download the latest update files or use an existing set. I tried to point it to the SP1 folder as an existing set, but it didn't like that. So I used the option to download files to a new location and picked a new, empty folder.
Two of the first couple of lines tell me that the installer was at least looking toward the SP1 folder. And no, there was no manifest file there but there is one in the new folder where I had the latest updates go to. So I wonder if I was supposed to tell the installer to download the latest files to the SP1 folder. Too late now because an uninstall of SP1 is not supported. I will have to try that in another environment.
INFO: Downloading files to C:\SC2012_R2_SP1_Configmgr
ERROR: Manifest file C:\SC2012_R2_SP1_Configmgr\ConfigMgr.Manifest.cab not found. Verification failed.
My test lab is small with a database about 5.0GB. The database update part took the longest by far, about 40 minutes. The total update took about 58 minutes and was very easy and smooth. Once it was all done I quickly scanned through the logfile to see if there were any errors to be concerned with. I didn't see anything too concerning but I did see the following warning that you should know about.
WARN: Setup does not upgrade customized boot image package. Please update it manually.
Configuration Manager Client Package gets automatically updated.
Open the Configuration Manger console and in the About you can see the new Console and Site version numbers, which matches the Full Version and Full UI Version in the registry at HKLM\Software\Microsoft\SMS. 5.0.8239.1000


The new Client installer version in the \\ConfigMgrSrv\SMS_Site\Client folder says version 5.0.8239.1001.

But the Client on the endpoint machines show the same as the new server version, 5.0.8239.1000.

So it looks like my update was successful. Happy installing!
Tuesday, May 12, 2015
SCCM Driver Package contents do not distribute to DP Share
An update to part of two other posts I made.
***EDIT 5/12/2015: ConfigMgr 2012 SP2/R2 SP1 does resolve this issue, but, at the moment, only if you import drivers with the builtin driver import wizard.***
***EDIT 5/26/2015: We now have a fix for the issue with Dell Server Deployment pack v3.0. Please see this new post, http://bradsjumpbag.blogspot.com/2015/05/fix-for-dell-server-deployment-pack.html***
Back in How to Import Driver Packages with DSDP 3.0 into SCCM 2012 R2, I had mentioned near the bottom that Driver Packages may have to be distributed to the DP share twice. First time when you run the Distribute Content operation the content may not fully distribute. Or, the packageID folder may not even be created and the distmgr.log shows an error "SetObjectSecurity failed; 0x80070002".
This is not Dell specific. I downloaded and tested a couple of driver sets from other vendors also and they did the same thing. I downloaded their packages, imported them into their own Driver Packages using the builtin SCCM import wizard, not other vendor tools. Then when I hit Distribute Content I saw the same issues.
SCCM 2012 R2 Service Pack 1 is set to be released this week, most likely on Thursday, 5/14/2015. And there was a slide from Microsoft Ignite that mentioned 24 fixed bugs and design change requests in Driver Management alone. One of them was "Content won't get to DP if imported drivers are added to a new package and the checkbox "Update DPs when finished" is unchecked." Hopefully that is the same bug and the fix for it will be available this week.
Wednesday, April 15, 2015
How to import server driver packages with Dell Server Deployment Pack 3.0 into ConfigMgr 2012 R2
The Dell Server Deployment Pack (DSDP) is a Microsoft System Center ConfigMgr plugin that helps create boot media with Dell server drivers injected and lets you select server models and Operating Systems that you want to import driver packs for. The driver packages can then be used for various things including being attached to Task Sequences for Bare Metal Deployment.
Install the Dell Server Deployment Pack 3.0 using the Install Guide that comes in the download package. http://en.community.dell.com/techcenter/systems-management/w/wiki/4125.dell-server-deployment-pack-dsdp-for-configuration-manager
The install log is located at C:\Program Files (x86)\Microsoft Configuration Manager\AdminConsole\XmlStorage\Extensions\bin\Deployment\Dell\PowerEdge\Setup. There you can find the DSDPInstaller.log and DSDPInstallDebug.log.
You will also need the Dell Toolkit. There are several versions available. Read the Fixes and Enhancements, Compatible Systems, and Supported Operating Systems to find the version you need. As long as you are using a server that is 10G - 13G and the OS is 2008 R2 - Server 2012 R2, I suggest you use DTK 5.1. I say that having not fully tested 5.1 yet, but based on that 5.1 should support the newer 13G servers with Server 2012 R2.
DTK 4.4.1 - http://www.dell.com/support/home/us/en/19/Drivers/DriversDetails?driverId=2XKRY
DTK 5.0.2 - http://www.dell.com/support/home/us/en/19/Drivers/DriversDetails?driverId=3HYJG
DTK 5.1 - http://www.dell.com/support/home/us/en/19/Drivers/DriversDetails?driverid=67M0X
And you will need to make sure you have the latest version of the Windows Automated Deployment Kit (ADK), which is 8.100.26629 from 9/15/2014. Here is the link: http://www.microsoft.com/en-us/download/details.aspx?id=39982
To install the DTK, right click on the Packages container and follow through to Launch Deployment Toolkit Configuration Wizard.


Which version of the DSDP you download will determine which servers and operating systems you can get driver packages for. Be sure to read the Fixes and Enhancements, Compatible Systems, and Supported Operating Systems sections on each one to find what you need. Here are some links to the latest several versions.
SMTD 7.4 - Looks to support most 9G-12G servers. http://www.dell.com/support/home/us/en/19/Drivers/DriversDetails?driverid=PYKGK
SMTD 8.0.1 - Some 13G servers and other new hardware.
http://www.dell.com/support/home/us/en/04/Drivers/DriversDetails?driverId=MKGTT&id=102
SMTD 8.0.2 - More 13G servers and hardware.
http://www.dell.com/support/home/us/en/04/Drivers/DriversDetails?driverId=J5MT0&id=102
*Edit
SMTD 8.1 was released shortly after this was published. It supports all 12G-13G Dell servers.
http://www.dell.com/support/home/us/en/04/Drivers/DriversDetails?driverId=XT65T
Edit*
Please keep in mind that the SMTD may not have the most recent versions if newer versions have come out since the last SMTD release date. Download one or more of the ISOs above to fit your needs. Do not extract the ISO.


-----------------
EDIT 5/18/2015: ConfigMgr 2012 SP2/R2 SP1 does resolve the issue below, but only if importing drivers using the builtin driver import wizard.
EDIT 5/26/2015: We now have a fix for the issue with Dell Server Deployment pack v3.0. Please see this new post, http://bradsjumpbag.blogspot.com/2015/05/fix-for-dell-server-deployment-pack.html
-----------------


Install the Dell Server Deployment Pack 3.0 using the Install Guide that comes in the download package. http://en.community.dell.com/techcenter/systems-management/w/wiki/4125.dell-server-deployment-pack-dsdp-for-configuration-manager
The install log is located at C:\Program Files (x86)\Microsoft Configuration Manager\AdminConsole\XmlStorage\Extensions\bin\Deployment\Dell\PowerEdge\Setup. There you can find the DSDPInstaller.log and DSDPInstallDebug.log.
You will also need the Dell Toolkit. There are several versions available. Read the Fixes and Enhancements, Compatible Systems, and Supported Operating Systems to find the version you need. As long as you are using a server that is 10G - 13G and the OS is 2008 R2 - Server 2012 R2, I suggest you use DTK 5.1. I say that having not fully tested 5.1 yet, but based on that 5.1 should support the newer 13G servers with Server 2012 R2.
DTK 4.4.1 - http://www.dell.com/support/home/us/en/19/Drivers/DriversDetails?driverId=2XKRY
DTK 5.0.2 - http://www.dell.com/support/home/us/en/19/Drivers/DriversDetails?driverId=3HYJG
DTK 5.1 - http://www.dell.com/support/home/us/en/19/Drivers/DriversDetails?driverid=67M0X
And you will need to make sure you have the latest version of the Windows Automated Deployment Kit (ADK), which is 8.100.26629 from 9/15/2014. Here is the link: http://www.microsoft.com/en-us/download/details.aspx?id=39982
To install the DTK, right click on the Packages container and follow through to Launch Deployment Toolkit Configuration Wizard.
On the first screen of the DTK wizard you will point to the EXE of the downloaded DTK. In this picture I had the previous version (4.4) imported showing on the left and then on the right it shows what will be imported with the new 5.1 version.
Next screen lets you build a new boot image by combining the Dell drivers in the DTK with your choice of the boot image in the ADK, an existing image in ConfigMgr, or a custom image at another location.
The screen after this one lets you name and version the boot image. This will take a couple minutes to build the boot image, which can then be seen in the Boot Images container in ConfigMgr. Log files for this process are located at C:\Program Files (x86)\Microsoft Configuration Manager\AdminConsole\XmlStorage\Extensions\bin\Deployment\Dell\PowerEdge. Logs are called DellConfigWizard.log and Dell ConfigWizardDebug.log.
Next, it is time to import server and OS specific drivers.
You should be using the OpenManage System Management Tools and Documentation DVD or ISO. This is sometimes just referred to as the SMTD. Do not use the SUU or SBUU or any other downloads because they do not have the appropriate folder structure to work with the DSDP at this time.
Which version of the DSDP you download will determine which servers and operating systems you can get driver packages for. Be sure to read the Fixes and Enhancements, Compatible Systems, and Supported Operating Systems sections on each one to find what you need. Here are some links to the latest several versions.
SMTD 7.4 - Looks to support most 9G-12G servers. http://www.dell.com/support/home/us/en/19/Drivers/DriversDetails?driverid=PYKGK
SMTD 8.0.1 - Some 13G servers and other new hardware.
http://www.dell.com/support/home/us/en/04/Drivers/DriversDetails?driverId=MKGTT&id=102
SMTD 8.0.2 - More 13G servers and hardware.
http://www.dell.com/support/home/us/en/04/Drivers/DriversDetails?driverId=J5MT0&id=102
*Edit
SMTD 8.1 was released shortly after this was published. It supports all 12G-13G Dell servers.
http://www.dell.com/support/home/us/en/04/Drivers/DriversDetails?driverId=XT65T
Edit*
Please keep in mind that the SMTD may not have the most recent versions if newer versions have come out since the last SMTD release date. Download one or more of the ISOs above to fit your needs. Do not extract the ISO.
On the first page of the wizard you can either use the top option to point to the drive the ISO is mounted as, or you can use the bottom option to point directly to the ISO. I find the bottom option easier because you don't have to mount the ISO.
*****Do not try to use one ISO, press next to see what it has, and then click on Previous to change to a different ISO. It may not refresh and when you go forward again you will see the same servers from the previous ISO. If you need to change to a different ISO, hit Cancel to close the wizard, then open the wizard again, and select a different ISO to use.
Next, select the servers and OSes you want to import driver packs for and click on Finish. This could take a little while depending on how many you mark to import.
When it finishes you will see a completion screen that tells what it imported and what may have been skipped. There are logs for this as well. Located at C:\Program Files (x86)\Microsoft Configuration Manager\AdminConsole\XmlStorage\Extensions\bin\Deployment\Dell\PowerEdge. Logs are called DellDriverImport.log and DellDriverImportDebug.log
Now you should have driver packages for each server and OS that you selected. These will be broken up into the Dell PowerEdge Driver Packages OMversion containers under Driver Packages.
Before you can use the rest of the DSDP utilities, such as the Task Sequence Bare Metal Deployment Wizard, or be able to deploy the drivers in a Task Sequence or alone, there are a couple more things you need to do.
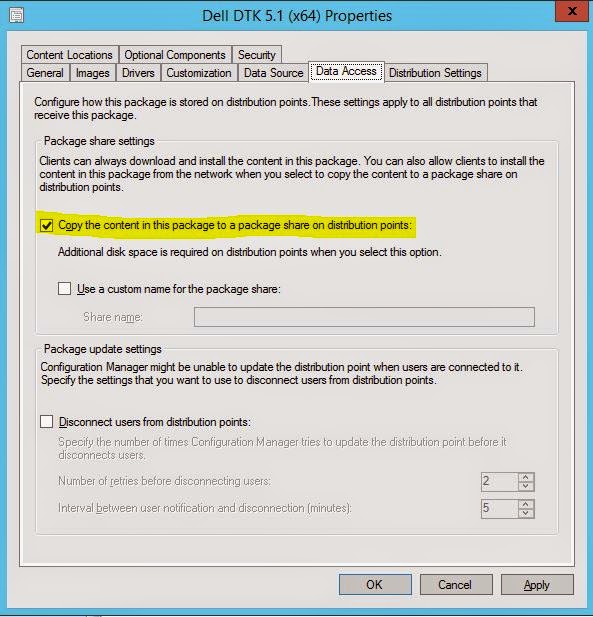
1. Boot Image. Go to the Boot Images, right click on your new boot image and select Properties. On the Customization tab, make sure Enable Command Support is checked. On the Data Source tab, mark Deploy this boot image from the PXE-enabled distribution point. On the Data Access tab, mark Copy the content in this package to a package share on distribution points. Then click OK.
You will also have to distribute the Boot Image to the DP(s). Do this by right-clicking on the new Boot Image and select Distribute Content.
Click Next, Add, Distribution Points (or group if you have one).
Mark your DP(s), next, next, and close.
After a couple minutes you can refresh to see if the Content Status at the bottom has turned green. Once it has you can right click on your Task Sequences, go to Properties, and add that boot image as the one to use to start that Task Sequence.
2. Dell PowerEdge Deployment Packages. With DSDP 3.0, there are 3 packages to distribute. PowerEdge Deployment Toolkit Integration, PowerEdge Custom Reboot Script, and PowerEdge Startup Network Setting. Each one should be set to "Copy the content in this package to a package share on distribution points". This is on the Data Access tab of the properties of each one just like in the screen shots above. Make sure you check this box for each of the 3 Dell PowerEdge Deployment Packages. Then right-click on each one and Distribute Content to the DP, just like you did with the boot image above. Then you can fresh and make sure each one shows Success under Content Status.
3. Driver Packages. Each one should be marked to "Copy the content in this package to a package share on the distribution point" just as you did above on the Data Access tab for the boot image and the Dell PowerEdge Deployment packages. Then you have to distribute to your DP(s). This is exactly the same as the last couple of steps in the Boot Image and Dell PowerEdge Deployment packages above.
-----------------
EDIT 5/18/2015: ConfigMgr 2012 SP2/R2 SP1 does resolve the issue below, but only if importing drivers using the builtin driver import wizard.
EDIT 5/26/2015: We now have a fix for the issue with Dell Server Deployment pack v3.0. Please see this new post, http://bradsjumpbag.blogspot.com/2015/05/fix-for-dell-server-deployment-pack.html
-----------------
*****Caveat***** When you distribute the driver packages, I have seen where the driver package contents does not fully distribute the first time. You can check this by looking at the PackageID and then going to the PackageID folder in the DP Share, which will be a SMSPKGdrive
This screenshot shows the Data Source tab which gives you the source folder location. You can also see that folder open where there is a total of 30 GUID folders.
This screenshot shows the DP share after the first Distribute Content and you can see that the Content Status shows Success but only 1 GUID folder is shown.
For the time being, the work-around for this is to distribute the content again by selecting Update Distribution Points.
After you Update Distribution Points, you can look back at the DP share folder and you should see the same number of GUID folders as was in the source folder above (30).
That is it. Now you can start to use these packages in your Task Sequences, or however else you want to use them.
Wednesday, April 1, 2015
Dell Warranty Tool in DCIS 4.0 Does Not Write to ConfigMgr DB
The latest version of the Dell Command Integration Suite 4.0 for System Center (link) includes the Warranty Tool similar to the previous versions. But it does not write to the ConfigMgr DB. This is due to a compatibility issue with the 2012 R2 DB and will hopefully be resolved in a near future version of the tool.
For now, here is a script that will help you import the results file from the Warranty Tool into your ConfigMgr 2012 DB. This script was shared with me by a customer who has been using it.
For now, here is a script that will help you import the results file from the Warranty Tool into your ConfigMgr 2012 DB. This script was shared with me by a customer who has been using it.
DECLARE @xml XML
set @xml =
(
select BulkColumn
from
openrowset(BULK
'C:\ProgramData\Dell\CommandIntegrationSuite\WarrantyInformation_03_05.xml',SINGLE_CLOB)
as x
)
select
T.c.value('(ServiceTag/text())[1]','Varchar(30)') as ServiceTag
,T.c.value('(SystemID/text())[1]','Varchar(30)') as SystemID
,T.c.value('(Buid/text())[1]','Varchar(30)') as Buid
,T.c.value('(Region/text())[1]','Varchar(30)') as Region
,T.c.value('(LOB/text())[1]','Varchar(30)') as LOB
,T.c.value('(SystemModel/text())[1]','Varchar(30)') as SystemModel
,T.c.value('(SystemShipDate/text())[1]','datetime') as ShipDate
,U.v.value('(Provider/text())[1]','Varchar(30)') as Provider
,U.v.value('(ServiceLevelDescription/text())[1]','Varchar(50)') as
Description
,U.v.value('(EntitlementType/text())[1]','Varchar(30)') as
EntitlementType
,U.v.value('(StartDate/text())[1]','datetime') as WarrantyStartDate
,U.v.value('(EndDate/text())[1]','datetime') as WarrantyEndDate
,U.v.value('(DaysLeft/text())[1]','Int') as DaysLeft
from
@xml.nodes('Warranty/Asset') T(c)
cross apply
T.c.nodes('Entitlement') U(v)
order by ServiceTag,
WarrantyEndDate
Monday, October 6, 2014
ConfigMgr Reports & Dell Server Administrator
ConfigMgr, in this case 2012 R2, Reports is showing older version of Dell "Server Administrator" but a newer version of OpenManage Server Administrator has been installed.
1. Latest version of OMSA was installed a couple weeks ago.
2. ConfigMgr Client Hardware Inventory was run in the last 24 hours.
So the ConfigMgr database should have the latest data. But the Report is still showing that an old version of "Server Administrator" is still present.
We looked at the Resource Manager for a client showing this issues and found that there were two instances of "Server Administrator". One of them was for the actual OMSA and the other was for omremote.exe, which is a file that DSET installs.
So, the old version of "Server Administrator" was actually the OMRemote.exe file installed with DSET. DSET uses OMRemote.exe to do remote server report collection. You can opt out of installing OMRemote during DSET install if you want and DSET will still run fine on the local system.
Customer wasn't using DSET, so solution was to uninstall it, force a new ConfigMgr Hardware Inventory, and run the report again.
Tuesday, August 26, 2014
"Failed to insert OSD binaries into the WIM file" error
If you are using the Dell Server Deployment Pack 2.1.0.2 with Configuration Manager 2012 (SP1), and you want to upgrade to Configuration Manager 2012 R2, make sure that your site system operating system is Server 2012 R2.
If you try to use DSDP 2.1.0.2 with ConfigMgr 2012 R2 running on a site system using Server 2012, you will get an error message similar to the picture below when trying to Update Distribution Points with new Boot Images. This error is because of a down-level OS with an up-level ConfigMgr because DISM is used to inject those drivers and DISM on the down-level OS cannot inject the drivers into an up-level boot image.
The prerequisites for DSDP 2.1.0.2 are documented in the Readme inside the DSDP 2.1 SP2 download package.
* Prerequisites of this service pack:
- System Center 2012 Configuration Manager R2 with kb#2907591,
System Center 2012 Configuration Manager,
System Center 2012 Configuration Manager SP1
- Dell Server Deployment Pack Version 2.1 or Dell Server Deployment Pack
Version 2.1.0.1
- For System Center 2012 Configuration Manager R2 the supported Site system
Operating System is Windows Server 2012 R2
"Failed to insert OSD binaries into the WIM file"

There is a work around for this. But you have to copy the boot image to another machine, running the newer DISM, and manually inject the drivers, copy the boot image back, and import it as a new boot image. I have documented this here: http://bradsjumpbag.blogspot.com/2014/08/get-configmgr-to-configure-raid-array.html
If you try to use DSDP 2.1.0.2 with ConfigMgr 2012 R2 running on a site system using Server 2012, you will get an error message similar to the picture below when trying to Update Distribution Points with new Boot Images. This error is because of a down-level OS with an up-level ConfigMgr because DISM is used to inject those drivers and DISM on the down-level OS cannot inject the drivers into an up-level boot image.
The prerequisites for DSDP 2.1.0.2 are documented in the Readme inside the DSDP 2.1 SP2 download package.
* Prerequisites of this service pack:
- System Center 2012 Configuration Manager R2 with kb#2907591,
System Center 2012 Configuration Manager,
System Center 2012 Configuration Manager SP1
- Dell Server Deployment Pack Version 2.1 or Dell Server Deployment Pack
Version 2.1.0.1
- For System Center 2012 Configuration Manager R2 the supported Site system
Operating System is Windows Server 2012 R2
"Failed to insert OSD binaries into the WIM file"
There is a work around for this. But you have to copy the boot image to another machine, running the newer DISM, and manually inject the drivers, copy the boot image back, and import it as a new boot image. I have documented this here: http://bradsjumpbag.blogspot.com/2014/08/get-configmgr-to-configure-raid-array.html
Tuesday, August 12, 2014
How to clean out old OpenManage driver packages and replace them in Configuration Manager 2012
To clean out the
imported OpenManage driver bundles from ConfigMgr and replace with newer or the same versions. This works for any version of OM driver
bundles but for this example I will use the last version and latest version at
the time of this writing as examples (OM7.3.2 and OM7.4). Some of these delete folder steps may need to be done on each DP.
- Write down the Package ID first for each one drive package, or take a screenshot. Then delete the Driver Packages and folders.
- Go to the same driver folders labeled as "Dell PowerEdge Drivers OM7.3.2" in the Drivers sections in ConfigMgr. Highlight all of the drivers listed, right click and delete them. Then delete the folder as well.
- Remove the folders labeled as "Dell PowerEdge Drivers OM7.3.2" also from both Drivers Packages and Drivers.
- Go to the ConfigMgr Installation location which is normally "C:\Program Files\Microsoft Configuration Manager". From here you will go down and delete the OM7.3.2 folders for the same versions you deleted from inside ConfigMgr in the following folders.
- "\OSD\Lib\DriverPackages\Dell\PowerEdge\"
- "\OSD\Lib\Drivers\Dell\PowerEdge\"
- Go to the drive where your DP Shares are located. For example, if they are on the E: drive you would go to "E:\SMSPKGE$\". If they are on the G: drive you would go to "G:\SMSPKGG$". Delete each Package ID folder that you copied back in Step 1 for each Driver Package. These folders may just be empty shells at this point.
Now the old versions
are cleaned out and you are ready to import new versions. These driver packages can only be imported
from the Dell System Management Tools and Documentation (SMTD) iso. Do not use the SBUU, CDU, or SUU iso or your
drivers will not be imported correctly.
- First, mount the SMTD 7.4 iso in Server 2012 by double clicking on it so that it will appear like a DVD drive.
- Right click on Drive Packages and select the "Dell Server Driver package\Import Dell PowerEdge Server Driver Packages" option.
- Select the drive letter that the OM7.4 iso is mounted it.
- Select the server models and OS versions you want to import and let it run.
- Right click on each driver package that you imported and go to Properties. On the Data Access tab, check the box "Copy the content in this package to a package share on distribution points". Press OK.
- After each of those is done, right click on each driver package and Distribute Content. Select your DPs and then give it some time to distribute. The amount of time will depend on # of DPs, locations, network, etc.
- Check the Content Status for an updated date and time and green pie chart. You can also verify distribution to each DP by going to the SMSPKGdrive$ folder and verify the PackageID folder is created and drivers are there.
********* Note
here********* I have noticed that drivers do not
always fully distribute. Your
SMSPKGdrive$\PackageID folder may only have one GUID sub-folder. In this case, just Update the Distribution
Points again for the same package and make sure the content status shows success.
- Now just go back to your Task Sequences, Edit, and on the Apply Driver Package step just add the new package.
Friday, May 23, 2014
Update iDrac6 or iDrac7 firmware with ConfigMgr 2012
Update iDrac6 or iDrac7 firmware with ConfigMgr 2012
There are multiple ways to update iDrac firmware.
Recently I had a customer request that it be done specifically with
ConfigMgr 2012 because they didn't want to install any other tools at the time.
So here is how to do it silently for iDrac6 and iDrac7.
First we have to get the iDrac firmware version from all
servers by adding the class to the hardware inventory.
- Default Client Settings, Hardware Inventory, Add, Connect, servername, wmi namespace = root\cimv2\dell, check recursive. Check DELL_Firmware. Press OK all the way out to save. This will also give you the Lifecycle Controller firmware version on the servers.
- Trigger an event or wait for the Machine Policy Update to run.
- Trigger an event or wait for the Hardware Inventory Policy to run.
Next, we need to create collections based on iDrac
generation. There may be other ways to do this but I like to create a
folder and then inside each folder you can put the collections. You just
have to change the query rule next time you are ready to update all the iDracs
to whatever the latest version is at that time.
- Create one folder called iDrac6 and one called iDrac7.
- Create a collection called iDrac6 to show all machines with this iDrac under the folder for iDrac6.
- Use a Query rule to look for Dell_Firmware: Name equal to iDRAC6
- Create a collection called iDrac7 to show all machines with this iDrac under the folder for iDrac7.
- Create a collection called iDrac7 under the iDrac7 folder.
- Use a Query rule to look for Dell_Firmware: Name equal to iDRAC7
- Create a collection called iDrac6 - less than latest firmware
- Limit to iDrac6 collection
- Use a Query rule to look for Dell_Firmware: Version not equal to whatever the latest version is.
- Create a collection called iDrac7 - less than latest firmware
- Limit to iDrac7 collection
- Use a Query rule to look for Dell_Firmware: Version not equal to whatever the latest version is.
Now we create the package for each new version.
- Download the Update Package for Windows from Dell and put it in your source location.
- Create the iDrac6 firmware package.
- Select to Copy the content in the package to a package share on DPs.
- Distribute the package to the DPs.
- Create a new program in the iDrac6 package and name it after the firmware version.
- Will look similar to this “ESM_Firmware_G6N28_WN32_1.97_A00.EXE /s”. The /s on the end tells it to do a silent install.
- Run Normal or Hidden, Whether or not a user is logged on, and Suppress program notifications.
- Deploy the package and program to the iDrac6 – Less than latest collection created earlier.
- Repeat the same steps for the iDrac7 package making the necessary changes.
Thursday, April 28, 2011
SCCM client install fix
I recently had to add the SCCM client to a bunch of machines from a non-trusted domain to manage them because the group previously tasked with those machines could no longer handle it. The majority of the machines installed correctly but some did not. This fix takes a couple minutes but has fixed all of my client issues so far.
1. Check the CCMInstall\Logs\ folder. Look at the logs, in particular look at ccmexec, clientIDmanagerstartup, and locationservices logs. Also look at the ccmsetup folder for the ccmsetup.log and client.msi.log. These logs can help you pinpoint the reasons for the installation problems.
2. If you see errors like "Unable to retrieve AMP for site code" in the CCMInstall\logs\LocationServices.log, the install may see more than 1 client certificate and not be able to pick one. If you AD automatically enrolls the machines and issues a new cert, you can run mmc, add the certificates snap-in for the computer account, and remove the client certificates under personal. If you can't delete those add CCMFIRSTCERT=1 to the client install options. There are some other things you can do also to make sure the correct certificates are available on the untrusted client.
3. Uninstall the SCCM client if it already exists but isn't working correctly. Go to a cmd window and change to the ccmsetup folder. run ccmsetup.exe /uninstall.
4. (optional and I haven't seen any effects from not using it) CCMClean does still work in SCCM 2007. You can download the SMS2003ToolKit and copy just that one tool. It helps remove registry links and orphaned files if any.
5. Cmd window and run "net stop winmgmt". You may have to run this twice to get it to stop because sometimes the service will start again immediately. As soon as it stops rename the c:\windows\system32\wbem\repository folder to oldrepository. This will reset WMI when the service restarts which we will do with a reboot in a minute.
6. Delete the c:\windows\system32\ccm and ccmsetup folders on 32bit machines or the c:\windows\syswow64\ccm folder on 64bit machines.
7. Restart the machine and you will have a repaired WMI and ready for a clean install of the SCCM client.
Friday, April 15, 2011
Change in how to apply Patch with SCCM Client push
There used to be a couple of articles online explaining how to add the PATCH=... command to the Client Push installation properties, but those articles have disappeared. I also began seeing error 1635 on machines trying to install with that argument.
The new way to add a patch, such as http://support.microsoft.com/kb/977384, is this:
In the Client source folder (%installdir%\Microsoft Configuration Manager\Client) create a folder called ClientPatch. Copy the .msp file into that folder.
So it looks like this:
E:\
Microsoft Configuration Manager\
Client\
ClientPatch\
sccm2007ac-sp2-kb977384-x86-enu.msp
That's it. SCCM will automatically try to install any .msp files you put in that folder when the Client is pushed to machines. Once I changed to that and removed the PATCH argument, my client pushes started working again.
Wednesday, June 30, 2010
SCCM Queries for Software Collections - Copy and Paste These
Queries for collections of machines with different versions of Adobe Acrobat, Symantec Anti-Virus or Symantec Endpoint Protection, or Microsoft Office.
As of today (6/30/2010), Adobe doesn't support or update the full version of Acrobat or Reader less then version 8.
Adobe Acrobat 6 or less:
select SMS_R_SYSTEM.ResourceID,SMS_R_SYSTEM.ResourceType,SMS_R_SYSTEM.Name,SMS_R_SYSTEM.SMSUniqueIdentifier,SMS_R_SYSTEM.ResourceDomainORWorkgroup,SMS_R_SYSTEM.Client from SMS_R_System inner join SMS_G_System_ADD_REMOVE_PROGRAMS on SMS_G_System_ADD_REMOVE_PROGRAMS.ResourceID = SMS_R_System.ResourceId where SMS_G_System_ADD_REMOVE_PROGRAMS.DisplayName like "Adobe Acrobat%" and SMS_G_System_ADD_REMOVE_PROGRAMS.Version < "7%"
Adobe Acrobat 7:
select SMS_R_SYSTEM.ResourceID,SMS_R_SYSTEM.ResourceType,SMS_R_SYSTEM.Name,SMS_R_SYSTEM.SMSUniqueIdentifier,SMS_R_SYSTEM.ResourceDomainORWorkgroup,SMS_R_SYSTEM.Client from SMS_R_System inner join SMS_G_System_ADD_REMOVE_PROGRAMS on SMS_G_System_ADD_REMOVE_PROGRAMS.ResourceID = SMS_R_System.ResourceId where SMS_G_System_ADD_REMOVE_PROGRAMS.DisplayName like "Adobe Acrobat%" and SMS_G_System_ADD_REMOVE_PROGRAMS.Version >= "7%" and SMS_G_System_ADD_REMOVE_PROGRAMS.Version < "8%"
Adobe Acrobat 8:
select SMS_R_SYSTEM.ResourceID,SMS_R_SYSTEM.ResourceType,SMS_R_SYSTEM.Name,SMS_R_SYSTEM.SMSUniqueIdentifier,SMS_R_SYSTEM.ResourceDomainORWorkgroup,SMS_R_SYSTEM.Client from SMS_R_System inner join SMS_G_System_ADD_REMOVE_PROGRAMS on SMS_G_System_ADD_REMOVE_PROGRAMS.ResourceID = SMS_R_System.ResourceId where SMS_G_System_ADD_REMOVE_PROGRAMS.DisplayName like "Adobe Acrobat%" and SMS_G_System_ADD_REMOVE_PROGRAMS.Version >= "8%" and SMS_G_System_ADD_REMOVE_PROGRAMS.Version < "9%"
Adobe Acrobat 9 (10 doesn't exist yet, so we can't put a <"10%":
select SMS_R_SYSTEM.ResourceID,SMS_R_SYSTEM.ResourceType,SMS_R_SYSTEM.Name,SMS_R_SYSTEM.SMSUniqueIdentifier,SMS_R_SYSTEM.ResourceDomainORWorkgroup,SMS_R_SYSTEM.Client from SMS_R_System inner join SMS_G_System_ADD_REMOVE_PROGRAMS on SMS_G_System_ADD_REMOVE_PROGRAMS.ResourceID = SMS_R_System.ResourceId where SMS_G_System_ADD_REMOVE_PROGRAMS.DisplayName like "Adobe Acrobat%" and SMS_G_System_ADD_REMOVE_PROGRAMS.Version >= "9%"
Symantec Anti-Virus or Symantec Endpoint Protection:
select SMS_R_SYSTEM.ResourceID,SMS_R_SYSTEM.ResourceType,SMS_R_SYSTEM.Name,SMS_R_SYSTEM.SMSUniqueIdentifier,SMS_R_SYSTEM.ResourceDomainORWorkgroup,SMS_R_SYSTEM.Client from SMS_R_System inner join SMS_G_System_ADD_REMOVE_PROGRAMS on SMS_G_System_ADD_REMOVE_PROGRAMS.ResourceID = SMS_R_System.ResourceId where SMS_G_System_ADD_REMOVE_PROGRAMS.DisplayName like "symantec antivirus" or SMS_G_System_ADD_REMOVE_PROGRAMS.DisplayName like "symantec endpoint protection"
Microsoft Office 2003:
select SMS_R_SYSTEM.ResourceID,SMS_R_SYSTEM.ResourceType,SMS_R_SYSTEM.Name,SMS_R_SYSTEM.SMSUniqueIdentifier,SMS_R_SYSTEM.ResourceDomainORWorkgroup,SMS_R_SYSTEM.Client from SMS_R_System inner join SMS_G_System_ADD_REMOVE_PROGRAMS on SMS_G_System_ADD_REMOVE_PROGRAMS.ResourceId = SMS_R_System.ResourceId where SMS_G_System_ADD_REMOVE_PROGRAMS.DisplayName = "Microsoft Office Professional Edition 2003" or SMS_G_System_ADD_REMOVE_PROGRAMS.DisplayName = "Microsoft Office Basic Edition 2003" or SMS_G_System_ADD_REMOVE_PROGRAMS.DisplayName = "Microsoft Office Standard Edition 2003"
Microsoft Office 2007:
select SMS_R_SYSTEM.ResourceID,SMS_R_SYSTEM.ResourceType,SMS_R_SYSTEM.Name,SMS_R_SYSTEM.SMSUniqueIdentifier,SMS_R_SYSTEM.ResourceDomainORWorkgroup,SMS_R_SYSTEM.Client from SMS_R_System inner join SMS_G_System_ADD_REMOVE_PROGRAMS on SMS_G_System_ADD_REMOVE_PROGRAMS.ResourceId = SMS_R_System.ResourceId where SMS_G_System_ADD_REMOVE_PROGRAMS.DisplayName = "Microsoft Office Enterprise 2007"
Microsoft Office 2010 (I had problems getting it to take all of this as 1 rule, so there are 2. 1 for x86 and 1 for x64)
Rule 1: Office 2010 x86
select SMS_R_SYSTEM.ResourceID,SMS_R_SYSTEM.ResourceType,SMS_R_SYSTEM.Name,SMS_R_SYSTEM.SMSUniqueIdentifier,SMS_R_SYSTEM.ResourceDomainORWorkgroup,SMS_R_SYSTEM.Client from SMS_R_System inner join SMS_G_System_ADD_REMOVE_PROGRAMS on SMS_G_System_ADD_REMOVE_PROGRAMS.ResourceID = SMS_R_System.ResourceId where SMS_G_System_ADD_REMOVE_PROGRAMS.DisplayName like "Microsoft Office Professional Plus 2010"
Rule 2: Office 2010 x64
select SMS_R_SYSTEM.ResourceID,SMS_R_SYSTEM.ResourceType,SMS_R_SYSTEM.Name,SMS_R_SYSTEM.SMSUniqueIdentifier,SMS_R_SYSTEM.ResourceDomainORWorkgroup,SMS_R_SYSTEM.Client from SMS_R_System inner join SMS_G_System_ADD_REMOVE_PROGRAMS_64 on SMS_G_System_ADD_REMOVE_PROGRAMS_64.ResourceId = SMS_R_System.ResourceId where SMS_G_System_ADD_REMOVE_PROGRAMS_64.DisplayName like "Microsoft Office Professional Plus 2010"
Subscribe to:
Posts (Atom)