Showing posts with label #iwork4dell. Show all posts

Monday, June 15, 2015

Dell ToolKit 5.1 with DSDP Set RAID envout issue

If you are using the Dell Server Deployment Pack with the Dell ToolKit (DTK) 5.1, you may see an error when trying to use the Set RAID function in an OSD task sequence.

Look in the SMSTS.log and find the section where raidcfg.exe is being called.  Near the end you may see errors saying "File is not writeable!" or "Could not find the raid output file you specified (envout.txt). Please check the path."

This turned out to be a permissions problem in DTK 5.1.0.1518 and possibly back in DTK 4.4 also.  This issue has been resolved and a new version of DTK 5.1.0.1658 A01 was released today (6/15/2015).  http://www.dell.com/support/home/us/en/04/Drivers/DriversDetails?driverId=2JC3P

1. Download the latest version of DTK at the link above.  Then in ConfigMgr, go to Software Library\Application Management\Packages and right click on Dell PowerEdge Deployment.  Select Dell PowerEdge Server Deployment -> Launch Deployment Toolkit Configuration Wizard.


When the wizard opens, point the zip location to the DTK zip you just downloaded.  If you already had the previous version of DTK 5.1 installed, the bottom part of the wizard will look the same on both sides.  They will both show Version 5.1.  Don't worry, it will update.

On the next screen you can select your previous boot image that you were using or let it create a new one from the Windows ADK.  Let this run to completion and you will have a new boot image with all the necessary drivers to boot the last couple of generations of Dell servers.

2. Next, you will need to update the 3 PowerEdge packages.  PowerEdge Custom Reboot Script, Deployment Toolkit Integration, and Startup Network Setting.  If you had already distributed them to your distribution point, just right click on them and select Update Distribution Points and then make sure the Content Status at the bottom turns green and has the current date and time.  This may take a couple minutes depending on your environment.


3. Once all 3 of those are updated, do one last check.  Look at the PackageID of the PowerEdge Deployment Toolkit Integration package.  Go to the path of where your distribution share packages are (Drive:\SMSPKGDrive$\) and find the folder with that PackageID and open it.  Find the Version.txt file and open that.  It should tell you Build 1658 which confirms that you have updated DTK and distributed it successfully.


4. And the last thing that needs to be done is to make sure your new boot image is the one that your task sequence uses and the target machine boots to.  I have instructions on how to do all of that in the following post.  Look down where it says "1. Boot Image".  http://bradsjumpbag.blogspot.com/2015/04/how-to-import-server-driver-packages.html

Now you should be able to run your OSD task sequence and have the Set RAID step work correctly.

Dell DSDPv3.0 with ConfigMgr 2012 R2 SP1

I have confirmed through testing that the Dell Server Deployment Pack v3.0 does work with ConfigMgr 2012 R2 SP1.  No need for a new version just to work with SP1.

I tested the Set Boot Order, Set BIOS config, Set iDrac config, and Set RAID config, and Driver import from SMTD and they all work.

A couple of things to keep in mind:

1. If you are trying to deploy Server 2012 R2, you will need your ConfigMgr host to be running Server 2012 R2, or may have to copy the boot image to a Server 2012 R2 machine to manually inject drivers.  This is due to a downlevel DISM issue described here: https://support.microsoft.com/en-us/kb/2853726

2. If you are trying to deploy Windows 8.1, Server 2012 or Server 2012 R2, I suggest you update your version of DTK (Dell ToolKit) to the latest version which was just released today (6/15/2015).  The latest version is 5.1.0.1658 A01 at this link http://www.dell.com/support/home/us/en/04/Drivers/DriversDetails?driverId=2JC3P.  This is because of a permissions issue in the previous version of DTK that we just resolved.  I explain that in another post.

Monday, June 8, 2015

Upgrade to Dell OpsMgr MP Suite 6.1

The new Dell OpsMgr Management Pack Suite resolves a couple of bugs that I identified.  The annoying Usage Information Alerts, and a problem with the Dell Connections License Manager in particular.  If you are using the MP Suite v5.2 or 6, I suggest you update to the new v6.1.  I went back and forth from 5.2 to 6.0 to 6.1 and back down and up again several times in 2 separate labs to confirm that these instructions worked each time for me.

1. Download the published release of the Dell OpsMgr Management Pack v6.1.  Here.

***Edit 6/23/2015
In #2 below, the best way to run the installer is to open an elevated command prompt and use "msiexec /i ".  If you are not logged in specifically as the local admin, the COM+ object will not be created.  This is a permissions issue with the MSI installer that will be resolved soon.  Logging in as the Domain Admin or any other user, even if a member of the local administrators group, will not install correctly unless you have lowered your UAC security profile.

If you already ran the installer, open dcomcnfg and look under Component Services\Computers\My Computer\COM+ Applications and see if the Dell Device Helper is there.  If not, open an elevated cmd and run the installer again and chose the repair option.
***

2. Extract and run the installer Dell_Server_Management_Pack_x64.msi, and I suggest unchecking the box at the end to open the OpsMgr console.

3. Right click on the OpsMgr console and Run As Admin.  This is usually the best way to open any of the System Center consoles.

4. Go to Monitoring\Dell\Feature Management Dashboard.  After a little while the FMP (dashboard) will update and show Available Versions as 6.1.

***On each one of the 5 features that you update, do not close the Task Status window until you have read through it to make sure it is successful because it will almost always show Success for Status even when there was an error running it.  That Success Status is just a success that the function ran.  Not that it completed successfully.  Read through the Task Output and you are looking for something similar to:

INFO: Dell.Chassis.Modular.Server.Correlation imported successfully
Success

Once you see that, you can close the window.***

5. Start at the top and select "Chassis Modular Server Correlation" and then in the task pane run the "Upgrade Chassis Modular Server Correlation Feature" task.

6. Next, is the Chassis Monitoring.  Highlight it and then run the task "Set to Chassis (either Detailed or Scalable) Monitoring Feature" task.

7. DRAC Monitoring.  Highlight it and run the "Upgrade DRAC Monitoring Feature" task.  Don't close until you are sure it was successful.  For me, this one was not successful on the first run.  I had to run it again and set an override to Auto Resolve Warning/Errors set to true in the task as seen below.


8. Server and Rack Workstation Agent-based Monitoring is next up.  Select it and run the "Set to Agent-based (Detailed or Scalable) Feature" task.

9. Last, is the Server and Rack Workstation Agent-free Monitoring.  Select it and run the "Set to Agent-free (Detailed or Scalable) Feature" task.

After a short while you should see the In Use Version column for each feature change to 6.1.0.

10. Now, go to Administrator\Management Packs.  Look at all of the Dell MPs and make sure they are all 6.1.0.x, where x could be any of multiple numbers, except for Dell Base Hardware Library which will still be 4.0.0.113.  Very specifically, look at Dell Feature Management and see what version it is.  If it is not 6.1.0.43, it hasn't updated and it may be held up by other MPs that are dependent on that one.  Open the properties of the Dell Feature Management MP and look on the Dependencies tab in the bottom half to see which ones.  Most likely will be Dell.FeatureManagement.Override version 1.0.0.0 and Dell.FeatureManagement.TaskRefresher version 1.0.0.0.  If there are others, make note of them also for the next step.

You can find those 2 MPs and export them if you like, and then you will need to delete them.  Delete both the Dell.FeatureManagement.Override and the Dell.FeatureManagement.TaskRefresher.

11. Once they are gone the next step is to import the new Dell Feature Management MP since it didn't update before.  Select Import Management Pack.  Select from Disk and No for searching for dependencies.  Browse to "C:\Program Files\Dell Management Packs\Server Mgmt Suite\6.1" and select the Dell.FeatureManagement.Pack.mp.  It should show the new version 6.1.0.43.  Click Install.  When it finishes, you should see that new version number for Dell Feature Management after the MPs list refreshes.

12. Go to Authoring\Management Pack objects\Object Discoveries.  In the Look for box, type "Dell Feature" and hit Find Now.  Select "Dell Feature Management Host Discovery".  Right click on it and select Overrides->Override the Object Discovery->For all objects of class: Management Server.


On the Override Properties you are going to put a check next to FMPHostFqdn and set that to the FQDN of your OpsMgr server.  Then put a check next to Interval Seconds and change the value to 600 seconds.  If you want a log of this, you can also check the Log level and change it from a 0 to a 1.  This log will be located at C:\Windows\Temp\DellFeatureMonitoring_Logs.  At the bottom of Override Properties, create a new Management pack.  Give it a name and then save it.


13. After the specified time period (600 seconds) the Dell Feature Management Dashboard will update to the new version.  You will no longer see the annoying Usage Informational Alerts and some of the column headers will change.  The Total Node Licenses column will change to Total Node Count, and the License in Use column will change to Required License Count.  And if you select the Server and Rack Workstation Agent-free Monitoring feature you will see a new task on the right side called Associate Run-As Account.  Once you see these things you will need to go back to step 12 above and uncheck the Interval Seconds so that it will go back to the default of once per day.  If you do not do this, the discovery cycle will run every 10 minutes appending the log file which will continue to grow (about 0.5MB/Day).

The Usage Information Alerts can be closed.  The Associate Run-As Account task associates the Run As account used for SMASH discovery with all Dell Server objects, required for health monitoring.

14. And lastly, you will see a new Information alert that should only appear one time.  The name is Dell FMP: License Information - Dell Server and Rack workstation Agent-free Monitoring and it gives you information about the license tiers and requirements.


Now you have updated to the new Dell OpsMgr Management Pack Suite v6.1.  If you have multiple OpsMgr management servers, you will need to run the installer for this MP Suite on each mgmt server to update the files and com+ object on each one and that should be all you need to do.

Friday, June 5, 2015

Set RAID Config not working with Dell Server Deployment Pack

Dell Server Deployment Pack 3.0 with Dell Toolkit 5.1 will have problems running the set RAIDcfg command.  We found that there was a security permissions change starting in DTK 5.1 for sure; and possibly as far back as DTK 4.4 because I had the same error there as well.

The permissions change created a situation where the envout.txt file could not be created by the script in the downloaded package folder.  The default location is "X:\Windows\Temp\SMSTSLog\PackageID\Tools\AMD64".

You would see an error in the SMSTS.log saying "File is not writable!" in the "Output from command execution" block immediately after the "Starting execution of ArrayBuilder script" block.  Then in the "StdOut output from the command:" block you will see "EXITCODE=204", which means the same thing "File is not writable".  Then just a little further down you will see something like this:

##########################################
##########################################
###
###      CRITICAL ERROR
###
##########################################
##########################################

ERROR CODE:  1
DESCRIPTION: Could not find the raid output file you specified (envout.txt). Please check the path.
SEVERITY:    3

##########################################
##########################################
###
###      CRITICAL ERROR
###
##########################################
##########################################


As a work-around, you could create a new script to make an empty envout.txt in the AMD64 folder.  Attach that script to your task sequence to run before the Set RAID step.

The resolution to this will be in a new version of DTK that will hopefully be out in the next week or two (from June 5, 2015).

And please remember that anytime you update DTK in ConfigMgr, you will need to re-distribute the Application Management\Packages\Dell PowerEdge Deployment\PowerEdge Deployment Toolkit Integration package in ConfigMgr.

Wednesday, May 27, 2015

Annoying Dell FMP: Feature Management Usage Information Alerts

If you have the Dell OpsMgr Management Pack 6.0 imported and OpsMgr is integrated with System Center Virtual Machine Manager, you may see some annoying "Dell FMP: Feature Management Usage Information" alerts every 6 hours.

Open the alerts and on the Alert Context tab you will see information related to the "StorageObjectsDiscovery.DS.ps1".

Most cases that I have seen involve 4 alerts.  The first one in the Alert Context Data says "Storage Discovery: started."  The second alert says "Storage Discovery: Got VMMServer. Module imported."  Third alert says "Missing Value in Property Id: {78FCB9D8-AFF4-785C-CAC3-1C9B8BAAA561}."  And the fourth and last alert says "Storage Discovery: Complete!".

These then repeat every 6 hours.


You can either ignore these and delete them as often as you want.  Or you can set an override by right-clicking on the alert and select Overrides -> Override the Rule -> For all objects of class: Health Service.  Check the Enabled parameter and change the override value to False.  Save to a new management pack.  That will stop you from seeing the alerts for now.

When the new version of the MP Suite comes out, these annoying alerts are supposed to be removed.

Tuesday, May 26, 2015

Fix for Dell Server Deployment Pack Driver Package where it is required to distribute to DP share multiple times.

If you have the issue I talked about in these two previous posts, listed below, where you import Dell Server Driver Packages and then you have to run Distribute Content and then a second Update Distribution Points to get the driver package to fully distribute, there is a fix now.

http://bradsjumpbag.blogspot.com/2015/05/sccm-driver-package-contents-do-not.html
http://bradsjumpbag.blogspot.com/2015/04/how-to-import-server-driver-packages.html

After updating to ConfigMgr 2012 R2 SP1, I found that the above issue was resolved if you manually import driver packages when I was importing packages from other vendors, but not if you use the Dell Server Deployment Pack v3.0.  With some research into the issue I found that the "RefreshDPs value" was set to "false" in DSDPv3.0.  In the new SP1 for ConfigMgr 2012 R2, that box was removed in the Driver Import Wizard and checked by default.

The initial fix was just to check that box for the DSDP wizard.  This then caused another issue which caused the driver import to refresh the DPs after every driver.  That made the import take a very long time.  From a normal import time of a couple minutes to nearly an hour.  So we made another change and now it all works correctly.  Driver Package import time is back to normal, driver package is created on the DPs the beginning of the import process and then refreshed once at the very end of the import.  So you will see a driver package version of 2 in the Distmgr.log at the end of the import.

Then you can check the box in the properties of the driver package to "Copy the content in this package to a package share on distribution points".  Then you can right click and Distribute Content one time and your package will show up fully on your DP in the SMSPKGDrive$ folder.

This fix will not help with Driver Packages that have already been imported because they were imported with the RefreshDPs box unchecked.  Those already imported driver packages will still have to be distributed to the DP share twice.  But any new driver package that is imported after installing the new DLLs will be able to be distributed once.

Since this is not a major issue and can be worked around, this patch will be included in the next version of DSDP.  If you need it before the next version is available, please call Dell and open a case.  Tell them you need the Configuration Manger DSDP Driver Package Import fix.  Your call should be transferred by the call director to the high complexity team, who you can then tell to contact me, Brad Goodman, directly for the patch.

Thursday, May 14, 2015

How to update ConfigMgr 2012 R2 to SP1

***Edit: So it turns out that I really didn't need the SC2012_R2_SP1_Configmgr.exe package because that is only needed if you are upgrading from 2012 SP1, not if you are already at R2.  Just ignore those parts below.  Everything else looks like it worked correctly.

If you are currently at ConfigMgr 2012 R2, all you need is the SC2012_SP2_Configmgr_SCEP.exe file to update.  If you are at ConfigMgr 2012 SP1, you will first run the SC2012_SP2_Configmgr_SCEP.exe file and then run the SC2012_R2_SP1_Configmgr.exe file to enable the R2 features.***

How I updated my ConfigMgr 2012 R2 lab to SP1:

Here are some helpful links on Planning for the update and what's new.
https://technet.microsoft.com/en-us/library/464a3ce6-3bbf-45d8-aeaa-0040f64214c5#BKMK_UpgradeVersions
https://technet.microsoft.com/library/mt131422.aspx

System Center Configuration Manager 2012 R2 Service Pack 1 comes with Configuration Manager 2012 Service Pack 2.

SC2012_R2_SP1_Configmgr.exe
SC2012_SP2_Configmgr_SCEP.exe

When you extract these to their default locations, which is a folder on the C: drive with the same name as the file, you will need at least 1.2GBs free just for the files.

If you try to run the C:\SC2012_R2_SP1_Configmgr\SMSSETUP\X64\Configmgr2012R2SP1.msi, you get an error saying "You must have local Administrator permissions to install this software."

It seems a little odd, but to install R2 SP1, you have to run the installer for non-R2 SP2, which is the second file that you downloaded.  Open C:\SC2012_SP2_Configmgr_SCEP\SMSSETUP\BIN\X64 and run Setup.exe.  The setup will create multiple logfiles in the root of the C: drive.  The main log will be C:\ConfigMgrSetup.lo_ and ConfigMgrSetup.log.  At the bottom of the installer will be a button for View Log.  If you have CMTrace installed on your server, (why would you not have it?) you can watch the log as everything happens.

At the beginning of the installer it asks to download the latest update files or use an existing set.  I tried to point it to the SP1 folder as an existing set, but it didn't like that.  So I used the option to download files to a new location and picked a new, empty folder.

Two of the first couple of lines tell me that the installer was at least looking toward the SP1 folder. And no, there was no manifest file there but there is one in the new folder where I had the latest updates go to.  So I wonder if I was supposed to tell the installer to download the latest files to the SP1 folder.  Too late now because an uninstall of SP1 is not supported.  I will have to try that in another environment.
INFO: Downloading files to C:\SC2012_R2_SP1_Configmgr
ERROR: Manifest file C:\SC2012_R2_SP1_Configmgr\ConfigMgr.Manifest.cab not found. Verification failed.

My test lab is small with a database about 5.0GB.  The database update part took the longest by far, about 40 minutes.  The total update took about 58 minutes and was very easy and smooth.  Once it was all done I quickly scanned through the logfile to see if there were any errors to be concerned with.  I didn't see anything too concerning but I did see the following warning that you should know about.

WARN: Setup does not upgrade customized boot image package. Please update it manually.
Configuration Manager Client Package gets automatically updated.

Open the Configuration Manger console and in the About you can see the new Console and Site version numbers, which matches the Full Version and Full UI Version in the registry at HKLM\Software\Microsoft\SMS.  5.0.8239.1000


The new Client installer version in the \\ConfigMgrSrv\SMS_Site\Client folder says version 5.0.8239.1001.


But the Client on the endpoint machines show the same as the new server version, 5.0.8239.1000.


So it looks like my update was successful.  Happy installing!

Tuesday, May 12, 2015

SCCM Driver Package contents do not distribute to DP Share

An update to part of two other posts I made.

***EDIT 5/12/2015: ConfigMgr 2012 SP2/R2 SP1 does resolve this issue, but, at the moment, only if you import drivers with the builtin driver import wizard.***

***EDIT 5/26/2015: We now have a fix for the issue with Dell Server Deployment pack v3.0.  Please see this new post, http://bradsjumpbag.blogspot.com/2015/05/fix-for-dell-server-deployment-pack.html***

Back in How to Import Driver Packages with DSDP 3.0 into SCCM 2012 R2, I had mentioned near the bottom that Driver Packages may have to be distributed to the DP share twice.  First time when you run the Distribute Content operation the content may not fully distribute.  Or, the packageID folder may not even be created and the distmgr.log shows an error "SetObjectSecurity failed; 0x80070002".

This is not Dell specific.  I downloaded and tested a couple of driver sets from other vendors also and they did the same thing.  I downloaded their packages, imported them into their own Driver Packages using the builtin SCCM import wizard, not other vendor tools.  Then when I hit Distribute Content I saw the same issues.

SCCM 2012 R2 Service Pack 1 is set to be released this week, most likely on Thursday, 5/14/2015.  And there was a slide from Microsoft Ignite that mentioned 24 fixed bugs and design change requests in Driver Management alone.  One of them was "Content won't get to DP if imported drivers are added to a new package and the checkbox "Update DPs when finished" is unchecked."  Hopefully that is the same bug and the fix for it will be available this week.

Thursday, April 30, 2015

Dell SMTD 8.1 Released

The new Dell Systems Management Tool and Documentation ISO version 8.1 has been released.  In relation to Configuration Manager 2012 and the Dell Server Deployment Pack, the new SMTD 8.1 can be used to import drivers for all 12G and 13G servers only.

There are no 11G or older server driver packages in this release.  For 9G-11G, you must use the SMTD v7.4.

http://www.dell.com/support/home/us/en/04/Drivers/DriversDetails?driverId=XT65T

Wednesday, April 15, 2015

How to import server driver packages with Dell Server Deployment Pack 3.0 into ConfigMgr 2012 R2

The Dell Server Deployment Pack (DSDP) is a Microsoft System Center ConfigMgr plugin that helps create boot media with Dell server drivers injected and lets you select server models and Operating Systems that you want to import driver packs for.  The driver packages can then be used for various things including being attached to Task Sequences for Bare Metal Deployment.

Install the Dell Server Deployment Pack 3.0 using the Install Guide that comes in the download package.  http://en.community.dell.com/techcenter/systems-management/w/wiki/4125.dell-server-deployment-pack-dsdp-for-configuration-manager

The install log is located at C:\Program Files (x86)\Microsoft Configuration Manager\AdminConsole\XmlStorage\Extensions\bin\Deployment\Dell\PowerEdge\Setup.  There you can find the DSDPInstaller.log and DSDPInstallDebug.log.

You will also need the Dell Toolkit.  There are several versions available.  Read the Fixes and Enhancements, Compatible Systems, and Supported Operating Systems to find the version you need.  As long as you are using a server that is 10G - 13G and the OS is 2008 R2 - Server 2012 R2, I suggest you use DTK 5.1.  I say that having not fully tested 5.1 yet, but based on that 5.1 should support the newer 13G servers with Server 2012 R2.

DTK 4.4.1 - http://www.dell.com/support/home/us/en/19/Drivers/DriversDetails?driverId=2XKRY
DTK 5.0.2 - http://www.dell.com/support/home/us/en/19/Drivers/DriversDetails?driverId=3HYJG
DTK 5.1 - http://www.dell.com/support/home/us/en/19/Drivers/DriversDetails?driverid=67M0X

And you will need to make sure you have the latest version of the Windows Automated Deployment Kit (ADK), which is 8.100.26629 from 9/15/2014.  Here is the link:  http://www.microsoft.com/en-us/download/details.aspx?id=39982

To install the DTK, right click on the Packages container and follow through to Launch Deployment Toolkit Configuration Wizard.


On the first screen of the DTK wizard you will point to the EXE of the downloaded DTK.  In this picture I had the previous version (4.4) imported showing on the left and then on the right it shows what will be imported with the new 5.1 version.


Next screen lets you build a new boot image by combining the Dell drivers in the DTK with your choice of the boot image in the ADK, an existing image in ConfigMgr, or a custom image at another location.


The screen after this one lets you name and version the boot image.  This will take a couple minutes to build the boot image, which can then be seen in the Boot Images container in ConfigMgr.  Log files for this process are located at C:\Program Files (x86)\Microsoft Configuration Manager\AdminConsole\XmlStorage\Extensions\bin\Deployment\Dell\PowerEdge.  Logs are called DellConfigWizard.log and Dell ConfigWizardDebug.log.


Next, it is time to import server and OS specific drivers.

You should be using the OpenManage System Management Tools and Documentation DVD or ISO.  This is sometimes just referred to as the SMTD.  Do not use the SUU or SBUU or any other downloads because they do not have the appropriate folder structure to work with the DSDP at this time.

Which version of the DSDP you download will determine which servers and operating systems you can get driver packages for.  Be sure to read the Fixes and Enhancements, Compatible Systems, and Supported Operating Systems sections on each one to find what you need.  Here are some links to the latest several versions.

SMTD 7.4 - Looks to support most 9G-12G servers. http://www.dell.com/support/home/us/en/19/Drivers/DriversDetails?driverid=PYKGK

SMTD 8.0.1 - Some 13G servers and other new hardware.
http://www.dell.com/support/home/us/en/04/Drivers/DriversDetails?driverId=MKGTT&id=102

SMTD 8.0.2 - More 13G servers and hardware.
http://www.dell.com/support/home/us/en/04/Drivers/DriversDetails?driverId=J5MT0&id=102

*Edit
SMTD 8.1 was released shortly after this was published.  It supports all 12G-13G Dell servers.
http://www.dell.com/support/home/us/en/04/Drivers/DriversDetails?driverId=XT65T
Edit*

Please keep in mind that the SMTD may not have the most recent versions if newer versions have come out since the last SMTD release date.  Download one or more of the ISOs above to fit your needs.  Do not extract the ISO.


On the first page of the wizard you can either use the top option to point to the drive the ISO is mounted as, or you can use the bottom option to point directly to the ISO.  I find the bottom option easier because you don't have to mount the ISO.

*****Do not try to use one ISO, press next to see what it has, and then click on Previous to change to a different ISO.  It may not refresh and when you go forward again you will see the same servers from the previous ISO.  If you need to change to a different ISO, hit Cancel to close the wizard, then open the wizard again, and select a different ISO to use.

Next, select the servers and OSes you want to import driver packs for and click on Finish.  This could take a little while depending on how many you mark to import.

When it finishes you will see a completion screen that tells what it imported and what may have been skipped.  There are logs for this as well.  Located at C:\Program Files (x86)\Microsoft Configuration Manager\AdminConsole\XmlStorage\Extensions\bin\Deployment\Dell\PowerEdge.  Logs are called DellDriverImport.log and DellDriverImportDebug.log

Now you should have driver packages for each server and OS that you selected.  These will be broken up into the Dell PowerEdge Driver Packages OMversion containers under Driver Packages.

Before you can use the rest of the DSDP utilities, such as the Task Sequence Bare Metal Deployment Wizard, or be able to deploy the drivers in a Task Sequence or alone, there are a couple more things you need to do.

1. Boot Image.  Go to the Boot Images, right click on your new boot image and select Properties.  On the Customization tab, make sure Enable Command Support is checked.  On the Data Source tab, mark Deploy this boot image from the PXE-enabled distribution point.  On the Data Access tab, mark Copy the content in this package to a package share on distribution points.  Then click OK.


You will also have to distribute the Boot Image to the DP(s).  Do this by right-clicking on the new Boot Image and select Distribute Content.

Click Next, Add, Distribution Points (or group if you have one).


Mark your DP(s), next, next, and close.

After a couple minutes you can refresh to see if the Content Status at the bottom has turned green.  Once it has you can right click on your Task Sequences, go to Properties, and add that boot image as the one to use to start that Task Sequence.


2. Dell PowerEdge Deployment Packages. With DSDP 3.0, there are 3 packages to distribute.  PowerEdge Deployment Toolkit Integration, PowerEdge Custom Reboot Script, and PowerEdge Startup Network Setting.  Each one should be set to "Copy the content in this package to a package share on distribution points".  This is on the Data Access tab of the properties of each one just like in the screen shots above.  Make sure you check this box for each of the 3 Dell PowerEdge Deployment Packages.  Then right-click on each one and Distribute Content to the DP, just like you did with the boot image above.  Then you can fresh and make sure each one shows Success under Content Status.


3. Driver Packages.  Each one should be marked to "Copy the content in this package to a package share on the distribution point" just as you did above on the Data Access tab for the boot image and the Dell PowerEdge Deployment packages.  Then you have to distribute to your DP(s).  This is exactly the same as the last couple of steps in the Boot Image and Dell PowerEdge Deployment packages above.


-----------------
EDIT 5/18/2015: ConfigMgr 2012 SP2/R2 SP1 does resolve the issue below, but only if importing drivers using the builtin driver import wizard.

EDIT 5/26/2015: We now have a fix for the issue with Dell Server Deployment pack v3.0.  Please see this new post, http://bradsjumpbag.blogspot.com/2015/05/fix-for-dell-server-deployment-pack.html
-----------------

*****Caveat*****  When you distribute the driver packages, I have seen where the driver package contents does not fully distribute the first time.  You can check this by looking at the PackageID and then going to the PackageID folder in the DP Share, which will be a SMSPKGdrive$ folder.  For example, if your package share is on your E: drive, the folder will be called SmspkgE$.  Find that PackageID folder.  This folder should match the source folder.  

This screenshot shows the Data Source tab which gives you the source folder location.  You can also see that folder open where there is a total of 30 GUID folders.


This screenshot shows the DP share after the first Distribute Content and you can see that the Content Status shows Success but only 1 GUID folder is shown.


For the time being, the work-around for this is to distribute the content again by selecting Update Distribution Points.


After you Update Distribution Points, you can look back at the DP share folder and you should see the same number of GUID folders as was in the source folder above (30).


That is it.  Now you can start to use these packages in your Task Sequences, or however else you want to use them.

Wednesday, April 1, 2015

Dell Warranty Tool in DCIS 4.0 Does Not Write to ConfigMgr DB

The latest version of the Dell Command Integration Suite 4.0 for System Center (link) includes the Warranty Tool similar to the previous versions.  But it does not write to the ConfigMgr DB.  This is due to a compatibility issue with the 2012 R2 DB and will hopefully be resolved in a near future version of the tool.

For now, here is a script that will help you import the results file from the Warranty Tool into your ConfigMgr 2012 DB.  This script was shared with me by a customer who has been using it.


DECLARE     @xml XML

set   @xml =
      (
      select BulkColumn
      from  openrowset(BULK 'C:\ProgramData\Dell\CommandIntegrationSuite\WarrantyInformation_03_05.xml',SINGLE_CLOB) as x
      )

select
            T.c.value('(ServiceTag/text())[1]','Varchar(30)') as ServiceTag
            ,T.c.value('(SystemID/text())[1]','Varchar(30)') as SystemID
            ,T.c.value('(Buid/text())[1]','Varchar(30)') as Buid
            ,T.c.value('(Region/text())[1]','Varchar(30)') as Region
            ,T.c.value('(LOB/text())[1]','Varchar(30)') as LOB
            ,T.c.value('(SystemModel/text())[1]','Varchar(30)') as SystemModel
            ,T.c.value('(SystemShipDate/text())[1]','datetime') as ShipDate
            ,U.v.value('(Provider/text())[1]','Varchar(30)') as Provider
            ,U.v.value('(ServiceLevelDescription/text())[1]','Varchar(50)') as Description
            ,U.v.value('(EntitlementType/text())[1]','Varchar(30)') as EntitlementType
            ,U.v.value('(StartDate/text())[1]','datetime') as WarrantyStartDate
            ,U.v.value('(EndDate/text())[1]','datetime') as WarrantyEndDate
            ,U.v.value('(DaysLeft/text())[1]','Int') as DaysLeft
from @xml.nodes('Warranty/Asset') T(c)
cross apply T.c.nodes('Entitlement') U(v)

order by ServiceTag, WarrantyEndDate

Friday, March 13, 2015

App-V 5.0 SP3 on Server 2012 R2 Scrolling Issue is Back

In App-V 5.0 SP3 web console, you may find that trying to scroll down your list of applications may cause the focus to jump back to the top of the list.  Here is a YouTube video of the problem when it occurred back in SP1.

https://www.youtube.com/watch?v=oKVSmc3NG_o

When this was an issue back in App-V 5.0 SP1 Microsoft released a hotfix for it (http://support.microsoft.com/kb/2897087).  Now in SP3 the problem is back again.

I escalated this to Microsoft and it has been marked as a regression bug.  Microsoft said, "The current workaround is to export the Deployment and User Config XML files, make the necessary modifications in these files to turn on or off the features of the affected packages.  You can do this to an extent with Office 2013 but it is best to manipulate that package during the ODT packager process and the CustomConfiguration XML file."

A fix should be included in updates for App-V sometime later this year.

Thursday, March 12, 2015

Adding EqualLogic SMP Storage Provider to SCVMM 2012 R2 fails with UR5 installed

This issue and resolution was discovered by my co-worker Jeremy Price.  All credit goes to him.  Posting here at his request to help get this out.

Users may experience errors in SCVMM 2012 R2 when adding EqualLogic SMP Storage Providers after Update Rollup 5 is installed.  The error ID will be 20413 and the error report will contain an exception as follows:

----------------------------------------------------
------------ exceptionObject.ToString() ------------
----------------------------------------------------
System.ArgumentNullException: Value cannot be null.
Parameter name: optionValue
   at Microsoft.Management.Infrastructure.Options.CimOperationOptions.SetCustomOption(String optionName, Object optionValue, CimType cimType, Boolean mustComply)
   at Microsoft.EnterpriseManagement.DataCenterManager.StorageUtil.PassThroughBase..ctor(String server, String provUser, SecureString provPassword)
   at Microsoft.EnterpriseManagement.DataCenterManager.StorageUtil.SMISPassThroughService..ctor(String server, String provUser, SecureString provPassword)
   at Microsoft.EnterpriseManagement.DataCenterManager.StorageUtil.ReplicationPassThroughService..ctor(String server, String provUser, SecureString provPassword)
   at Microsoft.EnterpriseManagement.DataCenterManager.StorageUtil.SCXArray.GetReplicationPTService()
   at Microsoft.EnterpriseManagement.DataCenterManager.StorageUtil.SCXArray.GetReplicationService(Boolean throwOnNull)
   at Microsoft.VirtualManager.Engine.ImageLibrary.StrgArray.RefreshReplicationCapabilities(SCXArray scxArray)
   at Microsoft.VirtualManager.Engine.ImageLibrary.StrgArray.Refresh(SCXStorageService scxService, StrgProvider provider, DiscoveryLevel discoveryLevel, String autoMgmtPoolId, StrgClassification autoMgmtPoolClassification, Boolean refreshReplicationCapabilities, Boolean useCachedArray)
   at Microsoft.VirtualManager.Engine.ImageLibrary.StrgProvider.Refresh(SCXStorageService scxService, DiscoveryLevel discoveryLevel, Boolean useCachedArray)
   at Microsoft.VirtualManager.Engine.Deployment.ImportStorageProviderSubtask.RunSubtask()
   at Microsoft.VirtualManager.Engine.TaskRepository.SubtaskBase.Run()
   at Microsoft.VirtualManager.Engine.TaskRepository.Task`1.SubtaskRun(Object state)

This behavior is not specifically documented, but is addressed in Microsoft KB 3039296 with a hotfix for the Storage Refresher. http://support.microsoft.com/en-us/kb/3039296


After applying the hotfix as indicated in the KB and restarting the System Center Virtual Machine Manager service, the errors no longer occur.

Monday, March 9, 2015

Dell Client Integration Pack Warranty Tool URL

Dell Client Integration pack 4.0 and previous use an older asset service called Xserv.

I have heard that future versions may switch a REST service at api.dell.com.  Until that switch is actually made, if you have a proxy, firewall, or other URL filtering service, make sure to add the following URL to your whitelist.

http://xserv.dell.com/services/assetservice.asmx

Tuesday, December 16, 2014

Theoretical Limits for Dell In-Band & Out-of-Band Monitoring with SCOM

Although I work for Dell at the time of publishing, this post is not official Dell documentation.

Dell has SCOM management packs (MPs) that allow In-Band and Out-of-Band monitoring of Dell hardware.  There are some possible limits I want to make you aware of before you begin your testing and implementation of these solutions.  We will start with the background and describe the different options.

First, there are 2 primary MPs for monitoring Dell server hardware.
  • In-Band: This requires the installation of OMSA and the SCOM agent on the systems that you want to monitor.  Processing of data is done on the monitored system by the SCOM agent.  This is also much easier to setup.
  • Out-of-Band: This does not require OMSA or the SCOM agent, but does require setting up SMASH discovery through the iDrac, a license from Dell, and the Dell Connections License Manager.  Processing of data is done on the SCOM Management Server.  I have another post on how to set this up in a single SCOM management server environment.
Inside each of those MPs are 2 monitoring levels.
  • Scalable: Inventory and monitoring of component groups and also displays the presence of the iDrac. For Reports, only OpenManage Windows Event log is available.
  • Detailed: Detailed inventory and monitoring of the following components: memory, processors, network interfaces, storage controllers, disks, volume, power, temperature, and BIOS information.  For Reports, availability of BIOS configuration, firmware and driver versions, and RAID configuration reports.
    ***Note: More details on these in the Dell SCOM MP User Guide.

There are other factors that can blur or move these theoretical limits up or down.  Factors including whether the SCOM management servers are physical or virtual, specs of those physical/virtual machines, how much other monitoring is being done and the load on the SCOM servers, bandwidth, etc.

Please remember that these are not hard limits and are not official Dell documentation.

# of Dell servers supported per SCOM Management Server

Scalable Detailed
In-Band (Agent-Based) 1500 500
Out-of-Band (Agent-Free) 150 50

Your mileage may vary.  Please test before rolling out into production.

Wednesday, October 8, 2014

Install Windows 10 Technical Preview on Surface Pro

I tried to install Windows 10 Tech Preview on my Surface Pro 1 and had just a little difficulty.  Looking online I found some instructions in different places but not everything I had to do all in one place.  So here is my take on the process with all the instructions I needed.

Note: Do NOT use the Windows 7 USB DVD Download Tool.  This tool formats the USB drive using NTFS.  The Surface is looking for a UEFI device which needs to be formatted as Fat32.


  1. Obligatory notes: Backup everything you need from your Surface before you start.
  2. Download the Windows 10 Technical Preview.
  3. Use a USB flash drive that is of sufficient size.  I needed just over 4GB.  So an 8GB drive would work.
  4. To create the install USB, open a command prompt and follow these directions.
    • Open an elevated command prompt, then start the Diskpart utility, List the disks, Select the USB stick, and Clean it:
      • Diskpart.exe
      • List disk
      • Select disk 4
      • Clean
    • Create a new partition, make it active, format as FAT32, and assign a drive letter:
      • Create part primary
      • Select part 1
      • Active
      • Format quick fs=fat32
      • Assign
      • Exit, but leave the command prompt open.
  5. Mount the Windows 10 ISO to a drive and then use the xcopy command in the already open command prompt to copy the files over.  In the below example the g: drive is where the ISO is mounted and the f: is where the USB is mounted.
      • xcopy g:\* f:\ /s /e
  6. Once that is done, now you have a USB ready to boot on the Surface but you may still need to copy over the Surface drivers just to be sure you have them.  Go to the following link, download the "Surface Pro 1" zip file.  Extract it and copy to your USB drive.  Now we need to prepare the Surface.
  7. There are 2 primary ways to disable Secure Boot.  Here is the easiest way.  First, make sure to shutdown the Surface.  Hold the Volume Up button down and press the Power once once.  When you see the Surface logo you can let go of the Volume Up button.  When you see the black screen with boot options, select Secure Boot and hit the space bar to change to disabled.  Save and reboot and you will see a red background screen indicating that Secure Boot is disabled.
  8. Plug in your USB and reboot the Surface.  It should boot directly into the Windows install.  *If you get a message about a missing media driver, reboot and try again.  This happened to me on 2 out of 2 I tried this on.  A simple reboot and it was able to keep going.

Monday, October 6, 2014

ConfigMgr Reports & Dell Server Administrator

ConfigMgr, in this case 2012 R2, Reports is showing older version of Dell "Server Administrator" but a newer version of OpenManage Server Administrator has been installed.

1. Latest version of OMSA was installed a couple weeks ago.
2. ConfigMgr Client Hardware Inventory was run in the last 24 hours.

So the ConfigMgr database should have the latest data.  But the Report is still showing that an old version of "Server Administrator" is still present.

We looked at the Resource Manager for a client showing this issues and found that there were two instances of "Server Administrator".  One of them was for the actual OMSA and the other was for omremote.exe, which is a file that DSET installs.

So, the old version of "Server Administrator" was actually the OMRemote.exe file installed with DSET.  DSET uses OMRemote.exe to do remote server report collection.  You can opt out of installing OMRemote during DSET install if you want and DSET will still run fine on the local system.

Customer wasn't using DSET, so solution was to uninstall it, force a new ConfigMgr Hardware Inventory, and run the report again.

Tuesday, August 26, 2014

"Failed to insert OSD binaries into the WIM file" error

If you are using the Dell Server Deployment Pack 2.1.0.2 with Configuration Manager 2012 (SP1), and you want to upgrade to Configuration Manager 2012 R2, make sure that your site system operating system is Server 2012 R2.

If you try to use DSDP 2.1.0.2 with ConfigMgr 2012 R2 running on a site system using Server 2012, you will get an error message similar to the picture below when trying to Update Distribution Points with new Boot Images.  This error is because of a down-level OS with an up-level ConfigMgr because DISM is used to inject those drivers and DISM on the down-level OS cannot inject the drivers into an up-level boot image.

The prerequisites for DSDP 2.1.0.2 are documented in the Readme inside the DSDP 2.1 SP2 download package.

* Prerequisites of this service pack:
- System Center 2012 Configuration Manager R2 with kb#2907591,
          System Center 2012 Configuration Manager,
          System Center 2012 Configuration Manager SP1
- Dell Server Deployment Pack Version 2.1 or Dell Server Deployment Pack
 Version 2.1.0.1
- For System Center 2012 Configuration Manager R2 the supported Site system
 Operating  System is Windows Server 2012 R2

"Failed to insert OSD binaries into the WIM file"


There is a work around for this.  But you have to copy the boot image to another machine, running the newer DISM, and manually inject the drivers, copy the boot image back, and import it as a new boot image.  I have documented this here: http://bradsjumpbag.blogspot.com/2014/08/get-configmgr-to-configure-raid-array.html

Wednesday, August 20, 2014

Walk-Through: Monitoring Dell Server Out-of-Band with SCOM 2012

Want to monitor Dell server hardware without installing OpenManage Server Administrator, or maybe you can't install OMSA.  This walk-through gives you the steps to get this to work.

This walk-through assumes you already have SCOM running and are familiar with it.  If you don't have SCOM 2012 running, check out Kevin Holman's quick start guide: http://blogs.technet.com/b/kevinholman/archive/2011/07/26/deploying-opsmgr-2012-a-quick-start-guide.aspx

Links for reference.
Dell Server Management Pack Suite (download and docs), 5.2 is the latest as of this post:
http://en.community.dell.com/techcenter/systems-management/w/wiki/4118.dell-server-management-pack-suite.aspx

Dell Connections License Manager, 1.1 is the latest as of this post:
This is where DCLM should be but this page has not been updated to include 1.1 yet.
http://en.community.dell.com/techcenter/systems-management/w/wiki/4921.dell-connections-license-manager.aspx
So use this one for DCLM 1.1: http://www.dell.com/support/home/us/en/19/Drivers/DriversDetails?driverid=987Y6

License Management in Dell OpenManage Products using Dell Connections License Manager.  This PDF tells you how to get the licenses needed for Out-of-Band management.
http://en.community.dell.com/techcenter/extras/m/white_papers/20437073.aspx

Dell Connections License Manager Version 1.1 Installation Guide:
http://topics-cdn.dell.com/pdf/dell-connections-license-manager-v1.1_Setup%20Guide_en-us.pdf

Dell Connections License Manager Version 1.1 User's Guide:
ftp://ftp.dell.com/Manuals/all-products/esuprt_software/esuprt_ent_sys_mgmt/esuprt_ent_sys_mgmt_connections_license_mngr/dell-connections-license-manager-v1.1_User's%20Guide_en-us.pdf

System Center Monitoring Pack for WS-Management and SMASH Device Discovery:
http://www.microsoft.com/en-us/download/details.aspx?id=29266

Now for the actual walk-through.  And the first rule of SCOM is if you think you have waited long enough for something to happen, double your wait time unless you know how to set the overrides to make things happen quicker.

1. Get your licenses for SCOM Out-of-Band management through your sales rep at Dell if you don't already have them.
2. Get DCLM installed. Right click and Run As Admin. This can be local on the SCOM box or a remote box.  It has a very small footprint but if SCOM is heavily used, DCLM might be better on another machine.  I'm not going to walk through the install of DCLM.  The Install guide above does a nice job of that.  Things to point out include:

  • Firewall ports 8543 and 8544 have to be opened.
  • Add the DCLM site to your Trusted Sites list on the SCOM server, and DCLM server if it is remote.
  • DCLM wants to create 3 groups in your Active Directory Users OU.  If you cannot install DCLM as a domain user that has necessary permissions to create those groups, you will have to create them manually. http://bradsjumpbag.blogspot.com/2014/06/dell-connections-license-manager-1011.html
  • Add your AD account that you use for administering SCOM to the Dell Connections License Administrators group.
  • Import your licenses into DCLM.  For Out-of-Band monitoring, the license should read "Dell Server Management Pack Suite for System Center Operations Manager.  This license is for monitoring X server via out of band."
3. Next, you need to install the Dell Server Management Pack Suite 5.2 to your SCOM 2012 server.  Right click and Run As Admin. The install will ask for credentials for the Dell Device Helper COM+ Object.  This account should most probably be a domain account that is also added as a local admin on the SCOM box.  After the MP is installed, the Dell Feature Management Dashboard will most likely be blank.  Leave it be for a while and continue with the next steps.

4. Download and install the System Center Monitoring Pack for WS-Management and SMASH Device Discovery from the link above.  After running the package, you may still have to go to Administration, Management Packs, and Import it.  Once that is done you should see 'WS-Management and SMASH Device Discovery" under Authoring, Management Pack Templates.

5. Setup SNMP on your iDracs.  Go to each iDrac and make sure the SNMP community string is exactly the same.  Capitalization matters.  "Public" and "public" are two different community strings, but "Public" and "Public" are the same.
There are two places to check.  iDrac Settings\Network\Services under SNMP Agent, and then Overview\Server\Alerts\SNMP and Email Settings. Under SNMP and Email Settings, you also need to enter the Alert Destination IP of your SCOM server and hit the Apply button in that same IP Destination List table.

6. Create a Community String account in SCOM using the community string you set on all iDracs. It doesn't matter, but I set this to More secure and distribute it to my SCOM management servers.  Less secure works too.  Then under profiles, open the SNMP Monitoring Account and on the Run As Accounts screen add the Community String account you created. Select "A selected class, group, or object, hit the Select button.  In the Look for field change to SNMP Community and hit Search.  Pick the SNMPCommunity_GUID that comes up and Add it.  Press OK and Save.

7. After the Feature Management State populates, you will activate features you want to use.  For the OOB we will be using the Server (Out-of-band) Monitoring.  Click on it to highlight and then in the lower right corner click on Set to Server (OOB) either Scalable or Detailed Feature.  The Detailed feature will give much more info including memory, processors, nics, storage controllers, disks and volumes, and BIOS info.  Let this process complete before closing the task window and scroll to the bottom of that window to make sure it completed successfully.

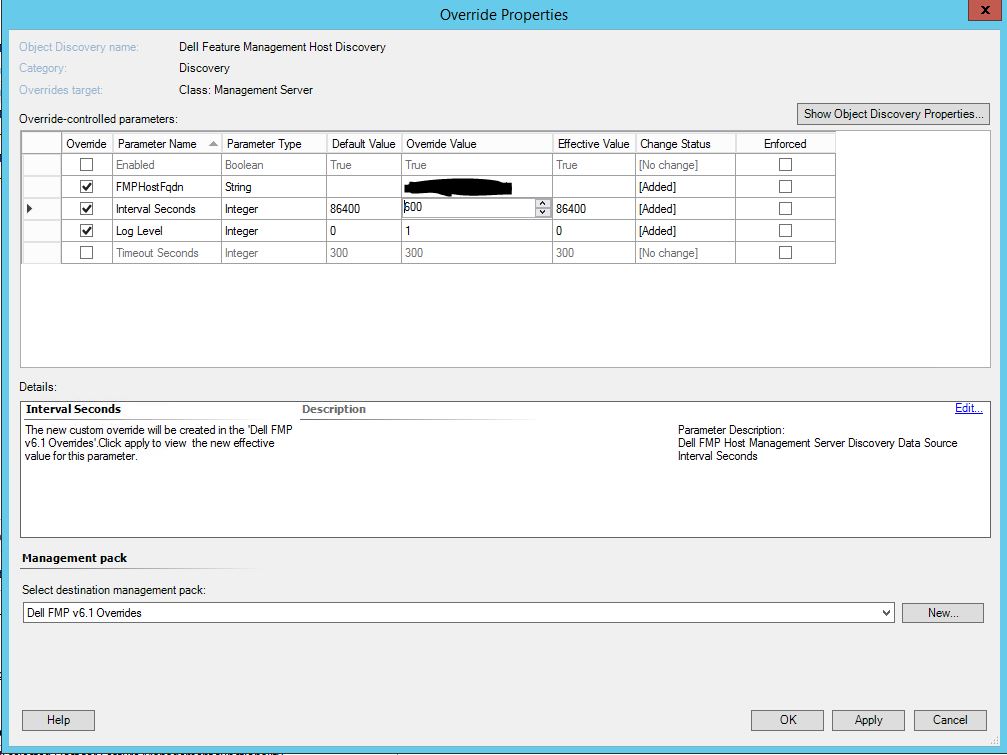
8. Next, you need to configure the connection from SCOM to DCLM.  On the Feature Management Dashboard, on the lower right under Tasks, look for and click on "Configure License Server".  Click the Override button.  Expand out the window and columns so you can see the full default value.  Copy that for the License Web UI URL and License Web Service URL but enter your IP or FQDN to your DCLM server.  For example: http://10.10.100.7:8544 and http://10.10.100.7:8543.  Press the Override button at the bottom and then Run.  Let this run and make sure it completes successfully.

You can verify that it should work by clicking the link to Launch Dell Connection License Manager in the tasks area and being able to browse and see your licenses.

After several more minutes, you should see number of licenses you have in DCLM show up under the Total Node Licenses column in the Dell Feature Management Dashboard.

Now we will use the Dell Server MP Suite 5.2 for SCOM User Guide for configuring the WS-Management Monitor.  I'm just going to copy the steps and past them here with some of my own notes added.

To discover a Dell server using the Dell Server (Out-of-band) monitoring feature:
1. Log on to OpsMgr 2012 as an administrator for the OpsMgr Management group.
2. On the OpsMgr console, click Authoring.
3. At the bottom of the navigation pane, click Add Monitoring Wizard.
The Add Monitoring Wizard screen appears.
4. On the Select Monitoring Type screen, select WS-Management and SMASH Device Discovery and
click Next.
5. On the General Properties screen, in the Name field provide a name for the wizard.
6. Under Management pack, click New.
The Create a Management Pack screen appears.
7. Provide a name for the management pack in the Name field and click Next.
For information on creating a management pack, see the OpsMgr documentation at
technet.microsoft.com.
8. Click Create.
The management pack you created is selected in the Management pack drop-down box.
9. Click Next.
10. On the Specify the target drop-down menu, select a resource pool for monitoring out-of-band
devices and click Next.
11. On the Specify the account to be used to run discovery screen, click New and create a Simple
Authentication Run As Account.  This Simple Authentication Run As Account will be the credentials used to access the iDrac.  I have added the steps to manually create the account and associate it to the SMASH profile below.

12. Select the Run As Account you created from the Run As Account drop-down menu and click Next.
13. Click Add.
14. On the Add Devices screen specify the iDRAC IP address of the systems you want to monitor using 
the Server (out-of-band) monitoring feature. You can specify the iDRAC IP address of the systems by:
• Scanning the IP Subnet that you provided.
• Scanning a specified IP Range.
• Importing a text file containing the list of iDRAC IP addresses.
15. Click Advanced Options, select the Skip CA Check and Skip CN Check option and click OK.
16. Click Scan for Devices to search for Dell PowerEdge 12G systems on your network.
The IP addresses are listed under Available Devices.
17. Click Add to add the list of IP addresses you want to monitor and click OK.
18. On the Specify the devices you want to monitor screen, click Create.
19. Click Close.

The scanned Dell servers initially appear in Monitoring → WS-Management and SMASH Monitoring 
→ WS-Management Device State screen. After the automatically triggered SMASH discovery is 
completed by the OpsMgr, the Dell servers appear in Monitoring → WS-Management and SMASH 
Monitoring → SMASH Device State screen.

This is the end unless you need to manually configure the Simple Authentication account and/or associate it with the SMASH profile.

Creating A Simple Authentication Run As Account
1. Log on to OpsMgr 2012 as an administrator for the OpsMgr Management Group.
2. On the OpsMgr console, click Administration.
3. Right-click Accounts, and then click Create Run As Account.
The Create Run As Account Wizard screen is displayed.
4. Click Next.
5. From the Run As Account type drop-down menu, select Simple Authentication.
6. Provide a display name in the Display Name text box.
7. Provide a brief description in the Description text box and click Next.
8. On the Credentials screen provide the iDRAC login credentials for the systems you want to discover
using the Server (Out-Of-Band) monitoring feature.
9. Click Next.
10. Select the Less secure or More secure option as appropriate.
For more information, see the OpsMgr documentation at technet.microsoft.com/en-us/library/
hh321655.aspx.
NOTE: If the iDRAC login credentials are different for each of the systems, create a separate
Run As Account for each of them.
11. Click Create.
12. After the Run As Account has been created, click Close.

Associating Run As Account For Monitoring A Dell Server Using The Server (Out-Of-Band) Monitoring Feature
For monitoring the Dell server, the Run As account used to discover it must be associated with the Dell
server in the SMASH Device Monitoring Profile. The management pack performs the association
automatically. But in some cases, you have to manually associate the Run As account.
To manually associate the Run As account in the SMASH Device Monitoring Profile:
1. Launch OpsMgr 2012, and click Administration.
2. In the Administration pane, browse to Run As Configuration → Profiles.
3. From the list of available profiles, right-click SMASH Device Monitoring Profile and click Properties.
The Introduction screen is displayed.
4. Click Next.
The Specify the Run As profile's general properties screen is displayed.
5. Click Next.
The Run As accounts screen is displayed.
6. Click Add.
The Add a Run As account screen is displayed.
7. Select the run as account used to discover the Dell server from the Run As account drop-down list.
NOTE: If you are using multiple Run As accounts to discover devices, associate each device 
with its associated Run As account.
8. Click A selected class, group, or object and add the association for the server in the SMASH 
Monitoring Profile.
• Click Select → Class option, use Dell server as the selection.
• Click Select → Group option, use the group containing the Dell server objects as the selection.
• Click Select → Object option, use the individual Dell server object as the selection.
9. Click OK.
10. Click Save and Close.
NOTE: If the Run As Account association is not done, the alert Dell OM: Server and its component 
health computation failed is displayed under Monitoring → Alerts View → Server Alerts on the 
console.