The new Dell OpsMgr Management Pack Suite resolves a couple of bugs that I identified. The
annoying Usage Information Alerts, and a problem with the Dell Connections License Manager in particular. If you are using the MP Suite v5.2 or 6, I suggest you update to the new v6.1. I went back and forth from 5.2 to 6.0 to 6.1 and back down and up again several times in 2 separate labs to confirm that these instructions worked each time for me.
1. Download the published release of the Dell OpsMgr Management Pack v6.1.
Here.
***Edit 6/23/2015
In #2 below, the best way to run the installer is to open an elevated command prompt and use "msiexec /i
". If you are not logged in specifically as the local admin, the COM+ object will not be created. This is a permissions issue with the MSI installer that will be resolved soon. Logging in as the Domain Admin or any other user, even if a member of the local administrators group, will not install correctly unless you have lowered your UAC security profile.
If you already ran the installer, open dcomcnfg and look under Component Services\Computers\My Computer\COM+ Applications and see if the Dell Device Helper is there. If not, open an elevated cmd and run the installer again and chose the repair option.
***
2. Extract and run the installer Dell_Server_Management_Pack_x64.msi, and I suggest unchecking the box at the end to open the OpsMgr console.
3. Right click on the OpsMgr console and Run As Admin. This is usually the best way to open any of the System Center consoles.
4. Go to Monitoring\Dell\Feature Management Dashboard. After a little while the FMP (dashboard) will update and show Available Versions as 6.1.
***On each one of the 5 features that you update, do not close the Task Status window until you have read through it to make sure it is successful because it will almost always show Success for Status even when there was an error running it. That Success Status is just a success that the function ran. Not that it completed successfully. Read through the Task Output and you are looking for something similar to:
INFO: Dell.Chassis.Modular.Server.Correlation imported successfully
Success
Once you see that, you can close the window.***
5. Start at the top and select "Chassis Modular Server Correlation" and then in the task pane run the "Upgrade Chassis Modular Server Correlation Feature" task.
6. Next, is the Chassis Monitoring. Highlight it and then run the task "Set to Chassis (either Detailed or Scalable) Monitoring Feature" task.
7. DRAC Monitoring. Highlight it and run the "Upgrade DRAC Monitoring Feature" task. Don't close until you are sure it was successful. For me, this one was not successful on the first run. I had to run it again and set an override to Auto Resolve Warning/Errors set to true in the task as seen below.
8. Server and Rack Workstation Agent-based Monitoring is next up. Select it and run the "Set to Agent-based (Detailed or Scalable) Feature" task.
9. Last, is the Server and Rack Workstation Agent-free Monitoring. Select it and run the "Set to Agent-free (Detailed or Scalable) Feature" task.
After a short while you should see the In Use Version column for each feature change to 6.1.0.
10. Now, go to Administrator\Management Packs. Look at all of the Dell MPs and make sure they are all 6.1.0.x, where x could be any of multiple numbers, except for Dell Base Hardware Library which will still be 4.0.0.113. Very specifically, look at Dell Feature Management and see what version it is. If it is not 6.1.0.43, it hasn't updated and it may be held up by other MPs that are dependent on that one. Open the properties of the Dell Feature Management MP and look on the Dependencies tab in the bottom half to see which ones. Most likely will be Dell.FeatureManagement.Override version 1.0.0.0 and Dell.FeatureManagement.TaskRefresher version 1.0.0.0. If there are others, make note of them also for the next step.
You can find those 2 MPs and export them if you like, and then you will need to delete them. Delete both the Dell.FeatureManagement.Override and the Dell.FeatureManagement.TaskRefresher.
11. Once they are gone the next step is to import the new Dell Feature Management MP since it didn't update before. Select Import Management Pack. Select from Disk and No for searching for dependencies. Browse to "C:\Program Files\Dell Management Packs\Server Mgmt Suite\6.1" and select the Dell.FeatureManagement.Pack.mp. It should show the new version 6.1.0.43. Click Install. When it finishes, you should see that new version number for Dell Feature Management after the MPs list refreshes.
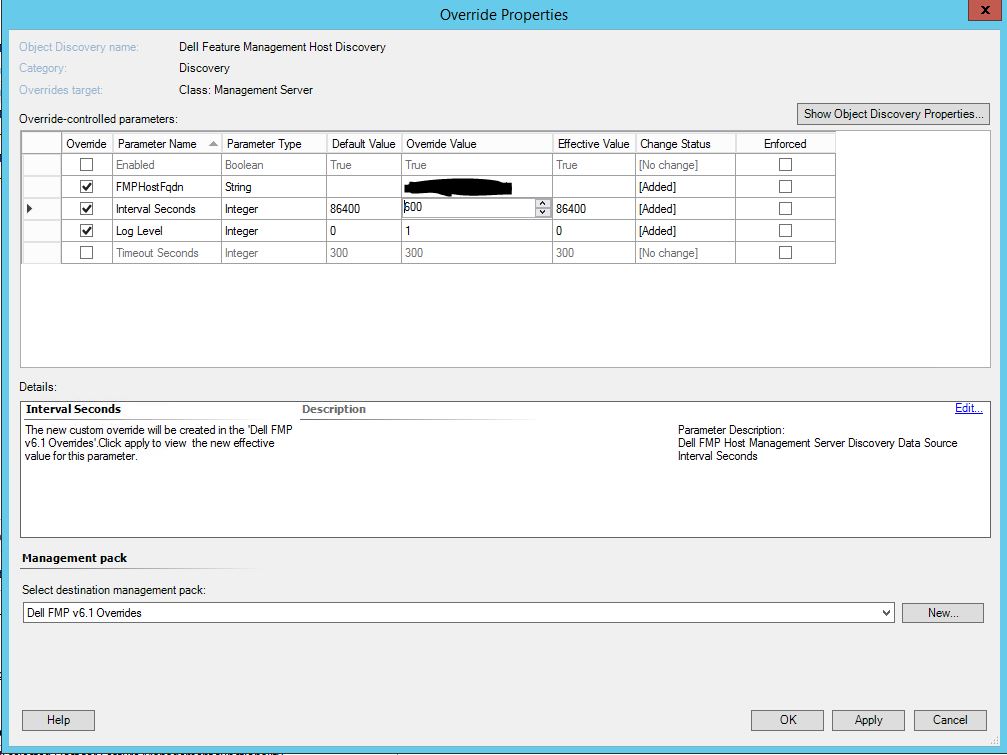
12. Go to Authoring\Management Pack objects\Object Discoveries. In the Look for box, type "Dell Feature" and hit Find Now. Select "Dell Feature Management Host Discovery". Right click on it and select Overrides->Override the Object Discovery->For all objects of class: Management Server.
On the Override Properties you are going to put a check next to FMPHostFqdn and set that to the FQDN of your OpsMgr server. Then put a check next to Interval Seconds and change the value to 600 seconds. If you want a log of this, you can also check the Log level and change it from a 0 to a 1. This log will be located at C:\Windows\Temp\DellFeatureMonitoring_Logs. At the bottom of Override Properties, create a new Management pack. Give it a name and then save it.
13. After the specified time period (600 seconds) the Dell Feature Management Dashboard will update to the new version. You will no longer see the
annoying Usage Informational Alerts and some of the column headers will change. The Total Node Licenses column will change to Total Node Count, and the License in Use column will change to Required License Count. And if you select the Server and Rack Workstation Agent-free Monitoring feature you will see a new task on the right side called Associate Run-As Account. Once you see these things you will need to go back to step 12 above and uncheck the Interval Seconds so that it will go back to the default of once per day. If you do not do this, the discovery cycle will run every 10 minutes appending the log file which will continue to grow (about 0.5MB/Day).
The Usage Information Alerts can be closed. The Associate Run-As Account task associates the Run As account used for SMASH discovery with all Dell Server objects, required for health monitoring.
14. And lastly, you will see a new Information alert that should only appear one time. The name is Dell FMP: License Information - Dell Server and Rack workstation Agent-free Monitoring and it gives you information about the license tiers and requirements.
Now you have updated to the new Dell OpsMgr Management Pack Suite v6.1. If you have multiple OpsMgr management servers, you will need to run the installer for this MP Suite on each mgmt server to update the files and com+ object on each one and that should be all you need to do.