Link to the video
I created the content for this video but had someone else do the voice-over.
Showing posts with label SCOM. Show all posts
Showing posts with label SCOM. Show all posts
Monday, October 9, 2017
Nutanix SCOM MP for Dell EMC XC Series
Co-Authored. Nutanix SCOM Management Pack lets you monitor Dell EMC XC Series clusters from a single console. Administrators can gain rapid insight into the state of the XC Series cluster environment using various views that show state, health, and performance information, as well as alerts generated for availability and performance. Nutanix SCOM alerts and thresholds are synchronized with alerts and thresholds in the Nutanix PRISM Web Console.
Friday, August 5, 2016
Quick Troubleshooting for Agent-Free Dell Devices in SCOM
First, if you know anything about SCOM, it is probably that almost nothing is quick. But here are the steps you need to take when needing to remove and re-add an Agent-Free device, or when you just can't get a device to be discovered Agent-Free to begin with.
Agent-Free monitoring in SCOM is available for 12G and later servers.
The rest of this post assumes that you have already been through my post on setting up Agent-Free and SNMP Monitoring (http://bradsjumpbag.blogspot.com/2015/12/dell-server-management-pack-with-agent.html) for initial setup. If you are still having problems and cannot get the iDracs discovered through the WSman template, here are some troubleshooting steps.
1. If an iDrac is already discovered and in SCOM, it cannot be discovered again. If it is already an Agent-Managed device or discovered as an SNMP device, it cannot be discovered again. You must remove it from the console first. Do a quick search for the machine in the top left Search box in SCOM. If it shows up in the results, then it is certainly in the console and will need to be removed.

Find it and delete it. The results may tell you where it is. Otherwise, look for it in some of these common places:
On the Administration workspace, look under Agent Managed, Agentless Managed, Pending Management, Network Devices, Network Devices Pending Management.
On the Authoring Node, go to WS-Management and SMASH Device Discovery, open the properties of the first template and make sure the iDrac is not on listed on the Devices tab. Repeat this for each template.
If you find the iDrac on any of these views, please delete it.
2. If the machine is a Windows server, login to it and look in Control Panel\Programs and Features. Make sure that the Microsoft Monitoring Agent is not installed. If it is, please uninstall it. Having this installed will cause the machine to keep trying to re-insert itself into the SCOM DB.
3. Make sure the machine is removed from the WS-Management and SMASH Device Discovery templates. Once you remove it here, SCOM should start the clean up process. There is a SMASH device script from Microsoft that is supposed to run. However, you can kickoff this script yourself too to make sure that it starts.
Go to the Monitoring workspace, scroll all the way to the bottom and expand WS-Management and SMASH Monitoring. Click on WS-Management and SMASH Operational Events. Click on any event to highlight it. Then you will be able to find and click on the "Clean up SMASH devices from deleted templates" script in the Tasks pane on the far right.

4. After you have deleted the target device, uninstalled any Microsoft Monitoring Agent, and run the SMASH clean up script, now it is time to wait a little while. I usually suggest giving it an hour.
5. Next, let's check the SQL DB. Open SQL Management Studio and connect to the Operations Manager DB. Select New Query from the toolbar. If you are looking for several machines, you can use this query:
SELECT * FROM dbo.[BasemanagedEntity] where FullName Like '%Windows.Computer%'
If you are looking for a specific machine, use this query and replace FQDN with your machine name:
SELECT * FROM dbo.[BasemanagedEntity] where FullName Like '%Windows.Computer%' and Name Like 'FQDN'
***NOTE*** If you copy and paste the query instead of typing it, you might need to replace the apostrophes. Just delete them and then replace from your keyboard.
In the results tab, scroll over looking for the IsDeleted column. If the machine(s) you are concerned with have a 0 in that column, we need to change them with an update query.

Use this Update query and replace FQDN with the specific machine that needs to be changed:
UPDATE dbo.[BasemanagedEntity] SET IsDeleted = 1 where FullName Like '%Windows.Computer%' and Name Like 'FQDN'
Give the system a little more time. I have not timed this so I don't know how long to suggest.
6. Now the target device should be gone from the DB and Operations Manager console. We should be able to discover it now. If you already have a WS-Management and SMASH Device Discovery template, you can add the target iDrac IP back into the into the device list. Or you can refer back to my post on setting up Agent-Free and SNMP Monitoring (http://bradsjumpbag.blogspot.com/2015/12/dell-server-management-pack-with-agent.html). Step 12 in section 1.3 is where we start creating the template.
Now give it a little more time for the discovery, inventory and correlation scripts to run. Once the iDrac shows up in the Servers and WRack orkstations (Agent-Free) view, you can discover them as SNMP devices. Those steps are in the other post as well.
I hope this helps you discover or re-discover your Dell Agent-Free devices.
Agent-Free monitoring in SCOM is available for 12G and later servers.
The rest of this post assumes that you have already been through my post on setting up Agent-Free and SNMP Monitoring (http://bradsjumpbag.blogspot.com/2015/12/dell-server-management-pack-with-agent.html) for initial setup. If you are still having problems and cannot get the iDracs discovered through the WSman template, here are some troubleshooting steps.
1. If an iDrac is already discovered and in SCOM, it cannot be discovered again. If it is already an Agent-Managed device or discovered as an SNMP device, it cannot be discovered again. You must remove it from the console first. Do a quick search for the machine in the top left Search box in SCOM. If it shows up in the results, then it is certainly in the console and will need to be removed.
Find it and delete it. The results may tell you where it is. Otherwise, look for it in some of these common places:
On the Administration workspace, look under Agent Managed, Agentless Managed, Pending Management, Network Devices, Network Devices Pending Management.
On the Authoring Node, go to WS-Management and SMASH Device Discovery, open the properties of the first template and make sure the iDrac is not on listed on the Devices tab. Repeat this for each template.
If you find the iDrac on any of these views, please delete it.
2. If the machine is a Windows server, login to it and look in Control Panel\Programs and Features. Make sure that the Microsoft Monitoring Agent is not installed. If it is, please uninstall it. Having this installed will cause the machine to keep trying to re-insert itself into the SCOM DB.
3. Make sure the machine is removed from the WS-Management and SMASH Device Discovery templates. Once you remove it here, SCOM should start the clean up process. There is a SMASH device script from Microsoft that is supposed to run. However, you can kickoff this script yourself too to make sure that it starts.
Go to the Monitoring workspace, scroll all the way to the bottom and expand WS-Management and SMASH Monitoring. Click on WS-Management and SMASH Operational Events. Click on any event to highlight it. Then you will be able to find and click on the "Clean up SMASH devices from deleted templates" script in the Tasks pane on the far right.

4. After you have deleted the target device, uninstalled any Microsoft Monitoring Agent, and run the SMASH clean up script, now it is time to wait a little while. I usually suggest giving it an hour.
5. Next, let's check the SQL DB. Open SQL Management Studio and connect to the Operations Manager DB. Select New Query from the toolbar. If you are looking for several machines, you can use this query:
SELECT * FROM dbo.[BasemanagedEntity] where FullName Like '%Windows.Computer%'
If you are looking for a specific machine, use this query and replace FQDN with your machine name:
SELECT * FROM dbo.[BasemanagedEntity] where FullName Like '%Windows.Computer%' and Name Like 'FQDN'
***NOTE*** If you copy and paste the query instead of typing it, you might need to replace the apostrophes. Just delete them and then replace from your keyboard.
In the results tab, scroll over looking for the IsDeleted column. If the machine(s) you are concerned with have a 0 in that column, we need to change them with an update query.

Use this Update query and replace FQDN with the specific machine that needs to be changed:
UPDATE dbo.[BasemanagedEntity] SET IsDeleted = 1 where FullName Like '%Windows.Computer%' and Name Like 'FQDN'
Give the system a little more time. I have not timed this so I don't know how long to suggest.
6. Now the target device should be gone from the DB and Operations Manager console. We should be able to discover it now. If you already have a WS-Management and SMASH Device Discovery template, you can add the target iDrac IP back into the into the device list. Or you can refer back to my post on setting up Agent-Free and SNMP Monitoring (http://bradsjumpbag.blogspot.com/2015/12/dell-server-management-pack-with-agent.html). Step 12 in section 1.3 is where we start creating the template.
Now give it a little more time for the discovery, inventory and correlation scripts to run. Once the iDrac shows up in the Servers and WRack orkstations (Agent-Free) view, you can discover them as SNMP devices. Those steps are in the other post as well.
I hope this helps you discover or re-discover your Dell Agent-Free devices.
Wednesday, March 23, 2016
Upgrade to Dell SCOM Management Pack 6.2
Here are the steps I recommend for updating your Operations Manager environment from previous versions of the Dell Management Pack Suite up to version 6.2, which came out in January 2016.
Things to know first:
1. If you have devices discovered as Agent-Free (aka OOB or Out-of-Band), it will be best to grab that list and then recreate that WSMan template after the upgrade.
2. If you have devices discovered as Agent-Free and SNMP, you will need to remove them from SNMP device list before they can be discovered again as Agent-Free devices. Once they have been rediscovered and inventoried, then you can quickly add them back as SNMP devices. See my other blog on setting up Agent-Free and SNMP Monitoring:
http://bradsjumpbag.blogspot.com/2015/12/dell-server-management-pack-with-agent.html
First is the smooth upgrade. After that, is the Manual method for when it doesn't go so smooth.
Download MP Suite v6.2 from here: http://www.dell.com/support/home/us/en/04/Drivers/DriversDetails?driverId=X95GK
Inside OpsMgr, go to Administration\Management Packs. Here you will need to export any custom MP, that you created, and that is a dependent on one of the Dell MPs. You can go to the properties of each customer MP or the properties of each Dell MP and look at the Dependencies tab to see which ones you need to export. In the following picture, I have 3 MPs that I need to export. I will export all of them to a folder on the desktop for later.

Once those MPs are exported, they need to be deleted.
There are possibly 4 more MPs that you can export and delete. Usually there are not many overrides in these, so I just delete them. Hopefully, you have not added any overrides to these because they will be recreated after the upgrade and you will still most likely have to recreate your overrides. There are 4 you need to delete. These are the Dell.FeatureManagement.Override, Dell.FeatureManagement.TaskRefresher, and the Dell.SecureReference.Override MPs, and the Microsoft.SystemCenter.SecureReferenceOverride if it is there.
Note: for the sake of writing this and being able to explain the manual method below, I am not going to delete the Microsoft.SystemCenter.SecureReferenceOverride, but you should delete it.

Run the Dell_Server_Management_Pack_Suite_v6.2_A00 zip file and it will extract to C:\Dell Management Packs\Server Management Pack\6.2. From there, right click on the Dell_Server_Management _Pack_Suite installer and Run As Admin.

You will get a windows notifying you that another version is already installed and ask if you want to upgrade. Click Yes. The rest of the installer is a 3 clicks to the Install button and let it finish. And give it some time; 30 minutes should be enough.
If the upgrade is successful, your Management Packs screen will show all of the Dell MPs being version 6.2.0.x, except for the Dell Base Hardware Library. Here is what it would look like with a successful upgrade.

If the Dell MPs are not all 6.2.0.x, then the upgrade is not complete. Most likely because a dependency got stuck. You need to finish with the manual method of deleting the older MPs and manually importing the rest.
Manual method:
If your upgrade looks more like this:

What we need to do is manually delete each of those that have a version number lower than 6.2, except the Dell Base Hardware Library. Leave the Dell Base Hardware Library alone. To delete the others, right click and select Delete. If you are allowed to delete it, you will see this and you can select Yes.

If there is a dependency, you will see something similar to the following. Here is where I didn't delete the Microsoft.SystemCenter.SecureReferenceOverride earlier and it caused a problem with the other MPs during the upgrade.

You will need to delete each of these other MPs before you can delete the one where you got this message. And some of those may have other dependencies. This may take a couple minutes and be a little trial and error to get rid of all of the lower version Dell MPs, in this example 6.1.1.x.
Now that all of the older version Dell MPs are gone, we need to import the new ones. To do this, click on the Import Management Packs in the far left Tasks pane, or right click on Management Packs and select the same option.

Click on Add, Add from disk. Then click on No when asked if you would like to search the online catalog.
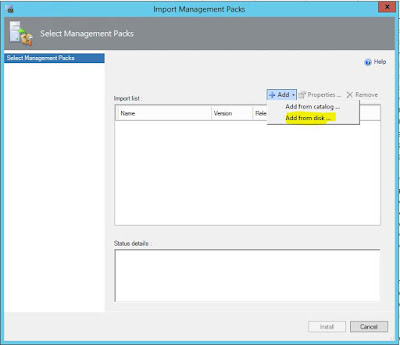

Browse to C:\Program Files\Dell Management Packs\Server Mgmt Suite\6.2. This is where all of the Dell MPs are installed it by default. Depending on which MPs you had to delete, you may need to select quite a few of these. I suggest adding most of them at the same time and any dependencies will be worked out; and any that are already installed will show that they are. Go through the first folder and select all of the .mp files that you need. If you are using OpsMgr 2012, you will probably not need the ones labeled "OM07". Click on Add. Then click through Add, Add from disk again and go to the next folder. Then again and so on until you have all of them added. Here are some screen shots.


Once you have added all of them, your Import Management Packs wizard will look like this. The ones with the green check will be imported and the ones with the blue circle with the white i are telling you that they are already imported and will be skipped. Click the Install button at the bottom and let it go.


When they are all done and say Imported you can click on Close and then refresh the Management Packs screen. All of the Dell MPs, except the Dell Base Hardware Library and the custom MPs with version 1.0.0.0, will be updated and have version 6.2.0.x.

At this point, you are updated to the Dell SCOM Management Pack v6.2. There is one override that needs to be set immediately. Go to Authoring, Object Discoveries, and in the Look for box, type "dell feature" and click on Find Now. Right click on Dell Feature Management Host Discovery, select Overrides, Override the Object Discovery, For all objects of class: Management Server.

If this is not already Enabled and has the FMP Host FQDN set, you will need to check these boxes and in the Override Value box you will type in the FQDN of your OpsMgr host. Then either select a management pack or create a new one to hold this setting. Then click on OK.

Next is re-importing your MPs that you exported back at the beginning of this process. Use the same process as what was described above to Import Management Packs and Add from disk.
If your Agent-Free devices do not come back within an hour or so, it will be best to remove the WSMan template and rediscover those devices. http://bradsjumpbag.blogspot.com/2015/12/dell-server-management-pack-with-agent.html
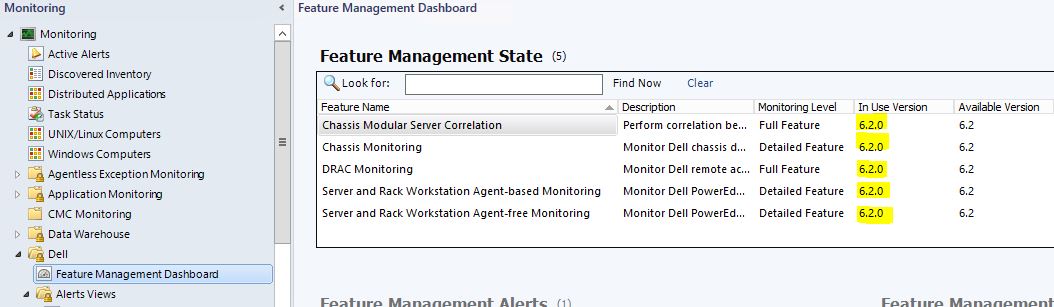
The last thing you may need to do is to make sure that the features you were using have updated to the latest version. Go to Monitoring\Dell\Feature Management Dashboard. Here you will want to look at the In Use Version and make sure they all say 6.2. If they do not, there are a couple of clicks to get them there. Mine all went straight to 6.2 so I can't show you one that didn't work. But I will still give you the steps below to update each one to 6.2.

Starting with Chassis Modular Server Coorelation. Click on it to highlight it and then click on the Upgrade Chassis Modular Server Correlation Feature task.

Click on the Override button.

Change the AutoResolve Warnings/Errors to True and then click on Override.

Then back on the Run Task window, make sure the AutoResolve value is True and if so click on Run.

When the task is running, do not close the window. Wait until it finishes and check in the Task Output that it says Success. The key here is the Success in the Task Output, not under Status at the top. That Success under Status just means that the task successfully started.

Make sure the AutoResolve Warnings/Errors is set to True for each of the other items below as well.
Next is the Chassis Monitoring. Highlight it in the Dashboard and then click the Set to Chassis (either Detailed or Scalable) Monitoring Feature task.
Then for DRAC Monitoring, highlight and click on Upgrade DRAC Monitoring Feature.
For both the Agent-Based and Agent-Free Monitoring Features, select them and then the Set to (Agent-based / Agent-free) (Detailed / Scalable) feature task item.
The Dell Feature Management Dashboard, by default is only set to update once per day. So don't be alarmed if the In Use Version column doesn't update right away. Give it a little time and it should update as long as the Available Version said 6.2 and you saw a Success in the Task Output of each of the above tasks.
That should be the end. You have completed the update from previous versions to the Dell SCOM MP v6.2.
Things to know first:
1. If you have devices discovered as Agent-Free (aka OOB or Out-of-Band), it will be best to grab that list and then recreate that WSMan template after the upgrade.
2. If you have devices discovered as Agent-Free and SNMP, you will need to remove them from SNMP device list before they can be discovered again as Agent-Free devices. Once they have been rediscovered and inventoried, then you can quickly add them back as SNMP devices. See my other blog on setting up Agent-Free and SNMP Monitoring:
http://bradsjumpbag.blogspot.com/2015/12/dell-server-management-pack-with-agent.html
First is the smooth upgrade. After that, is the Manual method for when it doesn't go so smooth.
Download MP Suite v6.2 from here: http://www.dell.com/support/home/us/en/04/Drivers/DriversDetails?driverId=X95GK
Inside OpsMgr, go to Administration\Management Packs. Here you will need to export any custom MP, that you created, and that is a dependent on one of the Dell MPs. You can go to the properties of each customer MP or the properties of each Dell MP and look at the Dependencies tab to see which ones you need to export. In the following picture, I have 3 MPs that I need to export. I will export all of them to a folder on the desktop for later.

Once those MPs are exported, they need to be deleted.
There are possibly 4 more MPs that you can export and delete. Usually there are not many overrides in these, so I just delete them. Hopefully, you have not added any overrides to these because they will be recreated after the upgrade and you will still most likely have to recreate your overrides. There are 4 you need to delete. These are the Dell.FeatureManagement.Override, Dell.FeatureManagement.TaskRefresher, and the Dell.SecureReference.Override MPs, and the Microsoft.SystemCenter.SecureReferenceOverride if it is there.
Note: for the sake of writing this and being able to explain the manual method below, I am not going to delete the Microsoft.SystemCenter.SecureReferenceOverride, but you should delete it.

Run the Dell_Server_Management_Pack_Suite_v6.2_A00 zip file and it will extract to C:\Dell Management Packs\Server Management Pack\6.2. From there, right click on the Dell_Server_Management _Pack_Suite installer and Run As Admin.

You will get a windows notifying you that another version is already installed and ask if you want to upgrade. Click Yes. The rest of the installer is a 3 clicks to the Install button and let it finish. And give it some time; 30 minutes should be enough.
If the upgrade is successful, your Management Packs screen will show all of the Dell MPs being version 6.2.0.x, except for the Dell Base Hardware Library. Here is what it would look like with a successful upgrade.

If the Dell MPs are not all 6.2.0.x, then the upgrade is not complete. Most likely because a dependency got stuck. You need to finish with the manual method of deleting the older MPs and manually importing the rest.
Manual method:
If your upgrade looks more like this:

What we need to do is manually delete each of those that have a version number lower than 6.2, except the Dell Base Hardware Library. Leave the Dell Base Hardware Library alone. To delete the others, right click and select Delete. If you are allowed to delete it, you will see this and you can select Yes.

If there is a dependency, you will see something similar to the following. Here is where I didn't delete the Microsoft.SystemCenter.SecureReferenceOverride earlier and it caused a problem with the other MPs during the upgrade.

You will need to delete each of these other MPs before you can delete the one where you got this message. And some of those may have other dependencies. This may take a couple minutes and be a little trial and error to get rid of all of the lower version Dell MPs, in this example 6.1.1.x.
Now that all of the older version Dell MPs are gone, we need to import the new ones. To do this, click on the Import Management Packs in the far left Tasks pane, or right click on Management Packs and select the same option.

Click on Add, Add from disk. Then click on No when asked if you would like to search the online catalog.


Browse to C:\Program Files\Dell Management Packs\Server Mgmt Suite\6.2. This is where all of the Dell MPs are installed it by default. Depending on which MPs you had to delete, you may need to select quite a few of these. I suggest adding most of them at the same time and any dependencies will be worked out; and any that are already installed will show that they are. Go through the first folder and select all of the .mp files that you need. If you are using OpsMgr 2012, you will probably not need the ones labeled "OM07". Click on Add. Then click through Add, Add from disk again and go to the next folder. Then again and so on until you have all of them added. Here are some screen shots.


Once you have added all of them, your Import Management Packs wizard will look like this. The ones with the green check will be imported and the ones with the blue circle with the white i are telling you that they are already imported and will be skipped. Click the Install button at the bottom and let it go.


When they are all done and say Imported you can click on Close and then refresh the Management Packs screen. All of the Dell MPs, except the Dell Base Hardware Library and the custom MPs with version 1.0.0.0, will be updated and have version 6.2.0.x.

At this point, you are updated to the Dell SCOM Management Pack v6.2. There is one override that needs to be set immediately. Go to Authoring, Object Discoveries, and in the Look for box, type "dell feature" and click on Find Now. Right click on Dell Feature Management Host Discovery, select Overrides, Override the Object Discovery, For all objects of class: Management Server.

If this is not already Enabled and has the FMP Host FQDN set, you will need to check these boxes and in the Override Value box you will type in the FQDN of your OpsMgr host. Then either select a management pack or create a new one to hold this setting. Then click on OK.

Next is re-importing your MPs that you exported back at the beginning of this process. Use the same process as what was described above to Import Management Packs and Add from disk.
If your Agent-Free devices do not come back within an hour or so, it will be best to remove the WSMan template and rediscover those devices. http://bradsjumpbag.blogspot.com/2015/12/dell-server-management-pack-with-agent.html
The last thing you may need to do is to make sure that the features you were using have updated to the latest version. Go to Monitoring\Dell\Feature Management Dashboard. Here you will want to look at the In Use Version and make sure they all say 6.2. If they do not, there are a couple of clicks to get them there. Mine all went straight to 6.2 so I can't show you one that didn't work. But I will still give you the steps below to update each one to 6.2.
Starting with Chassis Modular Server Coorelation. Click on it to highlight it and then click on the Upgrade Chassis Modular Server Correlation Feature task.

Click on the Override button.

Change the AutoResolve Warnings/Errors to True and then click on Override.

Then back on the Run Task window, make sure the AutoResolve value is True and if so click on Run.

When the task is running, do not close the window. Wait until it finishes and check in the Task Output that it says Success. The key here is the Success in the Task Output, not under Status at the top. That Success under Status just means that the task successfully started.

Make sure the AutoResolve Warnings/Errors is set to True for each of the other items below as well.
Next is the Chassis Monitoring. Highlight it in the Dashboard and then click the Set to Chassis (either Detailed or Scalable) Monitoring Feature task.
Then for DRAC Monitoring, highlight and click on Upgrade DRAC Monitoring Feature.
For both the Agent-Based and Agent-Free Monitoring Features, select them and then the Set to (Agent-based / Agent-free) (Detailed / Scalable) feature task item.
The Dell Feature Management Dashboard, by default is only set to update once per day. So don't be alarmed if the In Use Version column doesn't update right away. Give it a little time and it should update as long as the Available Version said 6.2 and you saw a Success in the Task Output of each of the above tasks.
That should be the end. You have completed the update from previous versions to the Dell SCOM MP v6.2.
Monday, February 1, 2016
Dell SCOM Management Pack 6.2 Released
The Dell SCOM Management Pack version 6.2 has been released. Downloadable here: http://www.dell.com/support/home/us/en/04/Drivers/DriversDetails?driverId=X95GK
Once downloaded and extracted, there is a Readme file that has more info including supported firmware versions and known issues. Here are the listed fixes and enhancements and a little more info to know.
Once downloaded and extracted, there is a Readme file that has more info including supported firmware versions and known issues. Here are the listed fixes and enhancements and a little more info to know.
Fixes & Enhancements
Fixes :
1. If OMSA is not installed, the server's hostname may be reported incorrectly in DRAC inventory.
2. NIC and TEAMED NIC association (Intel) are reported incorrectly.
Enhancements:
1. Simplified discovery and monitoring; Chassis Detailed discovery and Slot discovery do not require RACADM utility.
2. Support for monitoring Dell-branded OEM Servers and Dell OEM-Ready servers.
More info to know
Server Monitoring (Agent-based):
---------------------------------
* The Attribute "Enable Correlation" for "Dell Windows Server Physical and
Teamed Relationship Discovery Rule" is set to "False" for all Teamed Network
Interface (Enriched) in the Dell Windows Server (Detailed Edition)
Management Pack. Set the attribute value to "True", to see the relationships
between Physical and Teamed Network Interfaces in the "Complete Diagram View",
"Modular Systems Diagram View" and "Monolithic Servers Diagram View"
* The Performance Rules "Total Transmitted Packets", "Received Bytes",
"Total Received Packets" and "Transmitted Bytes" are disabled by default for
all Physical Network Interface (Enriched) in the Dell Windows Server
(Detailed Edition) Management Pack. Enable these rules to generate
performance statistics for the Physical Network Interfaces.
* The Performance Rules "Total Transmitted Packets", "Received Bytes",
"Total Received Packets" and "Transmitted Bytes" are disabled by default for
all Teamed Network Interface (Enriched) in the Dell Windows Server
(Detailed Edition) Management Pack. Enable these rules to generate
performance statistics for the Teamed Network Interfaces.
* The Dependency Monitor "Dell Server Availability Rollup (from iDRAC)"
is disabled by default for all Dell Servers in the Dell Scalable management
pack. Enable this monitor to rollup the iDRAC network interface health to
the Dell Server health.
* The Performance Rule "Dell Server (Agent-based) Physical Disk (SSD)
Performance", is disabled by default for all Physical Disks and is a part of
the Dell Windows Server (Detailed Edition) Management Pack. Enable this rule
to generate performance statistics for the Remaining Rated Endurance Level of
the SSDs (Solid State Drives).
Server Monitoring (Agent-free):
---------------------------------
* To use the Server Agent-free features, download the Microsoft WS-Management
template from the Microsoft download location mentioned in the Dell Server
Management Pack Suite Version 6.2 User’s Guide.
* Performance rules are disabled by default. Enable "Dell Server Performance
rule" to view the Server performance data (temperature, power and Network
Interface Card (NIC)and CPU, Memory, IO and CUPS).
* Performance Unit Monitors are disabled by default. Enable the performance
unit monitors to get performance health status.
* Health Monitoring for components under Software RAID controllers is not
supported. Data required for health monitoring not available from the device
for such components.
* Network Link status for PowerEdge FX2/FX2s shows internal NIC connectivity;
network cable removal does not affect Network Link status for PowerEdge
FX2/FX2s.
Remote Access Monitoring:
---------------------------------
* The Unit Monitor "Device Status Check" is disabled for all Dell Remote Access
Controllers in the Dell Remote Access Controller Management Pack for
SCOM 2007 R2.
Chassis Monitoring:
---------------------------------
* In Slot Discovery, the slot name for the slots containing FD332 Storage block,
will be shown as SLOT-(Slot Number).
* Slot names displayed by CMC Slot Discovery may differ from the slot names
shown by the CMC web console.
* The Discovery Rule "Dell Chassis Detailed Discovery" in the Dell Chassis
(Detailed Edition) Management Pack discovers and monitors the Chassis
components (Storage, Fans, Chassis Management controllers, PCIe devices etc.)
This discovery requires the creation of Run As accounts for the Dell Chassis
in your network and have them associated with the "Dell CMC Login Account".
For more information on configuring Run As Accounts refer to the User’s Guide.
This discovery also uses RACADM to connect to the Dell Chassis. The racadm
uses Internet Explorer Proxy Settings of SCOM Health Service user account to
connect to the CMC Devices. Ensure that Internet Explorer Proxy Settings of
the SCOM Health Service user account is configured such that CMC devices are
reachable. For instructions on modifying the Internet Explorer settings, see
Microsoft KB article 135982.
* The Discovery Rule "Dell CMC Slot Discovery" is disabled for all Dell Chassis
Management Controllers in the Dell Chassis Management Controller Management
Pack. Enable this rule to discover server modules and free slots for Dell
Chassis Management Controllers after you have created Run As Accounts for the
CMC devices in your network and associated them with the "Dell CMC Login
Account". For more information on configuring Run As Accounts refer to the
User’s Guide.
* The Unit Monitor "Device Status Check" is disabled for all Dell Chassis
Management Controllers in the Dell Chassis Management Controller Management
Pack for SCOM 2007 R2.
* To monitor the health of Chassis devices, associate the community string Run
As account with the SNMP Monitoring Account with the target as Dell Modular
Chassis class or respective Chassis object (if you have different Run As
accounts for different Chassis devices.)
Recent issues found in both Dell SCOM MP and Nutanix MP
Here are two issues we recently found in these Management Packs.
1. This is not a bug, but rather something to be aware of. The Dell SCOM Management Pack uses PowerShell for many of the scripts. That means that if you have any PowerShell protected characters in your iDrac credentials or possibly SNMP community names, the scripts may not work.
2. Nutanix Management Pack v1.3 has a possible bug that has been submitted to be looked at. If you have a dash "-" in your Nutanix SNMP name, the dash can cause the SNMP service to crash on the CVM.
Wednesday, September 2, 2015
Dell Operations Manager MP Suite 6.1.1 Released
I'm a little behind on this but Dell released the Dell SCOM Mp Suite 6.1.1 in early August to add support for a couple of new servers and to resolve an issue with the 6.1 installer.
Here is the link for the wiki: http://en.community.dell.com/techcenter/systems-management/w/wiki/4118.dell-server-management-pack-suite
Here is the direct link for the 6.1.1 download page. http://www.dell.com/support/home/us/en/19/Drivers/DriversDetails?driverId=8F4J0
The 6.1 installer was an msi that had to be run from an elevated command prompt. If you didn't run the 6.1 from an elevated cmd, you are most likely missing the Dell Device Helper COM+ Object. A simple repair install from an elevated cmd will resolve that or you can download and upgrade to 6.1.1.
Friday, July 17, 2015
Dell OpsMgr MP Suite Unit Monitors
If you have installed the Dell SCOM MP Suite and are wondering why some of the columns may not be lighting up, this post may help.


Here is the link to the Dell Server Management Pack Suite v6.1 for System Center Operations Manager User's Guide because I will reference it several times in this post. http://topics-cdn.dell.com/pdf/dell-srvr-mgmt-pck-v6.1-mscom_User's%20Guide_en-us.pdf

First I will give you some page numbers to see charts for the different monitoring features so you can see and make decisions on what you want to monitor and view.
Agent-based:
Comparison of Scalable and Detailed on page 10.
Discoveries by the Agent-based Monitoring Feature (Scalable & Detailed) starting on page 11.
Discoveries by the Agent-based Monitoring Feature (Scalable & Detailed) starting on page 11.
Monitored hardware components (Scalable vs. Detailed) starting on page 12.
Unit Monitors (Scalable vs. Detailed) starting the bottom of page 19.
Agent-free:
Comparison of Scalable and Detailed on page 33.
Discoveries by the Agent-free Monitoring Feature page 35.
Monitored hardware components (Scalable vs. Detailed) starting on page 36.
Unit Monitors (Scalable vs. Detailed) starting the bottom of page 41.
DRAC:
Discoveries by the DRAC Monitoring Feature on page 50.
Unit Monitors starting the bottom of page 52.
Chassis Monitoring Feature:
Discoveries by the Dell Chassis Monitoring Feature on page 58.
Monitored hardware components (Scalable vs. Detailed) starting on page 58.
Unit Monitors starting the bottom of page 62.
***The rest of this post will focus on the Agent-free monitoring.***
Once you install the MP Suite and you have your Agent-free devices discovered, the next thing to do will be to right click on the column headers and click on Personalize View. Then there will be several options here you can select to see more info about your servers in the main view.


Check the items you want. Some may have the same information as others so you may have to play with it a little to see which ones you want and which you don't.
Depending on whether you enabled the Scalable or Detailed discoveries on the Dell Feature Management Dashboard, some items may or may not be running discoveries already. Those are described in the charts listed above.
But to see the unit monitors light up, you still have some work to do. As you can see in the first picture above, the Dell Server Memory Group says Not Monitored.
There are 2 types of Unit Monitors to be aware of (Event and Periodic).
- Event - triggered by the event that the Dell instrumentation logs in the Windows event log, indicating the health of the corresponding object.
- Periodic - triggered by a periodic poll configured as Interval Seconds.
Next, go to Authoring, Management Pack Objects, Monitors. Use the Look For search box and type in "Dell Server".

Find the Unit Monitors that you chose from the charts listed above, that you want to enable. For example, we will look at the Dell Server Memory Group. Find the Dell Server Memory Group\Entity Health\Availability\Dell Server Memory Group. Right click on it and select Overrides\Override the Monitor\For all object of class: Dell Server Memory Group.

On the Override Properties screen, you have several items you can change. To enable the item, you need to check the Enabled line and change it to True. And check the Generates Alert option and change it to True if you want alerts from this component. Other items I suggest you look at include:
Alert on State - do you want an alert only in critical state or in both warning and critical states.
Alert Priority - depending on the component you may want to increase the priority of the alert.
Alert Severity - again, depending on the component and how important it is you might want to change this too.
Auto-Resolve Alert - do you want the alert to auto-resolve when it sees the condition change back to healthy or do you want to have to acknowledge the alert and close it in OpsMgr.
Interval Seconds - depending on the component and its importnace, I wouldn't change this one too much. The lower the time, the more polling the OpsMgr server will do of that component, which increases load and traffic.
Log Level - is more for troubleshooting. If necessary, change this from 0 to 1 and you should get a log at the interval seconds time, in a sub-folder at C:\Windows\Temp.
Once you have your options set, save this to a management pack, but don't use the default management pack.

Give it some time and possibly hit refresh and then your monitors will light up. Do this for all of the unit monitors that you want to get alerts for.


Monday, June 8, 2015
Upgrade to Dell OpsMgr MP Suite 6.1
The new Dell OpsMgr Management Pack Suite resolves a couple of bugs that I identified. The annoying Usage Information Alerts, and a problem with the Dell Connections License Manager in particular. If you are using the MP Suite v5.2 or 6, I suggest you update to the new v6.1. I went back and forth from 5.2 to 6.0 to 6.1 and back down and up again several times in 2 separate labs to confirm that these instructions worked each time for me.
1. Download the published release of the Dell OpsMgr Management Pack v6.1. Here.
***Edit 6/23/2015
In #2 below, the best way to run the installer is to open an elevated command prompt and use "msiexec /i
If you already ran the installer, open dcomcnfg and look under Component Services\Computers\My Computer\COM+ Applications and see if the Dell Device Helper is there. If not, open an elevated cmd and run the installer again and chose the repair option.
***
2. Extract and run the installer Dell_Server_Management_Pack_x64.msi, and I suggest unchecking the box at the end to open the OpsMgr console.
3. Right click on the OpsMgr console and Run As Admin. This is usually the best way to open any of the System Center consoles.
4. Go to Monitoring\Dell\Feature Management Dashboard. After a little while the FMP (dashboard) will update and show Available Versions as 6.1.
***On each one of the 5 features that you update, do not close the Task Status window until you have read through it to make sure it is successful because it will almost always show Success for Status even when there was an error running it. That Success Status is just a success that the function ran. Not that it completed successfully. Read through the Task Output and you are looking for something similar to:
INFO: Dell.Chassis.Modular.Server.Correlation imported successfully
Success
Once you see that, you can close the window.***
5. Start at the top and select "Chassis Modular Server Correlation" and then in the task pane run the "Upgrade Chassis Modular Server Correlation Feature" task.
6. Next, is the Chassis Monitoring. Highlight it and then run the task "Set to Chassis (either Detailed or Scalable) Monitoring Feature" task.
7. DRAC Monitoring. Highlight it and run the "Upgrade DRAC Monitoring Feature" task. Don't close until you are sure it was successful. For me, this one was not successful on the first run. I had to run it again and set an override to Auto Resolve Warning/Errors set to true in the task as seen below.

8. Server and Rack Workstation Agent-based Monitoring is next up. Select it and run the "Set to Agent-based (Detailed or Scalable) Feature" task.
9. Last, is the Server and Rack Workstation Agent-free Monitoring. Select it and run the "Set to Agent-free (Detailed or Scalable) Feature" task.
After a short while you should see the In Use Version column for each feature change to 6.1.0.
10. Now, go to Administrator\Management Packs. Look at all of the Dell MPs and make sure they are all 6.1.0.x, where x could be any of multiple numbers, except for Dell Base Hardware Library which will still be 4.0.0.113. Very specifically, look at Dell Feature Management and see what version it is. If it is not 6.1.0.43, it hasn't updated and it may be held up by other MPs that are dependent on that one. Open the properties of the Dell Feature Management MP and look on the Dependencies tab in the bottom half to see which ones. Most likely will be Dell.FeatureManagement.Override version 1.0.0.0 and Dell.FeatureManagement.TaskRefresher version 1.0.0.0. If there are others, make note of them also for the next step.
You can find those 2 MPs and export them if you like, and then you will need to delete them. Delete both the Dell.FeatureManagement.Override and the Dell.FeatureManagement.TaskRefresher.
11. Once they are gone the next step is to import the new Dell Feature Management MP since it didn't update before. Select Import Management Pack. Select from Disk and No for searching for dependencies. Browse to "C:\Program Files\Dell Management Packs\Server Mgmt Suite\6.1" and select the Dell.FeatureManagement.Pack.mp. It should show the new version 6.1.0.43. Click Install. When it finishes, you should see that new version number for Dell Feature Management after the MPs list refreshes.
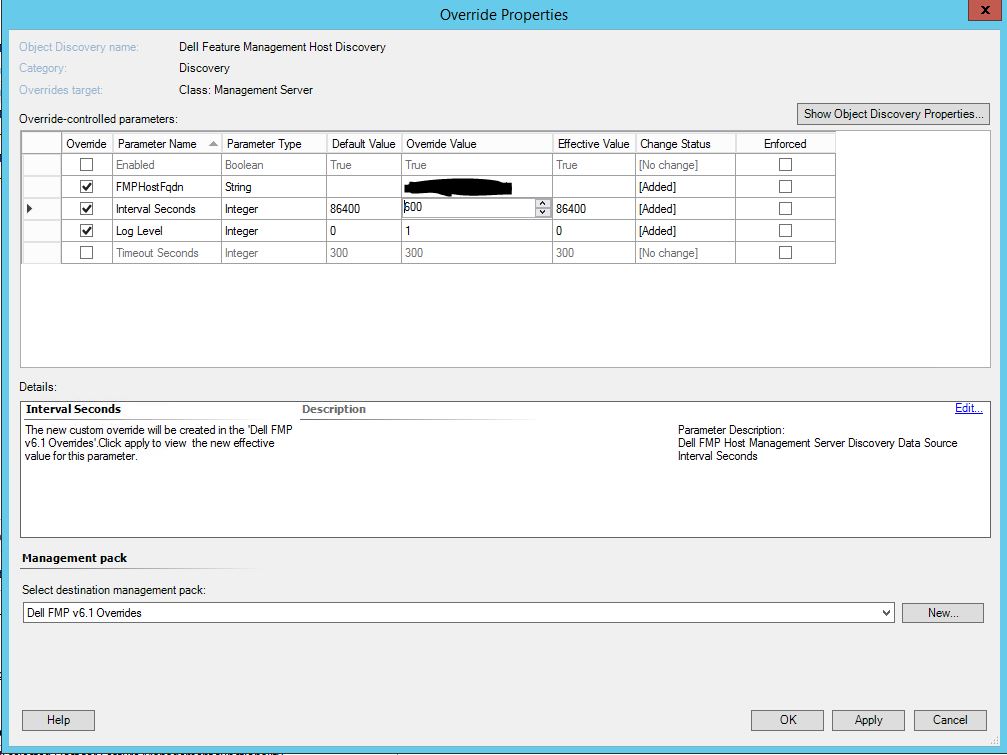
12. Go to Authoring\Management Pack objects\Object Discoveries. In the Look for box, type "Dell Feature" and hit Find Now. Select "Dell Feature Management Host Discovery". Right click on it and select Overrides->Override the Object Discovery->For all objects of class: Management Server.

On the Override Properties you are going to put a check next to FMPHostFqdn and set that to the FQDN of your OpsMgr server. Then put a check next to Interval Seconds and change the value to 600 seconds. If you want a log of this, you can also check the Log level and change it from a 0 to a 1. This log will be located at C:\Windows\Temp\DellFeatureMonitoring_Logs. At the bottom of Override Properties, create a new Management pack. Give it a name and then save it.
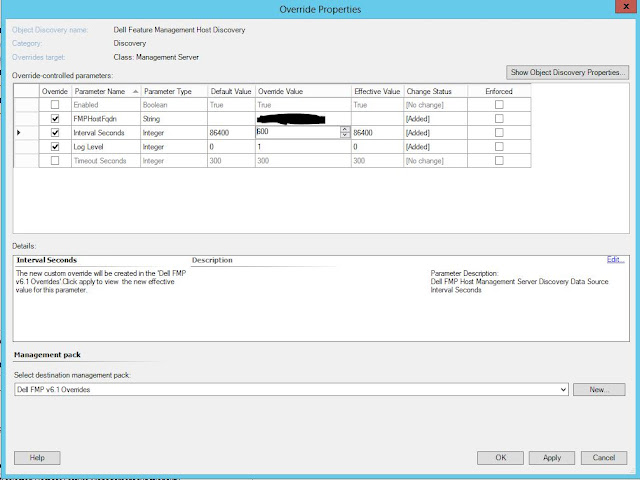
13. After the specified time period (600 seconds) the Dell Feature Management Dashboard will update to the new version. You will no longer see the annoying Usage Informational Alerts and some of the column headers will change. The Total Node Licenses column will change to Total Node Count, and the License in Use column will change to Required License Count. And if you select the Server and Rack Workstation Agent-free Monitoring feature you will see a new task on the right side called Associate Run-As Account. Once you see these things you will need to go back to step 12 above and uncheck the Interval Seconds so that it will go back to the default of once per day. If you do not do this, the discovery cycle will run every 10 minutes appending the log file which will continue to grow (about 0.5MB/Day).
The Usage Information Alerts can be closed. The Associate Run-As Account task associates the Run As account used for SMASH discovery with all Dell Server objects, required for health monitoring.
14. And lastly, you will see a new Information alert that should only appear one time. The name is Dell FMP: License Information - Dell Server and Rack workstation Agent-free Monitoring and it gives you information about the license tiers and requirements.

Now you have updated to the new Dell OpsMgr Management Pack Suite v6.1. If you have multiple OpsMgr management servers, you will need to run the installer for this MP Suite on each mgmt server to update the files and com+ object on each one and that should be all you need to do.
1. Download the published release of the Dell OpsMgr Management Pack v6.1. Here.
***Edit 6/23/2015
In #2 below, the best way to run the installer is to open an elevated command prompt and use "msiexec /i
If you already ran the installer, open dcomcnfg and look under Component Services\Computers\My Computer\COM+ Applications and see if the Dell Device Helper is there. If not, open an elevated cmd and run the installer again and chose the repair option.
***
2. Extract and run the installer Dell_Server_Management_Pack_x64.msi, and I suggest unchecking the box at the end to open the OpsMgr console.
3. Right click on the OpsMgr console and Run As Admin. This is usually the best way to open any of the System Center consoles.
4. Go to Monitoring\Dell\Feature Management Dashboard. After a little while the FMP (dashboard) will update and show Available Versions as 6.1.
***On each one of the 5 features that you update, do not close the Task Status window until you have read through it to make sure it is successful because it will almost always show Success for Status even when there was an error running it. That Success Status is just a success that the function ran. Not that it completed successfully. Read through the Task Output and you are looking for something similar to:
INFO: Dell.Chassis.Modular.Server.Correlation imported successfully
Success
Once you see that, you can close the window.***
5. Start at the top and select "Chassis Modular Server Correlation" and then in the task pane run the "Upgrade Chassis Modular Server Correlation Feature" task.
6. Next, is the Chassis Monitoring. Highlight it and then run the task "Set to Chassis (either Detailed or Scalable) Monitoring Feature" task.
7. DRAC Monitoring. Highlight it and run the "Upgrade DRAC Monitoring Feature" task. Don't close until you are sure it was successful. For me, this one was not successful on the first run. I had to run it again and set an override to Auto Resolve Warning/Errors set to true in the task as seen below.

8. Server and Rack Workstation Agent-based Monitoring is next up. Select it and run the "Set to Agent-based (Detailed or Scalable) Feature" task.
9. Last, is the Server and Rack Workstation Agent-free Monitoring. Select it and run the "Set to Agent-free (Detailed or Scalable) Feature" task.
After a short while you should see the In Use Version column for each feature change to 6.1.0.
10. Now, go to Administrator\Management Packs. Look at all of the Dell MPs and make sure they are all 6.1.0.x, where x could be any of multiple numbers, except for Dell Base Hardware Library which will still be 4.0.0.113. Very specifically, look at Dell Feature Management and see what version it is. If it is not 6.1.0.43, it hasn't updated and it may be held up by other MPs that are dependent on that one. Open the properties of the Dell Feature Management MP and look on the Dependencies tab in the bottom half to see which ones. Most likely will be Dell.FeatureManagement.Override version 1.0.0.0 and Dell.FeatureManagement.TaskRefresher version 1.0.0.0. If there are others, make note of them also for the next step.
You can find those 2 MPs and export them if you like, and then you will need to delete them. Delete both the Dell.FeatureManagement.Override and the Dell.FeatureManagement.TaskRefresher.
11. Once they are gone the next step is to import the new Dell Feature Management MP since it didn't update before. Select Import Management Pack. Select from Disk and No for searching for dependencies. Browse to "C:\Program Files\Dell Management Packs\Server Mgmt Suite\6.1" and select the Dell.FeatureManagement.Pack.mp. It should show the new version 6.1.0.43. Click Install. When it finishes, you should see that new version number for Dell Feature Management after the MPs list refreshes.
12. Go to Authoring\Management Pack objects\Object Discoveries. In the Look for box, type "Dell Feature" and hit Find Now. Select "Dell Feature Management Host Discovery". Right click on it and select Overrides->Override the Object Discovery->For all objects of class: Management Server.

On the Override Properties you are going to put a check next to FMPHostFqdn and set that to the FQDN of your OpsMgr server. Then put a check next to Interval Seconds and change the value to 600 seconds. If you want a log of this, you can also check the Log level and change it from a 0 to a 1. This log will be located at C:\Windows\Temp\DellFeatureMonitoring_Logs. At the bottom of Override Properties, create a new Management pack. Give it a name and then save it.
13. After the specified time period (600 seconds) the Dell Feature Management Dashboard will update to the new version. You will no longer see the annoying Usage Informational Alerts and some of the column headers will change. The Total Node Licenses column will change to Total Node Count, and the License in Use column will change to Required License Count. And if you select the Server and Rack Workstation Agent-free Monitoring feature you will see a new task on the right side called Associate Run-As Account. Once you see these things you will need to go back to step 12 above and uncheck the Interval Seconds so that it will go back to the default of once per day. If you do not do this, the discovery cycle will run every 10 minutes appending the log file which will continue to grow (about 0.5MB/Day).
The Usage Information Alerts can be closed. The Associate Run-As Account task associates the Run As account used for SMASH discovery with all Dell Server objects, required for health monitoring.
14. And lastly, you will see a new Information alert that should only appear one time. The name is Dell FMP: License Information - Dell Server and Rack workstation Agent-free Monitoring and it gives you information about the license tiers and requirements.

Now you have updated to the new Dell OpsMgr Management Pack Suite v6.1. If you have multiple OpsMgr management servers, you will need to run the installer for this MP Suite on each mgmt server to update the files and com+ object on each one and that should be all you need to do.
Wednesday, May 27, 2015
Annoying Dell FMP: Feature Management Usage Information Alerts
If you have the Dell OpsMgr Management Pack 6.0 imported and OpsMgr is integrated with System Center Virtual Machine Manager, you may see some annoying "Dell FMP: Feature Management Usage Information" alerts every 6 hours.
Open the alerts and on the Alert Context tab you will see information related to the "StorageObjectsDiscovery.DS.ps1".
Most cases that I have seen involve 4 alerts. The first one in the Alert Context Data says "Storage Discovery: started." The second alert says "Storage Discovery: Got VMMServer. Module imported." Third alert says "Missing Value in Property Id: {78FCB9D8-AFF4-785C-CAC3-1C9B8BAAA561}." And the fourth and last alert says "Storage Discovery: Complete!".
These then repeat every 6 hours.

You can either ignore these and delete them as often as you want. Or you can set an override by right-clicking on the alert and select Overrides -> Override the Rule -> For all objects of class: Health Service. Check the Enabled parameter and change the override value to False. Save to a new management pack. That will stop you from seeing the alerts for now.
When the new version of the MP Suite comes out, these annoying alerts are supposed to be removed.
Tuesday, December 16, 2014
Theoretical Limits for Dell In-Band & Out-of-Band Monitoring with SCOM
Although I work for Dell at the time of publishing, this post is not official Dell documentation.
Dell has SCOM management packs (MPs) that allow In-Band and Out-of-Band monitoring of Dell hardware. There are some possible limits I want to make you aware of before you begin your testing and implementation of these solutions. We will start with the background and describe the different options.
First, there are 2 primary MPs for monitoring Dell server hardware.
- In-Band: This requires the installation of OMSA and the SCOM agent on the systems that you want to monitor. Processing of data is done on the monitored system by the SCOM agent. This is also much easier to setup.
- Out-of-Band: This does not require OMSA or the SCOM agent, but does require setting up SMASH discovery through the iDrac, a license from Dell, and the Dell Connections License Manager. Processing of data is done on the SCOM Management Server. I have another post on how to set this up in a single SCOM management server environment.
Inside each of those MPs are 2 monitoring levels.
- Scalable: Inventory and monitoring of component groups and also displays the presence of the iDrac. For Reports, only OpenManage Windows Event log is available.
- Detailed: Detailed inventory and monitoring of the following components: memory, processors, network interfaces, storage controllers, disks, volume, power, temperature, and BIOS information. For Reports, availability of BIOS configuration, firmware and driver versions, and RAID configuration reports.
There are other factors that can blur or move these theoretical limits up or down. Factors including whether the SCOM management servers are physical or virtual, specs of those physical/virtual machines, how much other monitoring is being done and the load on the SCOM servers, bandwidth, etc.
Please remember that these are not hard limits and are not official Dell documentation.
# of Dell servers supported per SCOM Management Server
| Scalable | Detailed | |
| In-Band (Agent-Based) | 1500 | 500 |
| Out-of-Band (Agent-Free) | 150 | 50 |
Your mileage may vary. Please test before rolling out into production.
Wednesday, August 20, 2014
Walk-Through: Monitoring Dell Server Out-of-Band with SCOM 2012
Want to monitor Dell server hardware without installing OpenManage Server Administrator, or maybe you can't install OMSA. This walk-through gives you the steps to get this to work.
This walk-through assumes you already have SCOM running and are familiar with it. If you don't have SCOM 2012 running, check out Kevin Holman's quick start guide: http://blogs.technet.com/b/kevinholman/archive/2011/07/26/deploying-opsmgr-2012-a-quick-start-guide.aspx
Links for reference.
Dell Server Management Pack Suite (download and docs), 5.2 is the latest as of this post:
http://en.community.dell.com/techcenter/systems-management/w/wiki/4118.dell-server-management-pack-suite.aspx
Dell Connections License Manager, 1.1 is the latest as of this post:
This is where DCLM should be but this page has not been updated to include 1.1 yet.
http://en.community.dell.com/techcenter/systems-management/w/wiki/4921.dell-connections-license-manager.aspx
So use this one for DCLM 1.1: http://www.dell.com/support/home/us/en/19/Drivers/DriversDetails?driverid=987Y6
License Management in Dell OpenManage Products using Dell Connections License Manager. This PDF tells you how to get the licenses needed for Out-of-Band management.
http://en.community.dell.com/techcenter/extras/m/white_papers/20437073.aspx
Dell Connections License Manager Version 1.1 Installation Guide:
http://topics-cdn.dell.com/pdf/dell-connections-license-manager-v1.1_Setup%20Guide_en-us.pdf
Dell Connections License Manager Version 1.1 User's Guide:
ftp://ftp.dell.com/Manuals/all-products/esuprt_software/esuprt_ent_sys_mgmt/esuprt_ent_sys_mgmt_connections_license_mngr/dell-connections-license-manager-v1.1_User's%20Guide_en-us.pdf
System Center Monitoring Pack for WS-Management and SMASH Device Discovery:
http://www.microsoft.com/en-us/download/details.aspx?id=29266
Now for the actual walk-through. And the first rule of SCOM is if you think you have waited long enough for something to happen, double your wait time unless you know how to set the overrides to make things happen quicker.
1. Get your licenses for SCOM Out-of-Band management through your sales rep at Dell if you don't already have them.
2. Get DCLM installed. Right click and Run As Admin. This can be local on the SCOM box or a remote box. It has a very small footprint but if SCOM is heavily used, DCLM might be better on another machine. I'm not going to walk through the install of DCLM. The Install guide above does a nice job of that. Things to point out include:
- Firewall ports 8543 and 8544 have to be opened.
- Add the DCLM site to your Trusted Sites list on the SCOM server, and DCLM server if it is remote.
- DCLM wants to create 3 groups in your Active Directory Users OU. If you cannot install DCLM as a domain user that has necessary permissions to create those groups, you will have to create them manually. http://bradsjumpbag.blogspot.com/2014/06/dell-connections-license-manager-1011.html
- Add your AD account that you use for administering SCOM to the Dell Connections License Administrators group.
- Import your licenses into DCLM. For Out-of-Band monitoring, the license should read "Dell Server Management Pack Suite for System Center Operations Manager. This license is for monitoring X server via out of band."
3. Next, you need to install the Dell Server Management Pack Suite 5.2 to your SCOM 2012 server. Right click and Run As Admin. The install will ask for credentials for the Dell Device Helper COM+ Object. This account should most probably be a domain account that is also added as a local admin on the SCOM box. After the MP is installed, the Dell Feature Management Dashboard will most likely be blank. Leave it be for a while and continue with the next steps.
4. Download and install the System Center Monitoring Pack for WS-Management and SMASH Device Discovery from the link above. After running the package, you may still have to go to Administration, Management Packs, and Import it. Once that is done you should see 'WS-Management and SMASH Device Discovery" under Authoring, Management Pack Templates.
5. Setup SNMP on your iDracs. Go to each iDrac and make sure the SNMP community string is exactly the same. Capitalization matters. "Public" and "public" are two different community strings, but "Public" and "Public" are the same.
There are two places to check. iDrac Settings\Network\Services under SNMP Agent, and then Overview\Server\Alerts\SNMP and Email Settings. Under SNMP and Email Settings, you also need to enter the Alert Destination IP of your SCOM server and hit the Apply button in that same IP Destination List table.
6. Create a Community String account in SCOM using the community string you set on all iDracs. It doesn't matter, but I set this to More secure and distribute it to my SCOM management servers. Less secure works too. Then under profiles, open the SNMP Monitoring Account and on the Run As Accounts screen add the Community String account you created. Select "A selected class, group, or object, hit the Select button. In the Look for field change to SNMP Community and hit Search. Pick the SNMPCommunity_GUID that comes up and Add it. Press OK and Save.
7. After the Feature Management State populates, you will activate features you want to use. For the OOB we will be using the Server (Out-of-band) Monitoring. Click on it to highlight and then in the lower right corner click on Set to Server (OOB) either Scalable or Detailed Feature. The Detailed feature will give much more info including memory, processors, nics, storage controllers, disks and volumes, and BIOS info. Let this process complete before closing the task window and scroll to the bottom of that window to make sure it completed successfully.
8. Next, you need to configure the connection from SCOM to DCLM. On the Feature Management Dashboard, on the lower right under Tasks, look for and click on "Configure License Server". Click the Override button. Expand out the window and columns so you can see the full default value. Copy that for the License Web UI URL and License Web Service URL but enter your IP or FQDN to your DCLM server. For example: http://10.10.100.7:8544 and http://10.10.100.7:8543. Press the Override button at the bottom and then Run. Let this run and make sure it completes successfully.
You can verify that it should work by clicking the link to Launch Dell Connection License Manager in the tasks area and being able to browse and see your licenses.
After several more minutes, you should see number of licenses you have in DCLM show up under the Total Node Licenses column in the Dell Feature Management Dashboard.
Now we will use the Dell Server MP Suite 5.2 for SCOM User Guide for configuring the WS-Management Monitor. I'm just going to copy the steps and past them here with some of my own notes added.
To discover a Dell server using the Dell Server (Out-of-band) monitoring feature:
1. Log on to OpsMgr 2012 as an administrator for the OpsMgr Management group.
2. On the OpsMgr console, click Authoring.
3. At the bottom of the navigation pane, click Add Monitoring Wizard.
The Add Monitoring Wizard screen appears.
4. On the Select Monitoring Type screen, select WS-Management and SMASH Device Discovery and
click Next.
5. On the General Properties screen, in the Name field provide a name for the wizard.
6. Under Management pack, click New.
The Create a Management Pack screen appears.
7. Provide a name for the management pack in the Name field and click Next.
For information on creating a management pack, see the OpsMgr documentation at
technet.microsoft.com.
8. Click Create.
The management pack you created is selected in the Management pack drop-down box.
9. Click Next.
10. On the Specify the target drop-down menu, select a resource pool for monitoring out-of-band
devices and click Next.
11. On the Specify the account to be used to run discovery screen, click New and create a Simple
Authentication Run As Account. This Simple Authentication Run As Account will be the credentials used to access the iDrac. I have added the steps to manually create the account and associate it to the SMASH profile below.
12. Select the Run As Account you created from the Run As Account drop-down menu and click Next.
13. Click Add.
Creating A Simple Authentication Run As Account
1. Log on to OpsMgr 2012 as an administrator for the OpsMgr Management Group.
2. On the OpsMgr console, click Administration.
3. Right-click Accounts, and then click Create Run As Account.
The Create Run As Account Wizard screen is displayed.
4. Click Next.
5. From the Run As Account type drop-down menu, select Simple Authentication.
6. Provide a display name in the Display Name text box.
7. Provide a brief description in the Description text box and click Next.
8. On the Credentials screen provide the iDRAC login credentials for the systems you want to discover
using the Server (Out-Of-Band) monitoring feature.
9. Click Next.
10. Select the Less secure or More secure option as appropriate.
For more information, see the OpsMgr documentation at technet.microsoft.com/en-us/library/
hh321655.aspx.
NOTE: If the iDRAC login credentials are different for each of the systems, create a separate
Run As Account for each of them.
11. Click Create.
12. After the Run As Account has been created, click Close.
Associating Run As Account For Monitoring A Dell Server Using The Server (Out-Of-Band) Monitoring Feature
For monitoring the Dell server, the Run As account used to discover it must be associated with the Dell
server in the SMASH Device Monitoring Profile. The management pack performs the association
automatically. But in some cases, you have to manually associate the Run As account.
To manually associate the Run As account in the SMASH Device Monitoring Profile:
1. Launch OpsMgr 2012, and click Administration.
2. In the Administration pane, browse to Run As Configuration → Profiles.
3. From the list of available profiles, right-click SMASH Device Monitoring Profile and click Properties.
The Introduction screen is displayed.
4. Click Next.
The Specify the Run As profile's general properties screen is displayed.
5. Click Next.
The Run As accounts screen is displayed.
4. Download and install the System Center Monitoring Pack for WS-Management and SMASH Device Discovery from the link above. After running the package, you may still have to go to Administration, Management Packs, and Import it. Once that is done you should see 'WS-Management and SMASH Device Discovery" under Authoring, Management Pack Templates.
5. Setup SNMP on your iDracs. Go to each iDrac and make sure the SNMP community string is exactly the same. Capitalization matters. "Public" and "public" are two different community strings, but "Public" and "Public" are the same.
There are two places to check. iDrac Settings\Network\Services under SNMP Agent, and then Overview\Server\Alerts\SNMP and Email Settings. Under SNMP and Email Settings, you also need to enter the Alert Destination IP of your SCOM server and hit the Apply button in that same IP Destination List table.
6. Create a Community String account in SCOM using the community string you set on all iDracs. It doesn't matter, but I set this to More secure and distribute it to my SCOM management servers. Less secure works too. Then under profiles, open the SNMP Monitoring Account and on the Run As Accounts screen add the Community String account you created. Select "A selected class, group, or object, hit the Select button. In the Look for field change to SNMP Community and hit Search. Pick the SNMPCommunity_GUID that comes up and Add it. Press OK and Save.
7. After the Feature Management State populates, you will activate features you want to use. For the OOB we will be using the Server (Out-of-band) Monitoring. Click on it to highlight and then in the lower right corner click on Set to Server (OOB) either Scalable or Detailed Feature. The Detailed feature will give much more info including memory, processors, nics, storage controllers, disks and volumes, and BIOS info. Let this process complete before closing the task window and scroll to the bottom of that window to make sure it completed successfully.
8. Next, you need to configure the connection from SCOM to DCLM. On the Feature Management Dashboard, on the lower right under Tasks, look for and click on "Configure License Server". Click the Override button. Expand out the window and columns so you can see the full default value. Copy that for the License Web UI URL and License Web Service URL but enter your IP or FQDN to your DCLM server. For example: http://10.10.100.7:8544 and http://10.10.100.7:8543. Press the Override button at the bottom and then Run. Let this run and make sure it completes successfully.
You can verify that it should work by clicking the link to Launch Dell Connection License Manager in the tasks area and being able to browse and see your licenses.
After several more minutes, you should see number of licenses you have in DCLM show up under the Total Node Licenses column in the Dell Feature Management Dashboard.
Now we will use the Dell Server MP Suite 5.2 for SCOM User Guide for configuring the WS-Management Monitor. I'm just going to copy the steps and past them here with some of my own notes added.
To discover a Dell server using the Dell Server (Out-of-band) monitoring feature:
1. Log on to OpsMgr 2012 as an administrator for the OpsMgr Management group.
2. On the OpsMgr console, click Authoring.
3. At the bottom of the navigation pane, click Add Monitoring Wizard.
The Add Monitoring Wizard screen appears.
4. On the Select Monitoring Type screen, select WS-Management and SMASH Device Discovery and
click Next.
5. On the General Properties screen, in the Name field provide a name for the wizard.
6. Under Management pack, click New.
The Create a Management Pack screen appears.
7. Provide a name for the management pack in the Name field and click Next.
For information on creating a management pack, see the OpsMgr documentation at
technet.microsoft.com.
8. Click Create.
The management pack you created is selected in the Management pack drop-down box.
9. Click Next.
10. On the Specify the target drop-down menu, select a resource pool for monitoring out-of-band
devices and click Next.
11. On the Specify the account to be used to run discovery screen, click New and create a Simple
Authentication Run As Account. This Simple Authentication Run As Account will be the credentials used to access the iDrac. I have added the steps to manually create the account and associate it to the SMASH profile below.
12. Select the Run As Account you created from the Run As Account drop-down menu and click Next.
13. Click Add.
14. On the Add Devices screen specify the iDRAC IP address of the systems you want to monitor using
the Server (out-of-band) monitoring feature. You can specify the iDRAC IP address of the systems by:
• Scanning the IP Subnet that you provided.
• Scanning a specified IP Range.
• Importing a text file containing the list of iDRAC IP addresses.
15. Click Advanced Options, select the Skip CA Check and Skip CN Check option and click OK.
16. Click Scan for Devices to search for Dell PowerEdge 12G systems on your network.
The IP addresses are listed under Available Devices.
17. Click Add to add the list of IP addresses you want to monitor and click OK.
18. On the Specify the devices you want to monitor screen, click Create.
19. Click Close.
The scanned Dell servers initially appear in Monitoring → WS-Management and SMASH Monitoring
→ WS-Management Device State screen. After the automatically triggered SMASH discovery is
completed by the OpsMgr, the Dell servers appear in Monitoring → WS-Management and SMASH
Monitoring → SMASH Device State screen.
This is the end unless you need to manually configure the Simple Authentication account and/or associate it with the SMASH profile.
1. Log on to OpsMgr 2012 as an administrator for the OpsMgr Management Group.
2. On the OpsMgr console, click Administration.
3. Right-click Accounts, and then click Create Run As Account.
The Create Run As Account Wizard screen is displayed.
4. Click Next.
5. From the Run As Account type drop-down menu, select Simple Authentication.
6. Provide a display name in the Display Name text box.
7. Provide a brief description in the Description text box and click Next.
8. On the Credentials screen provide the iDRAC login credentials for the systems you want to discover
using the Server (Out-Of-Band) monitoring feature.
9. Click Next.
10. Select the Less secure or More secure option as appropriate.
For more information, see the OpsMgr documentation at technet.microsoft.com/en-us/library/
hh321655.aspx.
NOTE: If the iDRAC login credentials are different for each of the systems, create a separate
Run As Account for each of them.
11. Click Create.
12. After the Run As Account has been created, click Close.
Associating Run As Account For Monitoring A Dell Server Using The Server (Out-Of-Band) Monitoring Feature
For monitoring the Dell server, the Run As account used to discover it must be associated with the Dell
server in the SMASH Device Monitoring Profile. The management pack performs the association
automatically. But in some cases, you have to manually associate the Run As account.
To manually associate the Run As account in the SMASH Device Monitoring Profile:
1. Launch OpsMgr 2012, and click Administration.
2. In the Administration pane, browse to Run As Configuration → Profiles.
3. From the list of available profiles, right-click SMASH Device Monitoring Profile and click Properties.
The Introduction screen is displayed.
4. Click Next.
The Specify the Run As profile's general properties screen is displayed.
5. Click Next.
The Run As accounts screen is displayed.
6. Click Add.
The Add a Run As account screen is displayed.
7. Select the run as account used to discover the Dell server from the Run As account drop-down list.
NOTE: If you are using multiple Run As accounts to discover devices, associate each device
with its associated Run As account.
8. Click A selected class, group, or object and add the association for the server in the SMASH
Monitoring Profile.
• Click Select → Class option, use Dell server as the selection.
• Click Select → Group option, use the group containing the Dell server objects as the selection.
• Click Select → Object option, use the individual Dell server object as the selection.
9. Click OK.
10. Click Save and Close.
NOTE: If the Run As Account association is not done, the alert Dell OM: Server and its component
health computation failed is displayed under Monitoring → Alerts View → Server Alerts on the
console.
Subscribe to:
Posts (Atom)