Dell Server Deployment Pack 3.0 with Dell Toolkit 5.1 will have problems running the set RAIDcfg command. We found that there was a security permissions change starting in DTK 5.1 for sure; and possibly as far back as DTK 4.4 because I had the same error there as well.
The permissions change created a situation where the envout.txt file could not be created by the script in the downloaded package folder. The default location is "X:\Windows\Temp\SMSTSLog\PackageID\Tools\AMD64".
You would see an error in the SMSTS.log saying "File is not writable!" in the "Output from command execution" block immediately after the "Starting execution of ArrayBuilder script" block. Then in the "StdOut output from the command:" block you will see "EXITCODE=204", which means the same thing "File is not writable". Then just a little further down you will see something like this:
##########################################
##########################################
###
### CRITICAL ERROR
###
##########################################
##########################################
ERROR CODE: 1
DESCRIPTION: Could not find the raid output file you specified (envout.txt). Please check the path.
SEVERITY: 3
##########################################
##########################################
###
### CRITICAL ERROR
###
##########################################
##########################################
As a work-around, you could create a new script to make an empty envout.txt in the AMD64 folder. Attach that script to your task sequence to run before the Set RAID step.
The resolution to this will be in a new version of DTK that will hopefully be out in the next week or two (from June 5, 2015).
And please remember that anytime you update DTK in ConfigMgr, you will need to re-distribute the Application Management\Packages\Dell PowerEdge Deployment\PowerEdge Deployment Toolkit Integration package in ConfigMgr.
Friday, June 5, 2015
Wednesday, May 27, 2015
Annoying Dell FMP: Feature Management Usage Information Alerts
If you have the Dell OpsMgr Management Pack 6.0 imported and OpsMgr is integrated with System Center Virtual Machine Manager, you may see some annoying "Dell FMP: Feature Management Usage Information" alerts every 6 hours.
Open the alerts and on the Alert Context tab you will see information related to the "StorageObjectsDiscovery.DS.ps1".
Most cases that I have seen involve 4 alerts. The first one in the Alert Context Data says "Storage Discovery: started." The second alert says "Storage Discovery: Got VMMServer. Module imported." Third alert says "Missing Value in Property Id: {78FCB9D8-AFF4-785C-CAC3-1C9B8BAAA561}." And the fourth and last alert says "Storage Discovery: Complete!".
These then repeat every 6 hours.

You can either ignore these and delete them as often as you want. Or you can set an override by right-clicking on the alert and select Overrides -> Override the Rule -> For all objects of class: Health Service. Check the Enabled parameter and change the override value to False. Save to a new management pack. That will stop you from seeing the alerts for now.
When the new version of the MP Suite comes out, these annoying alerts are supposed to be removed.
Tuesday, May 26, 2015
Fix for Dell Server Deployment Pack Driver Package where it is required to distribute to DP share multiple times.
If you have the issue I talked about in these two previous posts, listed below, where you import Dell Server Driver Packages and then you have to run Distribute Content and then a second Update Distribution Points to get the driver package to fully distribute, there is a fix now.
http://bradsjumpbag.blogspot.com/2015/05/sccm-driver-package-contents-do-not.html
http://bradsjumpbag.blogspot.com/2015/04/how-to-import-server-driver-packages.html
After updating to ConfigMgr 2012 R2 SP1, I found that the above issue was resolved if you manually import driver packages when I was importing packages from other vendors, but not if you use the Dell Server Deployment Pack v3.0. With some research into the issue I found that the "RefreshDPs value" was set to "false" in DSDPv3.0. In the new SP1 for ConfigMgr 2012 R2, that box was removed in the Driver Import Wizard and checked by default.
The initial fix was just to check that box for the DSDP wizard. This then caused another issue which caused the driver import to refresh the DPs after every driver. That made the import take a very long time. From a normal import time of a couple minutes to nearly an hour. So we made another change and now it all works correctly. Driver Package import time is back to normal, driver package is created on the DPs the beginning of the import process and then refreshed once at the very end of the import. So you will see a driver package version of 2 in the Distmgr.log at the end of the import.
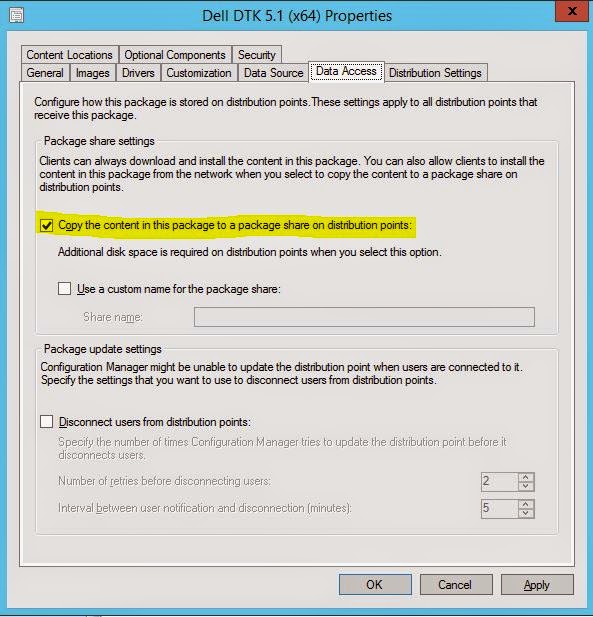
Then you can check the box in the properties of the driver package to "Copy the content in this package to a package share on distribution points". Then you can right click and Distribute Content one time and your package will show up fully on your DP in the SMSPKGDrive$ folder.
This fix will not help with Driver Packages that have already been imported because they were imported with the RefreshDPs box unchecked. Those already imported driver packages will still have to be distributed to the DP share twice. But any new driver package that is imported after installing the new DLLs will be able to be distributed once.
Since this is not a major issue and can be worked around, this patch will be included in the next version of DSDP. If you need it before the next version is available, please call Dell and open a case. Tell them you need the Configuration Manger DSDP Driver Package Import fix. Your call should be transferred by the call director to the high complexity team, who you can then tell to contact me, Brad Goodman, directly for the patch.
http://bradsjumpbag.blogspot.com/2015/05/sccm-driver-package-contents-do-not.html
http://bradsjumpbag.blogspot.com/2015/04/how-to-import-server-driver-packages.html
After updating to ConfigMgr 2012 R2 SP1, I found that the above issue was resolved if you manually import driver packages when I was importing packages from other vendors, but not if you use the Dell Server Deployment Pack v3.0. With some research into the issue I found that the "RefreshDPs value" was set to "false" in DSDPv3.0. In the new SP1 for ConfigMgr 2012 R2, that box was removed in the Driver Import Wizard and checked by default.
The initial fix was just to check that box for the DSDP wizard. This then caused another issue which caused the driver import to refresh the DPs after every driver. That made the import take a very long time. From a normal import time of a couple minutes to nearly an hour. So we made another change and now it all works correctly. Driver Package import time is back to normal, driver package is created on the DPs the beginning of the import process and then refreshed once at the very end of the import. So you will see a driver package version of 2 in the Distmgr.log at the end of the import.
Then you can check the box in the properties of the driver package to "Copy the content in this package to a package share on distribution points". Then you can right click and Distribute Content one time and your package will show up fully on your DP in the SMSPKGDrive$ folder.
This fix will not help with Driver Packages that have already been imported because they were imported with the RefreshDPs box unchecked. Those already imported driver packages will still have to be distributed to the DP share twice. But any new driver package that is imported after installing the new DLLs will be able to be distributed once.
Since this is not a major issue and can be worked around, this patch will be included in the next version of DSDP. If you need it before the next version is available, please call Dell and open a case. Tell them you need the Configuration Manger DSDP Driver Package Import fix. Your call should be transferred by the call director to the high complexity team, who you can then tell to contact me, Brad Goodman, directly for the patch.
Thursday, May 14, 2015
How to update ConfigMgr 2012 R2 to SP1
***Edit: So it turns out that I really didn't need the SC2012_R2_SP1_Configmgr.exe package because that is only needed if you are upgrading from 2012 SP1, not if you are already at R2. Just ignore those parts below. Everything else looks like it worked correctly.
If you are currently at ConfigMgr 2012 R2, all you need is the SC2012_SP2_Configmgr_SCEP.exe file to update. If you are at ConfigMgr 2012 SP1, you will first run the SC2012_SP2_Configmgr_SCEP.exe file and then run the SC2012_R2_SP1_Configmgr.exe file to enable the R2 features.***
How I updated my ConfigMgr 2012 R2 lab to SP1:
Here are some helpful links on Planning for the update and what's new.
https://technet.microsoft.com/en-us/library/464a3ce6-3bbf-45d8-aeaa-0040f64214c5#BKMK_UpgradeVersions
https://technet.microsoft.com/library/mt131422.aspx
System Center Configuration Manager 2012 R2 Service Pack 1 comes with Configuration Manager 2012 Service Pack 2.
SC2012_R2_SP1_Configmgr.exe
SC2012_SP2_Configmgr_SCEP.exe
When you extract these to their default locations, which is a folder on the C: drive with the same name as the file, you will need at least 1.2GBs free just for the files.
If you try to run the C:\SC2012_R2_SP1_Configmgr\SMSSETUP\X64\Configmgr2012R2SP1.msi, you get an error saying "You must have local Administrator permissions to install this software."
It seems a little odd, but to install R2 SP1, you have to run the installer for non-R2 SP2, which is the second file that you downloaded. Open C:\SC2012_SP2_Configmgr_SCEP\SMSSETUP\BIN\X64 and run Setup.exe. The setup will create multiple logfiles in the root of the C: drive. The main log will be C:\ConfigMgrSetup.lo_ and ConfigMgrSetup.log. At the bottom of the installer will be a button for View Log. If you have CMTrace installed on your server, (why would you not have it?) you can watch the log as everything happens.
At the beginning of the installer it asks to download the latest update files or use an existing set. I tried to point it to the SP1 folder as an existing set, but it didn't like that. So I used the option to download files to a new location and picked a new, empty folder.
Two of the first couple of lines tell me that the installer was at least looking toward the SP1 folder. And no, there was no manifest file there but there is one in the new folder where I had the latest updates go to. So I wonder if I was supposed to tell the installer to download the latest files to the SP1 folder. Too late now because an uninstall of SP1 is not supported. I will have to try that in another environment.
INFO: Downloading files to C:\SC2012_R2_SP1_Configmgr
ERROR: Manifest file C:\SC2012_R2_SP1_Configmgr\ConfigMgr.Manifest.cab not found. Verification failed.
My test lab is small with a database about 5.0GB. The database update part took the longest by far, about 40 minutes. The total update took about 58 minutes and was very easy and smooth. Once it was all done I quickly scanned through the logfile to see if there were any errors to be concerned with. I didn't see anything too concerning but I did see the following warning that you should know about.
WARN: Setup does not upgrade customized boot image package. Please update it manually.
Configuration Manager Client Package gets automatically updated.
Open the Configuration Manger console and in the About you can see the new Console and Site version numbers, which matches the Full Version and Full UI Version in the registry at HKLM\Software\Microsoft\SMS. 5.0.8239.1000


The new Client installer version in the \\ConfigMgrSrv\SMS_Site\Client folder says version 5.0.8239.1001.

But the Client on the endpoint machines show the same as the new server version, 5.0.8239.1000.

So it looks like my update was successful. Happy installing!
Tuesday, May 12, 2015
SCCM Driver Package contents do not distribute to DP Share
An update to part of two other posts I made.
***EDIT 5/12/2015: ConfigMgr 2012 SP2/R2 SP1 does resolve this issue, but, at the moment, only if you import drivers with the builtin driver import wizard.***
***EDIT 5/26/2015: We now have a fix for the issue with Dell Server Deployment pack v3.0. Please see this new post, http://bradsjumpbag.blogspot.com/2015/05/fix-for-dell-server-deployment-pack.html***
Back in How to Import Driver Packages with DSDP 3.0 into SCCM 2012 R2, I had mentioned near the bottom that Driver Packages may have to be distributed to the DP share twice. First time when you run the Distribute Content operation the content may not fully distribute. Or, the packageID folder may not even be created and the distmgr.log shows an error "SetObjectSecurity failed; 0x80070002".
This is not Dell specific. I downloaded and tested a couple of driver sets from other vendors also and they did the same thing. I downloaded their packages, imported them into their own Driver Packages using the builtin SCCM import wizard, not other vendor tools. Then when I hit Distribute Content I saw the same issues.
SCCM 2012 R2 Service Pack 1 is set to be released this week, most likely on Thursday, 5/14/2015. And there was a slide from Microsoft Ignite that mentioned 24 fixed bugs and design change requests in Driver Management alone. One of them was "Content won't get to DP if imported drivers are added to a new package and the checkbox "Update DPs when finished" is unchecked." Hopefully that is the same bug and the fix for it will be available this week.
Thursday, April 30, 2015
Dell SMTD 8.1 Released
The new Dell Systems Management Tool and Documentation ISO version 8.1 has been released. In relation to Configuration Manager 2012 and the Dell Server Deployment Pack, the new SMTD 8.1 can be used to import drivers for all 12G and 13G servers only.
There are no 11G or older server driver packages in this release. For 9G-11G, you must use the SMTD v7.4.
http://www.dell.com/support/home/us/en/04/Drivers/DriversDetails?driverId=XT65T
There are no 11G or older server driver packages in this release. For 9G-11G, you must use the SMTD v7.4.
http://www.dell.com/support/home/us/en/04/Drivers/DriversDetails?driverId=XT65T
Wednesday, April 15, 2015
How to import server driver packages with Dell Server Deployment Pack 3.0 into ConfigMgr 2012 R2
The Dell Server Deployment Pack (DSDP) is a Microsoft System Center ConfigMgr plugin that helps create boot media with Dell server drivers injected and lets you select server models and Operating Systems that you want to import driver packs for. The driver packages can then be used for various things including being attached to Task Sequences for Bare Metal Deployment.
Install the Dell Server Deployment Pack 3.0 using the Install Guide that comes in the download package. http://en.community.dell.com/techcenter/systems-management/w/wiki/4125.dell-server-deployment-pack-dsdp-for-configuration-manager
The install log is located at C:\Program Files (x86)\Microsoft Configuration Manager\AdminConsole\XmlStorage\Extensions\bin\Deployment\Dell\PowerEdge\Setup. There you can find the DSDPInstaller.log and DSDPInstallDebug.log.
You will also need the Dell Toolkit. There are several versions available. Read the Fixes and Enhancements, Compatible Systems, and Supported Operating Systems to find the version you need. As long as you are using a server that is 10G - 13G and the OS is 2008 R2 - Server 2012 R2, I suggest you use DTK 5.1. I say that having not fully tested 5.1 yet, but based on that 5.1 should support the newer 13G servers with Server 2012 R2.
DTK 4.4.1 - http://www.dell.com/support/home/us/en/19/Drivers/DriversDetails?driverId=2XKRY
DTK 5.0.2 - http://www.dell.com/support/home/us/en/19/Drivers/DriversDetails?driverId=3HYJG
DTK 5.1 - http://www.dell.com/support/home/us/en/19/Drivers/DriversDetails?driverid=67M0X
And you will need to make sure you have the latest version of the Windows Automated Deployment Kit (ADK), which is 8.100.26629 from 9/15/2014. Here is the link: http://www.microsoft.com/en-us/download/details.aspx?id=39982
To install the DTK, right click on the Packages container and follow through to Launch Deployment Toolkit Configuration Wizard.


Which version of the DSDP you download will determine which servers and operating systems you can get driver packages for. Be sure to read the Fixes and Enhancements, Compatible Systems, and Supported Operating Systems sections on each one to find what you need. Here are some links to the latest several versions.
SMTD 7.4 - Looks to support most 9G-12G servers. http://www.dell.com/support/home/us/en/19/Drivers/DriversDetails?driverid=PYKGK
SMTD 8.0.1 - Some 13G servers and other new hardware.
http://www.dell.com/support/home/us/en/04/Drivers/DriversDetails?driverId=MKGTT&id=102
SMTD 8.0.2 - More 13G servers and hardware.
http://www.dell.com/support/home/us/en/04/Drivers/DriversDetails?driverId=J5MT0&id=102
*Edit
SMTD 8.1 was released shortly after this was published. It supports all 12G-13G Dell servers.
http://www.dell.com/support/home/us/en/04/Drivers/DriversDetails?driverId=XT65T
Edit*
Please keep in mind that the SMTD may not have the most recent versions if newer versions have come out since the last SMTD release date. Download one or more of the ISOs above to fit your needs. Do not extract the ISO.


-----------------
EDIT 5/18/2015: ConfigMgr 2012 SP2/R2 SP1 does resolve the issue below, but only if importing drivers using the builtin driver import wizard.
EDIT 5/26/2015: We now have a fix for the issue with Dell Server Deployment pack v3.0. Please see this new post, http://bradsjumpbag.blogspot.com/2015/05/fix-for-dell-server-deployment-pack.html
-----------------


Install the Dell Server Deployment Pack 3.0 using the Install Guide that comes in the download package. http://en.community.dell.com/techcenter/systems-management/w/wiki/4125.dell-server-deployment-pack-dsdp-for-configuration-manager
The install log is located at C:\Program Files (x86)\Microsoft Configuration Manager\AdminConsole\XmlStorage\Extensions\bin\Deployment\Dell\PowerEdge\Setup. There you can find the DSDPInstaller.log and DSDPInstallDebug.log.
You will also need the Dell Toolkit. There are several versions available. Read the Fixes and Enhancements, Compatible Systems, and Supported Operating Systems to find the version you need. As long as you are using a server that is 10G - 13G and the OS is 2008 R2 - Server 2012 R2, I suggest you use DTK 5.1. I say that having not fully tested 5.1 yet, but based on that 5.1 should support the newer 13G servers with Server 2012 R2.
DTK 4.4.1 - http://www.dell.com/support/home/us/en/19/Drivers/DriversDetails?driverId=2XKRY
DTK 5.0.2 - http://www.dell.com/support/home/us/en/19/Drivers/DriversDetails?driverId=3HYJG
DTK 5.1 - http://www.dell.com/support/home/us/en/19/Drivers/DriversDetails?driverid=67M0X
And you will need to make sure you have the latest version of the Windows Automated Deployment Kit (ADK), which is 8.100.26629 from 9/15/2014. Here is the link: http://www.microsoft.com/en-us/download/details.aspx?id=39982
To install the DTK, right click on the Packages container and follow through to Launch Deployment Toolkit Configuration Wizard.
On the first screen of the DTK wizard you will point to the EXE of the downloaded DTK. In this picture I had the previous version (4.4) imported showing on the left and then on the right it shows what will be imported with the new 5.1 version.
Next screen lets you build a new boot image by combining the Dell drivers in the DTK with your choice of the boot image in the ADK, an existing image in ConfigMgr, or a custom image at another location.
The screen after this one lets you name and version the boot image. This will take a couple minutes to build the boot image, which can then be seen in the Boot Images container in ConfigMgr. Log files for this process are located at C:\Program Files (x86)\Microsoft Configuration Manager\AdminConsole\XmlStorage\Extensions\bin\Deployment\Dell\PowerEdge. Logs are called DellConfigWizard.log and Dell ConfigWizardDebug.log.
Next, it is time to import server and OS specific drivers.
You should be using the OpenManage System Management Tools and Documentation DVD or ISO. This is sometimes just referred to as the SMTD. Do not use the SUU or SBUU or any other downloads because they do not have the appropriate folder structure to work with the DSDP at this time.
Which version of the DSDP you download will determine which servers and operating systems you can get driver packages for. Be sure to read the Fixes and Enhancements, Compatible Systems, and Supported Operating Systems sections on each one to find what you need. Here are some links to the latest several versions.
SMTD 7.4 - Looks to support most 9G-12G servers. http://www.dell.com/support/home/us/en/19/Drivers/DriversDetails?driverid=PYKGK
SMTD 8.0.1 - Some 13G servers and other new hardware.
http://www.dell.com/support/home/us/en/04/Drivers/DriversDetails?driverId=MKGTT&id=102
SMTD 8.0.2 - More 13G servers and hardware.
http://www.dell.com/support/home/us/en/04/Drivers/DriversDetails?driverId=J5MT0&id=102
*Edit
SMTD 8.1 was released shortly after this was published. It supports all 12G-13G Dell servers.
http://www.dell.com/support/home/us/en/04/Drivers/DriversDetails?driverId=XT65T
Edit*
Please keep in mind that the SMTD may not have the most recent versions if newer versions have come out since the last SMTD release date. Download one or more of the ISOs above to fit your needs. Do not extract the ISO.
On the first page of the wizard you can either use the top option to point to the drive the ISO is mounted as, or you can use the bottom option to point directly to the ISO. I find the bottom option easier because you don't have to mount the ISO.
*****Do not try to use one ISO, press next to see what it has, and then click on Previous to change to a different ISO. It may not refresh and when you go forward again you will see the same servers from the previous ISO. If you need to change to a different ISO, hit Cancel to close the wizard, then open the wizard again, and select a different ISO to use.
Next, select the servers and OSes you want to import driver packs for and click on Finish. This could take a little while depending on how many you mark to import.
When it finishes you will see a completion screen that tells what it imported and what may have been skipped. There are logs for this as well. Located at C:\Program Files (x86)\Microsoft Configuration Manager\AdminConsole\XmlStorage\Extensions\bin\Deployment\Dell\PowerEdge. Logs are called DellDriverImport.log and DellDriverImportDebug.log
Now you should have driver packages for each server and OS that you selected. These will be broken up into the Dell PowerEdge Driver Packages OMversion containers under Driver Packages.
Before you can use the rest of the DSDP utilities, such as the Task Sequence Bare Metal Deployment Wizard, or be able to deploy the drivers in a Task Sequence or alone, there are a couple more things you need to do.
1. Boot Image. Go to the Boot Images, right click on your new boot image and select Properties. On the Customization tab, make sure Enable Command Support is checked. On the Data Source tab, mark Deploy this boot image from the PXE-enabled distribution point. On the Data Access tab, mark Copy the content in this package to a package share on distribution points. Then click OK.
You will also have to distribute the Boot Image to the DP(s). Do this by right-clicking on the new Boot Image and select Distribute Content.
Click Next, Add, Distribution Points (or group if you have one).
Mark your DP(s), next, next, and close.
After a couple minutes you can refresh to see if the Content Status at the bottom has turned green. Once it has you can right click on your Task Sequences, go to Properties, and add that boot image as the one to use to start that Task Sequence.
2. Dell PowerEdge Deployment Packages. With DSDP 3.0, there are 3 packages to distribute. PowerEdge Deployment Toolkit Integration, PowerEdge Custom Reboot Script, and PowerEdge Startup Network Setting. Each one should be set to "Copy the content in this package to a package share on distribution points". This is on the Data Access tab of the properties of each one just like in the screen shots above. Make sure you check this box for each of the 3 Dell PowerEdge Deployment Packages. Then right-click on each one and Distribute Content to the DP, just like you did with the boot image above. Then you can fresh and make sure each one shows Success under Content Status.
3. Driver Packages. Each one should be marked to "Copy the content in this package to a package share on the distribution point" just as you did above on the Data Access tab for the boot image and the Dell PowerEdge Deployment packages. Then you have to distribute to your DP(s). This is exactly the same as the last couple of steps in the Boot Image and Dell PowerEdge Deployment packages above.
-----------------
EDIT 5/18/2015: ConfigMgr 2012 SP2/R2 SP1 does resolve the issue below, but only if importing drivers using the builtin driver import wizard.
EDIT 5/26/2015: We now have a fix for the issue with Dell Server Deployment pack v3.0. Please see this new post, http://bradsjumpbag.blogspot.com/2015/05/fix-for-dell-server-deployment-pack.html
-----------------
*****Caveat***** When you distribute the driver packages, I have seen where the driver package contents does not fully distribute the first time. You can check this by looking at the PackageID and then going to the PackageID folder in the DP Share, which will be a SMSPKGdrive
This screenshot shows the Data Source tab which gives you the source folder location. You can also see that folder open where there is a total of 30 GUID folders.
This screenshot shows the DP share after the first Distribute Content and you can see that the Content Status shows Success but only 1 GUID folder is shown.
For the time being, the work-around for this is to distribute the content again by selecting Update Distribution Points.
After you Update Distribution Points, you can look back at the DP share folder and you should see the same number of GUID folders as was in the source folder above (30).
That is it. Now you can start to use these packages in your Task Sequences, or however else you want to use them.
Subscribe to:
Posts (Atom)