The current version (as of 5/11/2016) of the Dell Server Deployment Pack (DSDP) is 3.0 will install into ConfigMgr 1511 and 1602, and might let you import and create driver packages. But, as of right now (5/11/2016), we still cannot import the Dell ToolKit (DTK) to allow the rest of the Dell scripts to work and to create boot images. The current version of DTK is 5.3.
This is because ConfigMgr 1511+ requires ADK 10; and DTK is not yet compatible with ADK10.
From what I have been told, around the release time of Windows 2016 we should have OpenManage 8.4, which will include DTK 5.4 which will support ADK 10.
Showing posts with label dsdp. Show all posts
Showing posts with label dsdp. Show all posts
Wednesday, May 11, 2016

Monday, June 15, 2015
Dell ToolKit 5.1 with DSDP Set RAID envout issue
If you are using the Dell Server Deployment Pack with the Dell ToolKit (DTK) 5.1, you may see an error when trying to use the Set RAID function in an OSD task sequence.
Look in the SMSTS.log and find the section where raidcfg.exe is being called. Near the end you may see errors saying "File is not writeable!" or "Could not find the raid output file you specified (envout.txt). Please check the path."
This turned out to be a permissions problem in DTK 5.1.0.1518 and possibly back in DTK 4.4 also. This issue has been resolved and a new version of DTK 5.1.0.1658 A01 was released today (6/15/2015). http://www.dell.com/support/home/us/en/04/Drivers/DriversDetails?driverId=2JC3P
1. Download the latest version of DTK at the link above. Then in ConfigMgr, go to Software Library\Application Management\Packages and right click on Dell PowerEdge Deployment. Select Dell PowerEdge Server Deployment -> Launch Deployment Toolkit Configuration Wizard.

When the wizard opens, point the zip location to the DTK zip you just downloaded. If you already had the previous version of DTK 5.1 installed, the bottom part of the wizard will look the same on both sides. They will both show Version 5.1. Don't worry, it will update.
On the next screen you can select your previous boot image that you were using or let it create a new one from the Windows ADK. Let this run to completion and you will have a new boot image with all the necessary drivers to boot the last couple of generations of Dell servers.
2. Next, you will need to update the 3 PowerEdge packages. PowerEdge Custom Reboot Script, Deployment Toolkit Integration, and Startup Network Setting. If you had already distributed them to your distribution point, just right click on them and select Update Distribution Points and then make sure the Content Status at the bottom turns green and has the current date and time. This may take a couple minutes depending on your environment.

3. Once all 3 of those are updated, do one last check. Look at the PackageID of the PowerEdge Deployment Toolkit Integration package. Go to the path of where your distribution share packages are (Drive:\SMSPKGDrive$\) and find the folder with that PackageID and open it. Find the Version.txt file and open that. It should tell you Build 1658 which confirms that you have updated DTK and distributed it successfully.

4. And the last thing that needs to be done is to make sure your new boot image is the one that your task sequence uses and the target machine boots to. I have instructions on how to do all of that in the following post. Look down where it says "1. Boot Image". http://bradsjumpbag.blogspot.com/2015/04/how-to-import-server-driver-packages.html
Now you should be able to run your OSD task sequence and have the Set RAID step work correctly.
Look in the SMSTS.log and find the section where raidcfg.exe is being called. Near the end you may see errors saying "File is not writeable!" or "Could not find the raid output file you specified (envout.txt). Please check the path."
This turned out to be a permissions problem in DTK 5.1.0.1518 and possibly back in DTK 4.4 also. This issue has been resolved and a new version of DTK 5.1.0.1658 A01 was released today (6/15/2015). http://www.dell.com/support/home/us/en/04/Drivers/DriversDetails?driverId=2JC3P
1. Download the latest version of DTK at the link above. Then in ConfigMgr, go to Software Library\Application Management\Packages and right click on Dell PowerEdge Deployment. Select Dell PowerEdge Server Deployment -> Launch Deployment Toolkit Configuration Wizard.

When the wizard opens, point the zip location to the DTK zip you just downloaded. If you already had the previous version of DTK 5.1 installed, the bottom part of the wizard will look the same on both sides. They will both show Version 5.1. Don't worry, it will update.
On the next screen you can select your previous boot image that you were using or let it create a new one from the Windows ADK. Let this run to completion and you will have a new boot image with all the necessary drivers to boot the last couple of generations of Dell servers.
2. Next, you will need to update the 3 PowerEdge packages. PowerEdge Custom Reboot Script, Deployment Toolkit Integration, and Startup Network Setting. If you had already distributed them to your distribution point, just right click on them and select Update Distribution Points and then make sure the Content Status at the bottom turns green and has the current date and time. This may take a couple minutes depending on your environment.

3. Once all 3 of those are updated, do one last check. Look at the PackageID of the PowerEdge Deployment Toolkit Integration package. Go to the path of where your distribution share packages are (Drive:\SMSPKGDrive$\) and find the folder with that PackageID and open it. Find the Version.txt file and open that. It should tell you Build 1658 which confirms that you have updated DTK and distributed it successfully.

4. And the last thing that needs to be done is to make sure your new boot image is the one that your task sequence uses and the target machine boots to. I have instructions on how to do all of that in the following post. Look down where it says "1. Boot Image". http://bradsjumpbag.blogspot.com/2015/04/how-to-import-server-driver-packages.html
Now you should be able to run your OSD task sequence and have the Set RAID step work correctly.
Dell DSDPv3.0 with ConfigMgr 2012 R2 SP1
I have confirmed through testing that the Dell Server Deployment Pack v3.0 does work with ConfigMgr 2012 R2 SP1. No need for a new version just to work with SP1.
I tested the Set Boot Order, Set BIOS config, Set iDrac config, and Set RAID config, and Driver import from SMTD and they all work.
A couple of things to keep in mind:
1. If you are trying to deploy Server 2012 R2, you will need your ConfigMgr host to be running Server 2012 R2, or may have to copy the boot image to a Server 2012 R2 machine to manually inject drivers. This is due to a downlevel DISM issue described here: https://support.microsoft.com/en-us/kb/2853726
2. If you are trying to deploy Windows 8.1, Server 2012 or Server 2012 R2, I suggest you update your version of DTK (Dell ToolKit) to the latest version which was just released today (6/15/2015). The latest version is 5.1.0.1658 A01 at this link http://www.dell.com/support/home/us/en/04/Drivers/DriversDetails?driverId=2JC3P. This is because of a permissions issue in the previous version of DTK that we just resolved. I explain that in another post.
I tested the Set Boot Order, Set BIOS config, Set iDrac config, and Set RAID config, and Driver import from SMTD and they all work.
A couple of things to keep in mind:
1. If you are trying to deploy Server 2012 R2, you will need your ConfigMgr host to be running Server 2012 R2, or may have to copy the boot image to a Server 2012 R2 machine to manually inject drivers. This is due to a downlevel DISM issue described here: https://support.microsoft.com/en-us/kb/2853726
2. If you are trying to deploy Windows 8.1, Server 2012 or Server 2012 R2, I suggest you update your version of DTK (Dell ToolKit) to the latest version which was just released today (6/15/2015). The latest version is 5.1.0.1658 A01 at this link http://www.dell.com/support/home/us/en/04/Drivers/DriversDetails?driverId=2JC3P. This is because of a permissions issue in the previous version of DTK that we just resolved. I explain that in another post.
Friday, June 5, 2015
Set RAID Config not working with Dell Server Deployment Pack
Dell Server Deployment Pack 3.0 with Dell Toolkit 5.1 will have problems running the set RAIDcfg command. We found that there was a security permissions change starting in DTK 5.1 for sure; and possibly as far back as DTK 4.4 because I had the same error there as well.
The permissions change created a situation where the envout.txt file could not be created by the script in the downloaded package folder. The default location is "X:\Windows\Temp\SMSTSLog\PackageID\Tools\AMD64".
You would see an error in the SMSTS.log saying "File is not writable!" in the "Output from command execution" block immediately after the "Starting execution of ArrayBuilder script" block. Then in the "StdOut output from the command:" block you will see "EXITCODE=204", which means the same thing "File is not writable". Then just a little further down you will see something like this:
##########################################
##########################################
###
### CRITICAL ERROR
###
##########################################
##########################################
ERROR CODE: 1
DESCRIPTION: Could not find the raid output file you specified (envout.txt). Please check the path.
SEVERITY: 3
##########################################
##########################################
###
### CRITICAL ERROR
###
##########################################
##########################################
As a work-around, you could create a new script to make an empty envout.txt in the AMD64 folder. Attach that script to your task sequence to run before the Set RAID step.
The resolution to this will be in a new version of DTK that will hopefully be out in the next week or two (from June 5, 2015).
And please remember that anytime you update DTK in ConfigMgr, you will need to re-distribute the Application Management\Packages\Dell PowerEdge Deployment\PowerEdge Deployment Toolkit Integration package in ConfigMgr.
The permissions change created a situation where the envout.txt file could not be created by the script in the downloaded package folder. The default location is "X:\Windows\Temp\SMSTSLog\PackageID\Tools\AMD64".
You would see an error in the SMSTS.log saying "File is not writable!" in the "Output from command execution" block immediately after the "Starting execution of ArrayBuilder script" block. Then in the "StdOut output from the command:" block you will see "EXITCODE=204", which means the same thing "File is not writable". Then just a little further down you will see something like this:
##########################################
##########################################
###
### CRITICAL ERROR
###
##########################################
##########################################
ERROR CODE: 1
DESCRIPTION: Could not find the raid output file you specified (envout.txt). Please check the path.
SEVERITY: 3
##########################################
##########################################
###
### CRITICAL ERROR
###
##########################################
##########################################
As a work-around, you could create a new script to make an empty envout.txt in the AMD64 folder. Attach that script to your task sequence to run before the Set RAID step.
The resolution to this will be in a new version of DTK that will hopefully be out in the next week or two (from June 5, 2015).
And please remember that anytime you update DTK in ConfigMgr, you will need to re-distribute the Application Management\Packages\Dell PowerEdge Deployment\PowerEdge Deployment Toolkit Integration package in ConfigMgr.
Tuesday, May 26, 2015
Fix for Dell Server Deployment Pack Driver Package where it is required to distribute to DP share multiple times.
If you have the issue I talked about in these two previous posts, listed below, where you import Dell Server Driver Packages and then you have to run Distribute Content and then a second Update Distribution Points to get the driver package to fully distribute, there is a fix now.
http://bradsjumpbag.blogspot.com/2015/05/sccm-driver-package-contents-do-not.html
http://bradsjumpbag.blogspot.com/2015/04/how-to-import-server-driver-packages.html
After updating to ConfigMgr 2012 R2 SP1, I found that the above issue was resolved if you manually import driver packages when I was importing packages from other vendors, but not if you use the Dell Server Deployment Pack v3.0. With some research into the issue I found that the "RefreshDPs value" was set to "false" in DSDPv3.0. In the new SP1 for ConfigMgr 2012 R2, that box was removed in the Driver Import Wizard and checked by default.
The initial fix was just to check that box for the DSDP wizard. This then caused another issue which caused the driver import to refresh the DPs after every driver. That made the import take a very long time. From a normal import time of a couple minutes to nearly an hour. So we made another change and now it all works correctly. Driver Package import time is back to normal, driver package is created on the DPs the beginning of the import process and then refreshed once at the very end of the import. So you will see a driver package version of 2 in the Distmgr.log at the end of the import.
Then you can check the box in the properties of the driver package to "Copy the content in this package to a package share on distribution points". Then you can right click and Distribute Content one time and your package will show up fully on your DP in the SMSPKGDrive$ folder.
This fix will not help with Driver Packages that have already been imported because they were imported with the RefreshDPs box unchecked. Those already imported driver packages will still have to be distributed to the DP share twice. But any new driver package that is imported after installing the new DLLs will be able to be distributed once.
Since this is not a major issue and can be worked around, this patch will be included in the next version of DSDP. If you need it before the next version is available, please call Dell and open a case. Tell them you need the Configuration Manger DSDP Driver Package Import fix. Your call should be transferred by the call director to the high complexity team, who you can then tell to contact me, Brad Goodman, directly for the patch.
http://bradsjumpbag.blogspot.com/2015/05/sccm-driver-package-contents-do-not.html
http://bradsjumpbag.blogspot.com/2015/04/how-to-import-server-driver-packages.html
After updating to ConfigMgr 2012 R2 SP1, I found that the above issue was resolved if you manually import driver packages when I was importing packages from other vendors, but not if you use the Dell Server Deployment Pack v3.0. With some research into the issue I found that the "RefreshDPs value" was set to "false" in DSDPv3.0. In the new SP1 for ConfigMgr 2012 R2, that box was removed in the Driver Import Wizard and checked by default.
The initial fix was just to check that box for the DSDP wizard. This then caused another issue which caused the driver import to refresh the DPs after every driver. That made the import take a very long time. From a normal import time of a couple minutes to nearly an hour. So we made another change and now it all works correctly. Driver Package import time is back to normal, driver package is created on the DPs the beginning of the import process and then refreshed once at the very end of the import. So you will see a driver package version of 2 in the Distmgr.log at the end of the import.
Then you can check the box in the properties of the driver package to "Copy the content in this package to a package share on distribution points". Then you can right click and Distribute Content one time and your package will show up fully on your DP in the SMSPKGDrive$ folder.
This fix will not help with Driver Packages that have already been imported because they were imported with the RefreshDPs box unchecked. Those already imported driver packages will still have to be distributed to the DP share twice. But any new driver package that is imported after installing the new DLLs will be able to be distributed once.
Since this is not a major issue and can be worked around, this patch will be included in the next version of DSDP. If you need it before the next version is available, please call Dell and open a case. Tell them you need the Configuration Manger DSDP Driver Package Import fix. Your call should be transferred by the call director to the high complexity team, who you can then tell to contact me, Brad Goodman, directly for the patch.
Wednesday, April 15, 2015
How to import server driver packages with Dell Server Deployment Pack 3.0 into ConfigMgr 2012 R2
The Dell Server Deployment Pack (DSDP) is a Microsoft System Center ConfigMgr plugin that helps create boot media with Dell server drivers injected and lets you select server models and Operating Systems that you want to import driver packs for. The driver packages can then be used for various things including being attached to Task Sequences for Bare Metal Deployment.
Install the Dell Server Deployment Pack 3.0 using the Install Guide that comes in the download package. http://en.community.dell.com/techcenter/systems-management/w/wiki/4125.dell-server-deployment-pack-dsdp-for-configuration-manager
The install log is located at C:\Program Files (x86)\Microsoft Configuration Manager\AdminConsole\XmlStorage\Extensions\bin\Deployment\Dell\PowerEdge\Setup. There you can find the DSDPInstaller.log and DSDPInstallDebug.log.
You will also need the Dell Toolkit. There are several versions available. Read the Fixes and Enhancements, Compatible Systems, and Supported Operating Systems to find the version you need. As long as you are using a server that is 10G - 13G and the OS is 2008 R2 - Server 2012 R2, I suggest you use DTK 5.1. I say that having not fully tested 5.1 yet, but based on that 5.1 should support the newer 13G servers with Server 2012 R2.
DTK 4.4.1 - http://www.dell.com/support/home/us/en/19/Drivers/DriversDetails?driverId=2XKRY
DTK 5.0.2 - http://www.dell.com/support/home/us/en/19/Drivers/DriversDetails?driverId=3HYJG
DTK 5.1 - http://www.dell.com/support/home/us/en/19/Drivers/DriversDetails?driverid=67M0X
And you will need to make sure you have the latest version of the Windows Automated Deployment Kit (ADK), which is 8.100.26629 from 9/15/2014. Here is the link: http://www.microsoft.com/en-us/download/details.aspx?id=39982
To install the DTK, right click on the Packages container and follow through to Launch Deployment Toolkit Configuration Wizard.


Which version of the DSDP you download will determine which servers and operating systems you can get driver packages for. Be sure to read the Fixes and Enhancements, Compatible Systems, and Supported Operating Systems sections on each one to find what you need. Here are some links to the latest several versions.
SMTD 7.4 - Looks to support most 9G-12G servers. http://www.dell.com/support/home/us/en/19/Drivers/DriversDetails?driverid=PYKGK
SMTD 8.0.1 - Some 13G servers and other new hardware.
http://www.dell.com/support/home/us/en/04/Drivers/DriversDetails?driverId=MKGTT&id=102
SMTD 8.0.2 - More 13G servers and hardware.
http://www.dell.com/support/home/us/en/04/Drivers/DriversDetails?driverId=J5MT0&id=102
*Edit
SMTD 8.1 was released shortly after this was published. It supports all 12G-13G Dell servers.
http://www.dell.com/support/home/us/en/04/Drivers/DriversDetails?driverId=XT65T
Edit*
Please keep in mind that the SMTD may not have the most recent versions if newer versions have come out since the last SMTD release date. Download one or more of the ISOs above to fit your needs. Do not extract the ISO.




-----------------
EDIT 5/18/2015: ConfigMgr 2012 SP2/R2 SP1 does resolve the issue below, but only if importing drivers using the builtin driver import wizard.
EDIT 5/26/2015: We now have a fix for the issue with Dell Server Deployment pack v3.0. Please see this new post, http://bradsjumpbag.blogspot.com/2015/05/fix-for-dell-server-deployment-pack.html
-----------------


Install the Dell Server Deployment Pack 3.0 using the Install Guide that comes in the download package. http://en.community.dell.com/techcenter/systems-management/w/wiki/4125.dell-server-deployment-pack-dsdp-for-configuration-manager
The install log is located at C:\Program Files (x86)\Microsoft Configuration Manager\AdminConsole\XmlStorage\Extensions\bin\Deployment\Dell\PowerEdge\Setup. There you can find the DSDPInstaller.log and DSDPInstallDebug.log.
You will also need the Dell Toolkit. There are several versions available. Read the Fixes and Enhancements, Compatible Systems, and Supported Operating Systems to find the version you need. As long as you are using a server that is 10G - 13G and the OS is 2008 R2 - Server 2012 R2, I suggest you use DTK 5.1. I say that having not fully tested 5.1 yet, but based on that 5.1 should support the newer 13G servers with Server 2012 R2.
DTK 4.4.1 - http://www.dell.com/support/home/us/en/19/Drivers/DriversDetails?driverId=2XKRY
DTK 5.0.2 - http://www.dell.com/support/home/us/en/19/Drivers/DriversDetails?driverId=3HYJG
DTK 5.1 - http://www.dell.com/support/home/us/en/19/Drivers/DriversDetails?driverid=67M0X
And you will need to make sure you have the latest version of the Windows Automated Deployment Kit (ADK), which is 8.100.26629 from 9/15/2014. Here is the link: http://www.microsoft.com/en-us/download/details.aspx?id=39982
To install the DTK, right click on the Packages container and follow through to Launch Deployment Toolkit Configuration Wizard.
On the first screen of the DTK wizard you will point to the EXE of the downloaded DTK. In this picture I had the previous version (4.4) imported showing on the left and then on the right it shows what will be imported with the new 5.1 version.
Next screen lets you build a new boot image by combining the Dell drivers in the DTK with your choice of the boot image in the ADK, an existing image in ConfigMgr, or a custom image at another location.
The screen after this one lets you name and version the boot image. This will take a couple minutes to build the boot image, which can then be seen in the Boot Images container in ConfigMgr. Log files for this process are located at C:\Program Files (x86)\Microsoft Configuration Manager\AdminConsole\XmlStorage\Extensions\bin\Deployment\Dell\PowerEdge. Logs are called DellConfigWizard.log and Dell ConfigWizardDebug.log.
Next, it is time to import server and OS specific drivers.
You should be using the OpenManage System Management Tools and Documentation DVD or ISO. This is sometimes just referred to as the SMTD. Do not use the SUU or SBUU or any other downloads because they do not have the appropriate folder structure to work with the DSDP at this time.
Which version of the DSDP you download will determine which servers and operating systems you can get driver packages for. Be sure to read the Fixes and Enhancements, Compatible Systems, and Supported Operating Systems sections on each one to find what you need. Here are some links to the latest several versions.
SMTD 7.4 - Looks to support most 9G-12G servers. http://www.dell.com/support/home/us/en/19/Drivers/DriversDetails?driverid=PYKGK
SMTD 8.0.1 - Some 13G servers and other new hardware.
http://www.dell.com/support/home/us/en/04/Drivers/DriversDetails?driverId=MKGTT&id=102
SMTD 8.0.2 - More 13G servers and hardware.
http://www.dell.com/support/home/us/en/04/Drivers/DriversDetails?driverId=J5MT0&id=102
*Edit
SMTD 8.1 was released shortly after this was published. It supports all 12G-13G Dell servers.
http://www.dell.com/support/home/us/en/04/Drivers/DriversDetails?driverId=XT65T
Edit*
Please keep in mind that the SMTD may not have the most recent versions if newer versions have come out since the last SMTD release date. Download one or more of the ISOs above to fit your needs. Do not extract the ISO.
On the first page of the wizard you can either use the top option to point to the drive the ISO is mounted as, or you can use the bottom option to point directly to the ISO. I find the bottom option easier because you don't have to mount the ISO.
*****Do not try to use one ISO, press next to see what it has, and then click on Previous to change to a different ISO. It may not refresh and when you go forward again you will see the same servers from the previous ISO. If you need to change to a different ISO, hit Cancel to close the wizard, then open the wizard again, and select a different ISO to use.
Next, select the servers and OSes you want to import driver packs for and click on Finish. This could take a little while depending on how many you mark to import.
When it finishes you will see a completion screen that tells what it imported and what may have been skipped. There are logs for this as well. Located at C:\Program Files (x86)\Microsoft Configuration Manager\AdminConsole\XmlStorage\Extensions\bin\Deployment\Dell\PowerEdge. Logs are called DellDriverImport.log and DellDriverImportDebug.log
Now you should have driver packages for each server and OS that you selected. These will be broken up into the Dell PowerEdge Driver Packages OMversion containers under Driver Packages.
Before you can use the rest of the DSDP utilities, such as the Task Sequence Bare Metal Deployment Wizard, or be able to deploy the drivers in a Task Sequence or alone, there are a couple more things you need to do.
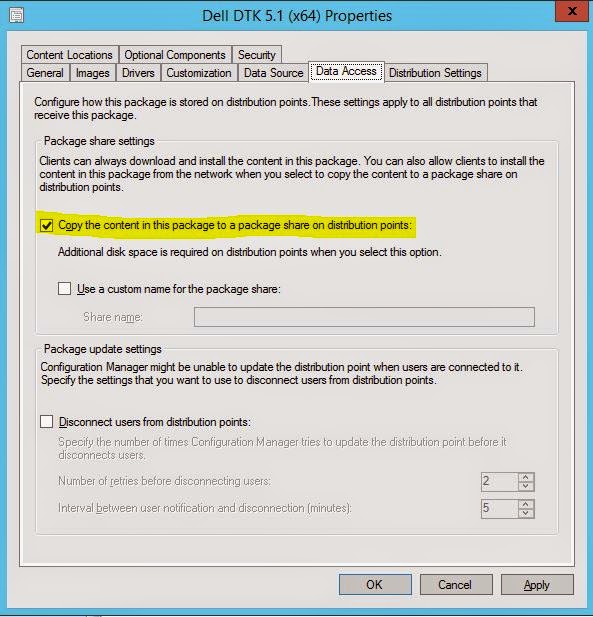
1. Boot Image. Go to the Boot Images, right click on your new boot image and select Properties. On the Customization tab, make sure Enable Command Support is checked. On the Data Source tab, mark Deploy this boot image from the PXE-enabled distribution point. On the Data Access tab, mark Copy the content in this package to a package share on distribution points. Then click OK.
You will also have to distribute the Boot Image to the DP(s). Do this by right-clicking on the new Boot Image and select Distribute Content.
Click Next, Add, Distribution Points (or group if you have one).
Mark your DP(s), next, next, and close.
After a couple minutes you can refresh to see if the Content Status at the bottom has turned green. Once it has you can right click on your Task Sequences, go to Properties, and add that boot image as the one to use to start that Task Sequence.
2. Dell PowerEdge Deployment Packages. With DSDP 3.0, there are 3 packages to distribute. PowerEdge Deployment Toolkit Integration, PowerEdge Custom Reboot Script, and PowerEdge Startup Network Setting. Each one should be set to "Copy the content in this package to a package share on distribution points". This is on the Data Access tab of the properties of each one just like in the screen shots above. Make sure you check this box for each of the 3 Dell PowerEdge Deployment Packages. Then right-click on each one and Distribute Content to the DP, just like you did with the boot image above. Then you can fresh and make sure each one shows Success under Content Status.
3. Driver Packages. Each one should be marked to "Copy the content in this package to a package share on the distribution point" just as you did above on the Data Access tab for the boot image and the Dell PowerEdge Deployment packages. Then you have to distribute to your DP(s). This is exactly the same as the last couple of steps in the Boot Image and Dell PowerEdge Deployment packages above.
-----------------
EDIT 5/18/2015: ConfigMgr 2012 SP2/R2 SP1 does resolve the issue below, but only if importing drivers using the builtin driver import wizard.
EDIT 5/26/2015: We now have a fix for the issue with Dell Server Deployment pack v3.0. Please see this new post, http://bradsjumpbag.blogspot.com/2015/05/fix-for-dell-server-deployment-pack.html
-----------------
*****Caveat***** When you distribute the driver packages, I have seen where the driver package contents does not fully distribute the first time. You can check this by looking at the PackageID and then going to the PackageID folder in the DP Share, which will be a SMSPKGdrive
This screenshot shows the Data Source tab which gives you the source folder location. You can also see that folder open where there is a total of 30 GUID folders.
This screenshot shows the DP share after the first Distribute Content and you can see that the Content Status shows Success but only 1 GUID folder is shown.
For the time being, the work-around for this is to distribute the content again by selecting Update Distribution Points.
After you Update Distribution Points, you can look back at the DP share folder and you should see the same number of GUID folders as was in the source folder above (30).
That is it. Now you can start to use these packages in your Task Sequences, or however else you want to use them.
Tuesday, August 26, 2014
"Failed to insert OSD binaries into the WIM file" error
If you are using the Dell Server Deployment Pack 2.1.0.2 with Configuration Manager 2012 (SP1), and you want to upgrade to Configuration Manager 2012 R2, make sure that your site system operating system is Server 2012 R2.
If you try to use DSDP 2.1.0.2 with ConfigMgr 2012 R2 running on a site system using Server 2012, you will get an error message similar to the picture below when trying to Update Distribution Points with new Boot Images. This error is because of a down-level OS with an up-level ConfigMgr because DISM is used to inject those drivers and DISM on the down-level OS cannot inject the drivers into an up-level boot image.
The prerequisites for DSDP 2.1.0.2 are documented in the Readme inside the DSDP 2.1 SP2 download package.
* Prerequisites of this service pack:
- System Center 2012 Configuration Manager R2 with kb#2907591,
System Center 2012 Configuration Manager,
System Center 2012 Configuration Manager SP1
- Dell Server Deployment Pack Version 2.1 or Dell Server Deployment Pack
Version 2.1.0.1
- For System Center 2012 Configuration Manager R2 the supported Site system
Operating System is Windows Server 2012 R2
"Failed to insert OSD binaries into the WIM file"

There is a work around for this. But you have to copy the boot image to another machine, running the newer DISM, and manually inject the drivers, copy the boot image back, and import it as a new boot image. I have documented this here: http://bradsjumpbag.blogspot.com/2014/08/get-configmgr-to-configure-raid-array.html
If you try to use DSDP 2.1.0.2 with ConfigMgr 2012 R2 running on a site system using Server 2012, you will get an error message similar to the picture below when trying to Update Distribution Points with new Boot Images. This error is because of a down-level OS with an up-level ConfigMgr because DISM is used to inject those drivers and DISM on the down-level OS cannot inject the drivers into an up-level boot image.
The prerequisites for DSDP 2.1.0.2 are documented in the Readme inside the DSDP 2.1 SP2 download package.
* Prerequisites of this service pack:
- System Center 2012 Configuration Manager R2 with kb#2907591,
System Center 2012 Configuration Manager,
System Center 2012 Configuration Manager SP1
- Dell Server Deployment Pack Version 2.1 or Dell Server Deployment Pack
Version 2.1.0.1
- For System Center 2012 Configuration Manager R2 the supported Site system
Operating System is Windows Server 2012 R2
"Failed to insert OSD binaries into the WIM file"
There is a work around for this. But you have to copy the boot image to another machine, running the newer DISM, and manually inject the drivers, copy the boot image back, and import it as a new boot image. I have documented this here: http://bradsjumpbag.blogspot.com/2014/08/get-configmgr-to-configure-raid-array.html
Wednesday, August 20, 2014
How to Get ConfigMgr to Configure RAID Array on Dell PERC during OSD
Depending on which PERC you have (I was using a PowerEdge R720 with a PERC H710P), the DSDP and DTK may not inject the most appropriate driver for the "Set RAID Config" step to actually configure the controller during OSD.
*************
Edit 8/26/2014: This has been found to possibly be an issue with up-level ConfigMgr and down-level OS. Below is the work-around for an issue described here: http://bradsjumpbag.blogspot.com/2014/08/failed-to-insert-osd-binaries-into-wim.html
*************
Here are the steps needed to get this working until the correct driver is injected automatically. As of this post, the DTK and DSDP are only injecting the percsas3 driver and not the percsas2 driver.
A high level overview of this process: Get the boot image and inject the needed drivers using dism, re-import the boot image into ConfigMgr and make it usable again.
1. Right click on the boot image you are using in ConfigMgr and go to Properties. On the Data Source tab you can see the Image Path. Go to that location where the image is stored. It should be similar to "\\SCCMServer\SMS_Site\OSD\Lib\BootImages\Dell\PowerEdge\x64\bootxxxx.wim".
Copy that wim file and paste it in the following step.
2. You will need a server running the same version of Dism as the version of the boot wim. For example, if the boot wim is OS Version 6.3.9600.16384, you will need to copy the wim from #1 above to a server running Server 2012 R2 (you can see the OS Version column in Boot Images in ConfigMgr). Paste that wim file to that server. I just put mine in the root of C:\.
3. From a workstation without a PERC, go to www.dell.com/support. You can either enter your service tag or click on "Servers, Storage & Networking"/PowerEdge/Model. Then click on Drivers & Downloads. Select your operating system in the dropdown. Scroll down to and expand SAS RAID. Find and download the Windows driver. For this example I am using the "Microsoft Windows 2012 R2 64 bit driver for Dell PERC H310/H170/H710P/H810/SPERC8 Controllers" located here:
http://www.dell.com/support/home/us/en/19/Drivers/DriversDetails?driverId=0P5XV&fileId=3389791240&osCode=W12R2&productCode=poweredge-r720&languageCode=EN&categoryId=SF
4. This is being done on a workstation without a PERC so that you can extract the drivers without having it actually install. Double click on the executable you just downloaded and click the Install button, but nothing else. The install will fail but do not close it yet. While the failed notice is still on the screen, browse to c:\users\YourLoggedInUser\Appdata\Local\Temp and find the folder that was just created based on time. It will be a GUID. Open that folder and you will find another folder with the drivers. Copy that folder out and put it on your server where the wim was copied to. I put mine in a folder called c:\perc.
So to this point we now have copied our bootxxxx.wim to C:\ on a server running the same OS version as the boot image; copied the needed drivers to C:\perc on the same server.
Next we will mount that image, inject the drivers, and commit the changes.
5. From an elevated PowerShell command windows, make another folder on this server called C:\Mount. Then run the following commands.
This will mount that wim into the C:\Mount folder for editing.
"dism /Mount-wim /WimFile:C:\bootxxxx.wim /Index:1 /MountDir:C:\Mount"
replace bootxxxx.wim with the actual name of your file. WinPE boot images usually only have 1 index so Index should always be 1.
Inject the drivers from C:\perc.
"dism /Image:C:\Mount /Add-Driver /Driver:C:\perc /Recurse"
Make sure all drivers were injected successfully.
Commit changes and unmount the image.
"dism /Unmount-wim /MountDir:C:\Mount /Commit"
If you have any File Explorer windows open to the C:\Mount folder, the commit may fail. Close windows and try again.
6. Now the bootxxxx.wim file should show a modified date and time along with a slightly larger size than before. Move this bootxxxx.wim to your sources folder, or other UNC accessible share path on your ConfigMgr server.
7. In ConfigMgr, right click on the Boot Images node and select "Dell PowerEdge Server Deployment\Create Dell Server Boot Image". Mark the radial button for "Use a custom boot image" and enter the path to that new bootxxxx.wim. The Boot Image should only show the first Index. Press Next and give a name, version, and any comments for the new boot image we are creating. Continue through the wizard and after a little processing time you should have a new boot image listed in ConfigMgr.
8. Open the properties of this new boot image. On the Customization tab, make sure "Enable command support" is checked. On the Data Source tab, mark "Deploy this boot image from the PXE-enabled distribution point". On the Data Access tab, mark "Copy the content in this package to a package share on distribution points". Press Ok.
9. Right click on the new boot image and Distribute Content. Distribute to any and all DPs that you will be used for OSD. refresh and check the status to make sure it succeeds. You can also look at the Image ID on that boot image and then on each DP look in the SMSPKGDrive$ folder for that Image ID and make sure the bootxxxx.wim is there.
10. Go to your Task Sequences. Right click on the TS you want to use and go to Properties, not Edit. On the Advanced tab you can update the box for "Use a boot image" to this new image. Press Ok.
11. Now go boot your server that you are trying to deploy to. I like to go into the controller (CTRL+R) when possible and clear the config. Then reboot to PXE and now the "Set RAID config" step should be able to access your PERC and try to configure it.
Press F8 during the task sequence so that you can stop it from rebooting just in case it doesn't work. From here you open cmtrace and check out the SMSTS.log or run diskpart and type "list disk". If "list disk" shows the drives now, it is working. If not, open X:\Windows\Temp\Smsts\SMSTS.log to find the next error.
*************
Edit 8/26/2014: This has been found to possibly be an issue with up-level ConfigMgr and down-level OS. Below is the work-around for an issue described here: http://bradsjumpbag.blogspot.com/2014/08/failed-to-insert-osd-binaries-into-wim.html
*************
Here are the steps needed to get this working until the correct driver is injected automatically. As of this post, the DTK and DSDP are only injecting the percsas3 driver and not the percsas2 driver.
A high level overview of this process: Get the boot image and inject the needed drivers using dism, re-import the boot image into ConfigMgr and make it usable again.
1. Right click on the boot image you are using in ConfigMgr and go to Properties. On the Data Source tab you can see the Image Path. Go to that location where the image is stored. It should be similar to "\\SCCMServer\SMS_Site\OSD\Lib\BootImages\Dell\PowerEdge\x64\bootxxxx.wim".
Copy that wim file and paste it in the following step.
2. You will need a server running the same version of Dism as the version of the boot wim. For example, if the boot wim is OS Version 6.3.9600.16384, you will need to copy the wim from #1 above to a server running Server 2012 R2 (you can see the OS Version column in Boot Images in ConfigMgr). Paste that wim file to that server. I just put mine in the root of C:\.
3. From a workstation without a PERC, go to www.dell.com/support. You can either enter your service tag or click on "Servers, Storage & Networking"/PowerEdge/Model. Then click on Drivers & Downloads. Select your operating system in the dropdown. Scroll down to and expand SAS RAID. Find and download the Windows driver. For this example I am using the "Microsoft Windows 2012 R2 64 bit driver for Dell PERC H310/H170/H710P/H810/SPERC8 Controllers" located here:
http://www.dell.com/support/home/us/en/19/Drivers/DriversDetails?driverId=0P5XV&fileId=3389791240&osCode=W12R2&productCode=poweredge-r720&languageCode=EN&categoryId=SF
4. This is being done on a workstation without a PERC so that you can extract the drivers without having it actually install. Double click on the executable you just downloaded and click the Install button, but nothing else. The install will fail but do not close it yet. While the failed notice is still on the screen, browse to c:\users\YourLoggedInUser\Appdata\Local\Temp and find the folder that was just created based on time. It will be a GUID. Open that folder and you will find another folder with the drivers. Copy that folder out and put it on your server where the wim was copied to. I put mine in a folder called c:\perc.
So to this point we now have copied our bootxxxx.wim to C:\ on a server running the same OS version as the boot image; copied the needed drivers to C:\perc on the same server.
Next we will mount that image, inject the drivers, and commit the changes.
5. From an elevated PowerShell command windows, make another folder on this server called C:\Mount. Then run the following commands.
This will mount that wim into the C:\Mount folder for editing.
"dism /Mount-wim /WimFile:C:\bootxxxx.wim /Index:1 /MountDir:C:\Mount"
replace bootxxxx.wim with the actual name of your file. WinPE boot images usually only have 1 index so Index should always be 1.
Inject the drivers from C:\perc.
"dism /Image:C:\Mount /Add-Driver /Driver:C:\perc /Recurse"
Make sure all drivers were injected successfully.
Commit changes and unmount the image.
"dism /Unmount-wim /MountDir:C:\Mount /Commit"
If you have any File Explorer windows open to the C:\Mount folder, the commit may fail. Close windows and try again.
6. Now the bootxxxx.wim file should show a modified date and time along with a slightly larger size than before. Move this bootxxxx.wim to your sources folder, or other UNC accessible share path on your ConfigMgr server.
7. In ConfigMgr, right click on the Boot Images node and select "Dell PowerEdge Server Deployment\Create Dell Server Boot Image". Mark the radial button for "Use a custom boot image" and enter the path to that new bootxxxx.wim. The Boot Image should only show the first Index. Press Next and give a name, version, and any comments for the new boot image we are creating. Continue through the wizard and after a little processing time you should have a new boot image listed in ConfigMgr.
8. Open the properties of this new boot image. On the Customization tab, make sure "Enable command support" is checked. On the Data Source tab, mark "Deploy this boot image from the PXE-enabled distribution point". On the Data Access tab, mark "Copy the content in this package to a package share on distribution points". Press Ok.
9. Right click on the new boot image and Distribute Content. Distribute to any and all DPs that you will be used for OSD. refresh and check the status to make sure it succeeds. You can also look at the Image ID on that boot image and then on each DP look in the SMSPKGDrive$ folder for that Image ID and make sure the bootxxxx.wim is there.
10. Go to your Task Sequences. Right click on the TS you want to use and go to Properties, not Edit. On the Advanced tab you can update the box for "Use a boot image" to this new image. Press Ok.
11. Now go boot your server that you are trying to deploy to. I like to go into the controller (CTRL+R) when possible and clear the config. Then reboot to PXE and now the "Set RAID config" step should be able to access your PERC and try to configure it.
Press F8 during the task sequence so that you can stop it from rebooting just in case it doesn't work. From here you open cmtrace and check out the SMSTS.log or run diskpart and type "list disk". If "list disk" shows the drives now, it is working. If not, open X:\Windows\Temp\Smsts\SMSTS.log to find the next error.
Subscribe to:
Posts (Atom)