The new Dell Systems Management Tool and Documentation ISO version 8.1 has been released. In relation to Configuration Manager 2012 and the Dell Server Deployment Pack, the new SMTD 8.1 can be used to import drivers for all 12G and 13G servers only.
There are no 11G or older server driver packages in this release. For 9G-11G, you must use the SMTD v7.4.
http://www.dell.com/support/home/us/en/04/Drivers/DriversDetails?driverId=XT65T
Thursday, April 30, 2015
Wednesday, April 15, 2015
How to import server driver packages with Dell Server Deployment Pack 3.0 into ConfigMgr 2012 R2
The Dell Server Deployment Pack (DSDP) is a Microsoft System Center ConfigMgr plugin that helps create boot media with Dell server drivers injected and lets you select server models and Operating Systems that you want to import driver packs for. The driver packages can then be used for various things including being attached to Task Sequences for Bare Metal Deployment.
Install the Dell Server Deployment Pack 3.0 using the Install Guide that comes in the download package. http://en.community.dell.com/techcenter/systems-management/w/wiki/4125.dell-server-deployment-pack-dsdp-for-configuration-manager
The install log is located at C:\Program Files (x86)\Microsoft Configuration Manager\AdminConsole\XmlStorage\Extensions\bin\Deployment\Dell\PowerEdge\Setup. There you can find the DSDPInstaller.log and DSDPInstallDebug.log.
You will also need the Dell Toolkit. There are several versions available. Read the Fixes and Enhancements, Compatible Systems, and Supported Operating Systems to find the version you need. As long as you are using a server that is 10G - 13G and the OS is 2008 R2 - Server 2012 R2, I suggest you use DTK 5.1. I say that having not fully tested 5.1 yet, but based on that 5.1 should support the newer 13G servers with Server 2012 R2.
DTK 4.4.1 - http://www.dell.com/support/home/us/en/19/Drivers/DriversDetails?driverId=2XKRY
DTK 5.0.2 - http://www.dell.com/support/home/us/en/19/Drivers/DriversDetails?driverId=3HYJG
DTK 5.1 - http://www.dell.com/support/home/us/en/19/Drivers/DriversDetails?driverid=67M0X
And you will need to make sure you have the latest version of the Windows Automated Deployment Kit (ADK), which is 8.100.26629 from 9/15/2014. Here is the link: http://www.microsoft.com/en-us/download/details.aspx?id=39982
To install the DTK, right click on the Packages container and follow through to Launch Deployment Toolkit Configuration Wizard.


Which version of the DSDP you download will determine which servers and operating systems you can get driver packages for. Be sure to read the Fixes and Enhancements, Compatible Systems, and Supported Operating Systems sections on each one to find what you need. Here are some links to the latest several versions.
SMTD 7.4 - Looks to support most 9G-12G servers. http://www.dell.com/support/home/us/en/19/Drivers/DriversDetails?driverid=PYKGK
SMTD 8.0.1 - Some 13G servers and other new hardware.
http://www.dell.com/support/home/us/en/04/Drivers/DriversDetails?driverId=MKGTT&id=102
SMTD 8.0.2 - More 13G servers and hardware.
http://www.dell.com/support/home/us/en/04/Drivers/DriversDetails?driverId=J5MT0&id=102
*Edit
SMTD 8.1 was released shortly after this was published. It supports all 12G-13G Dell servers.
http://www.dell.com/support/home/us/en/04/Drivers/DriversDetails?driverId=XT65T
Edit*
Please keep in mind that the SMTD may not have the most recent versions if newer versions have come out since the last SMTD release date. Download one or more of the ISOs above to fit your needs. Do not extract the ISO.


-----------------
EDIT 5/18/2015: ConfigMgr 2012 SP2/R2 SP1 does resolve the issue below, but only if importing drivers using the builtin driver import wizard.
EDIT 5/26/2015: We now have a fix for the issue with Dell Server Deployment pack v3.0. Please see this new post, http://bradsjumpbag.blogspot.com/2015/05/fix-for-dell-server-deployment-pack.html
-----------------


Install the Dell Server Deployment Pack 3.0 using the Install Guide that comes in the download package. http://en.community.dell.com/techcenter/systems-management/w/wiki/4125.dell-server-deployment-pack-dsdp-for-configuration-manager
The install log is located at C:\Program Files (x86)\Microsoft Configuration Manager\AdminConsole\XmlStorage\Extensions\bin\Deployment\Dell\PowerEdge\Setup. There you can find the DSDPInstaller.log and DSDPInstallDebug.log.
You will also need the Dell Toolkit. There are several versions available. Read the Fixes and Enhancements, Compatible Systems, and Supported Operating Systems to find the version you need. As long as you are using a server that is 10G - 13G and the OS is 2008 R2 - Server 2012 R2, I suggest you use DTK 5.1. I say that having not fully tested 5.1 yet, but based on that 5.1 should support the newer 13G servers with Server 2012 R2.
DTK 4.4.1 - http://www.dell.com/support/home/us/en/19/Drivers/DriversDetails?driverId=2XKRY
DTK 5.0.2 - http://www.dell.com/support/home/us/en/19/Drivers/DriversDetails?driverId=3HYJG
DTK 5.1 - http://www.dell.com/support/home/us/en/19/Drivers/DriversDetails?driverid=67M0X
And you will need to make sure you have the latest version of the Windows Automated Deployment Kit (ADK), which is 8.100.26629 from 9/15/2014. Here is the link: http://www.microsoft.com/en-us/download/details.aspx?id=39982
To install the DTK, right click on the Packages container and follow through to Launch Deployment Toolkit Configuration Wizard.
On the first screen of the DTK wizard you will point to the EXE of the downloaded DTK. In this picture I had the previous version (4.4) imported showing on the left and then on the right it shows what will be imported with the new 5.1 version.
Next screen lets you build a new boot image by combining the Dell drivers in the DTK with your choice of the boot image in the ADK, an existing image in ConfigMgr, or a custom image at another location.
The screen after this one lets you name and version the boot image. This will take a couple minutes to build the boot image, which can then be seen in the Boot Images container in ConfigMgr. Log files for this process are located at C:\Program Files (x86)\Microsoft Configuration Manager\AdminConsole\XmlStorage\Extensions\bin\Deployment\Dell\PowerEdge. Logs are called DellConfigWizard.log and Dell ConfigWizardDebug.log.
Next, it is time to import server and OS specific drivers.
You should be using the OpenManage System Management Tools and Documentation DVD or ISO. This is sometimes just referred to as the SMTD. Do not use the SUU or SBUU or any other downloads because they do not have the appropriate folder structure to work with the DSDP at this time.
Which version of the DSDP you download will determine which servers and operating systems you can get driver packages for. Be sure to read the Fixes and Enhancements, Compatible Systems, and Supported Operating Systems sections on each one to find what you need. Here are some links to the latest several versions.
SMTD 7.4 - Looks to support most 9G-12G servers. http://www.dell.com/support/home/us/en/19/Drivers/DriversDetails?driverid=PYKGK
SMTD 8.0.1 - Some 13G servers and other new hardware.
http://www.dell.com/support/home/us/en/04/Drivers/DriversDetails?driverId=MKGTT&id=102
SMTD 8.0.2 - More 13G servers and hardware.
http://www.dell.com/support/home/us/en/04/Drivers/DriversDetails?driverId=J5MT0&id=102
*Edit
SMTD 8.1 was released shortly after this was published. It supports all 12G-13G Dell servers.
http://www.dell.com/support/home/us/en/04/Drivers/DriversDetails?driverId=XT65T
Edit*
Please keep in mind that the SMTD may not have the most recent versions if newer versions have come out since the last SMTD release date. Download one or more of the ISOs above to fit your needs. Do not extract the ISO.
On the first page of the wizard you can either use the top option to point to the drive the ISO is mounted as, or you can use the bottom option to point directly to the ISO. I find the bottom option easier because you don't have to mount the ISO.
*****Do not try to use one ISO, press next to see what it has, and then click on Previous to change to a different ISO. It may not refresh and when you go forward again you will see the same servers from the previous ISO. If you need to change to a different ISO, hit Cancel to close the wizard, then open the wizard again, and select a different ISO to use.
Next, select the servers and OSes you want to import driver packs for and click on Finish. This could take a little while depending on how many you mark to import.
When it finishes you will see a completion screen that tells what it imported and what may have been skipped. There are logs for this as well. Located at C:\Program Files (x86)\Microsoft Configuration Manager\AdminConsole\XmlStorage\Extensions\bin\Deployment\Dell\PowerEdge. Logs are called DellDriverImport.log and DellDriverImportDebug.log
Now you should have driver packages for each server and OS that you selected. These will be broken up into the Dell PowerEdge Driver Packages OMversion containers under Driver Packages.
Before you can use the rest of the DSDP utilities, such as the Task Sequence Bare Metal Deployment Wizard, or be able to deploy the drivers in a Task Sequence or alone, there are a couple more things you need to do.
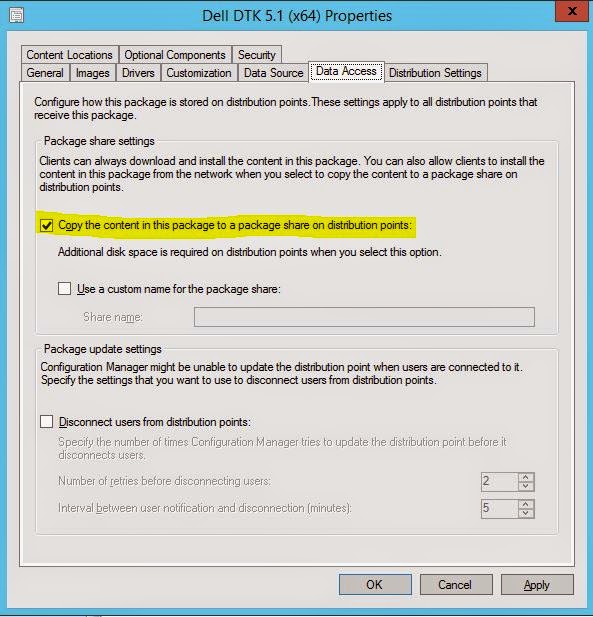
1. Boot Image. Go to the Boot Images, right click on your new boot image and select Properties. On the Customization tab, make sure Enable Command Support is checked. On the Data Source tab, mark Deploy this boot image from the PXE-enabled distribution point. On the Data Access tab, mark Copy the content in this package to a package share on distribution points. Then click OK.
You will also have to distribute the Boot Image to the DP(s). Do this by right-clicking on the new Boot Image and select Distribute Content.
Click Next, Add, Distribution Points (or group if you have one).
Mark your DP(s), next, next, and close.
After a couple minutes you can refresh to see if the Content Status at the bottom has turned green. Once it has you can right click on your Task Sequences, go to Properties, and add that boot image as the one to use to start that Task Sequence.
2. Dell PowerEdge Deployment Packages. With DSDP 3.0, there are 3 packages to distribute. PowerEdge Deployment Toolkit Integration, PowerEdge Custom Reboot Script, and PowerEdge Startup Network Setting. Each one should be set to "Copy the content in this package to a package share on distribution points". This is on the Data Access tab of the properties of each one just like in the screen shots above. Make sure you check this box for each of the 3 Dell PowerEdge Deployment Packages. Then right-click on each one and Distribute Content to the DP, just like you did with the boot image above. Then you can fresh and make sure each one shows Success under Content Status.
3. Driver Packages. Each one should be marked to "Copy the content in this package to a package share on the distribution point" just as you did above on the Data Access tab for the boot image and the Dell PowerEdge Deployment packages. Then you have to distribute to your DP(s). This is exactly the same as the last couple of steps in the Boot Image and Dell PowerEdge Deployment packages above.
-----------------
EDIT 5/18/2015: ConfigMgr 2012 SP2/R2 SP1 does resolve the issue below, but only if importing drivers using the builtin driver import wizard.
EDIT 5/26/2015: We now have a fix for the issue with Dell Server Deployment pack v3.0. Please see this new post, http://bradsjumpbag.blogspot.com/2015/05/fix-for-dell-server-deployment-pack.html
-----------------
*****Caveat***** When you distribute the driver packages, I have seen where the driver package contents does not fully distribute the first time. You can check this by looking at the PackageID and then going to the PackageID folder in the DP Share, which will be a SMSPKGdrive
This screenshot shows the Data Source tab which gives you the source folder location. You can also see that folder open where there is a total of 30 GUID folders.
This screenshot shows the DP share after the first Distribute Content and you can see that the Content Status shows Success but only 1 GUID folder is shown.
For the time being, the work-around for this is to distribute the content again by selecting Update Distribution Points.
After you Update Distribution Points, you can look back at the DP share folder and you should see the same number of GUID folders as was in the source folder above (30).
That is it. Now you can start to use these packages in your Task Sequences, or however else you want to use them.
Wednesday, April 1, 2015
Dell Warranty Tool in DCIS 4.0 Does Not Write to ConfigMgr DB
The latest version of the Dell Command Integration Suite 4.0 for System Center (link) includes the Warranty Tool similar to the previous versions. But it does not write to the ConfigMgr DB. This is due to a compatibility issue with the 2012 R2 DB and will hopefully be resolved in a near future version of the tool.
For now, here is a script that will help you import the results file from the Warranty Tool into your ConfigMgr 2012 DB. This script was shared with me by a customer who has been using it.
For now, here is a script that will help you import the results file from the Warranty Tool into your ConfigMgr 2012 DB. This script was shared with me by a customer who has been using it.
DECLARE @xml XML
set @xml =
(
select BulkColumn
from
openrowset(BULK
'C:\ProgramData\Dell\CommandIntegrationSuite\WarrantyInformation_03_05.xml',SINGLE_CLOB)
as x
)
select
T.c.value('(ServiceTag/text())[1]','Varchar(30)') as ServiceTag
,T.c.value('(SystemID/text())[1]','Varchar(30)') as SystemID
,T.c.value('(Buid/text())[1]','Varchar(30)') as Buid
,T.c.value('(Region/text())[1]','Varchar(30)') as Region
,T.c.value('(LOB/text())[1]','Varchar(30)') as LOB
,T.c.value('(SystemModel/text())[1]','Varchar(30)') as SystemModel
,T.c.value('(SystemShipDate/text())[1]','datetime') as ShipDate
,U.v.value('(Provider/text())[1]','Varchar(30)') as Provider
,U.v.value('(ServiceLevelDescription/text())[1]','Varchar(50)') as
Description
,U.v.value('(EntitlementType/text())[1]','Varchar(30)') as
EntitlementType
,U.v.value('(StartDate/text())[1]','datetime') as WarrantyStartDate
,U.v.value('(EndDate/text())[1]','datetime') as WarrantyEndDate
,U.v.value('(DaysLeft/text())[1]','Int') as DaysLeft
from
@xml.nodes('Warranty/Asset') T(c)
cross apply
T.c.nodes('Entitlement') U(v)
order by ServiceTag,
WarrantyEndDate
Friday, March 13, 2015
App-V 5.0 SP3 on Server 2012 R2 Scrolling Issue is Back
In App-V 5.0 SP3 web console, you may find that trying to scroll down your list of applications may cause the focus to jump back to the top of the list. Here is a YouTube video of the problem when it occurred back in SP1.
https://www.youtube.com/watch?v=oKVSmc3NG_o
When this was an issue back in App-V 5.0 SP1 Microsoft released a hotfix for it (http://support.microsoft.com/kb/2897087). Now in SP3 the problem is back again.
I escalated this to Microsoft and it has been marked as a regression bug. Microsoft said, "The current workaround is to export the Deployment and User Config XML files, make the necessary modifications in these files to turn on or off the features of the affected packages. You can do this to an extent with Office 2013 but it is best to manipulate that package during the ODT packager process and the CustomConfiguration XML file."
A fix should be included in updates for App-V sometime later this year.
Thursday, March 12, 2015
Adding EqualLogic SMP Storage Provider to SCVMM 2012 R2 fails with UR5 installed
This issue and resolution was discovered by my co-worker Jeremy Price. All credit goes to him. Posting here at his request to help get this out.
Users may experience errors in SCVMM 2012 R2 when adding EqualLogic SMP
Storage Providers after Update Rollup 5 is installed. The error ID will be 20413 and the error report
will contain an exception as follows:
----------------------------------------------------
------------ exceptionObject.ToString() ------------
----------------------------------------------------
System.ArgumentNullException: Value cannot be null.
Parameter name: optionValue
at Microsoft.Management.Infrastructure.Options.CimOperationOptions.SetCustomOption(String optionName, Object optionValue, CimType cimType, Boolean mustComply)
at Microsoft.EnterpriseManagement.DataCenterManager.StorageUtil.PassThroughBase..ctor(String server, String provUser, SecureString provPassword)
at Microsoft.EnterpriseManagement.DataCenterManager.StorageUtil.SMISPassThroughService..ctor(String server, String provUser, SecureString provPassword)
at Microsoft.EnterpriseManagement.DataCenterManager.StorageUtil.ReplicationPassThroughService..ctor(String server, String provUser, SecureString provPassword)
at Microsoft.EnterpriseManagement.DataCenterManager.StorageUtil.SCXArray.GetReplicationPTService()
at Microsoft.EnterpriseManagement.DataCenterManager.StorageUtil.SCXArray.GetReplicationService(Boolean throwOnNull)
at Microsoft.VirtualManager.Engine.ImageLibrary.StrgArray.RefreshReplicationCapabilities(SCXArray scxArray)
at Microsoft.VirtualManager.Engine.ImageLibrary.StrgArray.Refresh(SCXStorageService scxService, StrgProvider provider, DiscoveryLevel discoveryLevel, String autoMgmtPoolId, StrgClassification autoMgmtPoolClassification, Boolean refreshReplicationCapabilities, Boolean useCachedArray)
at Microsoft.VirtualManager.Engine.ImageLibrary.StrgProvider.Refresh(SCXStorageService scxService, DiscoveryLevel discoveryLevel, Boolean useCachedArray)
at Microsoft.VirtualManager.Engine.Deployment.ImportStorageProviderSubtask.RunSubtask()
at Microsoft.VirtualManager.Engine.TaskRepository.SubtaskBase.Run()
at Microsoft.VirtualManager.Engine.TaskRepository.Task`1.SubtaskRun(Object state)
This behavior is not specifically documented, but is addressed in Microsoft
KB 3039296 with a hotfix for the Storage Refresher. http://support.microsoft.com/en-us/kb/3039296
After applying the hotfix as indicated in the KB and restarting the
System Center Virtual Machine Manager service, the errors no longer occur.
Monday, March 9, 2015
Dell Client Integration Pack Warranty Tool URL
Dell Client Integration pack 4.0 and previous use an older asset service called Xserv.
I have heard that future versions may switch a REST service at api.dell.com. Until that switch is actually made, if you have a proxy, firewall, or other URL filtering service, make sure to add the following URL to your whitelist.
http://xserv.dell.com/services/assetservice.asmx
I have heard that future versions may switch a REST service at api.dell.com. Until that switch is actually made, if you have a proxy, firewall, or other URL filtering service, make sure to add the following URL to your whitelist.
http://xserv.dell.com/services/assetservice.asmx
Tuesday, December 16, 2014
Theoretical Limits for Dell In-Band & Out-of-Band Monitoring with SCOM
Although I work for Dell at the time of publishing, this post is not official Dell documentation.
Dell has SCOM management packs (MPs) that allow In-Band and Out-of-Band monitoring of Dell hardware. There are some possible limits I want to make you aware of before you begin your testing and implementation of these solutions. We will start with the background and describe the different options.
First, there are 2 primary MPs for monitoring Dell server hardware.
- In-Band: This requires the installation of OMSA and the SCOM agent on the systems that you want to monitor. Processing of data is done on the monitored system by the SCOM agent. This is also much easier to setup.
- Out-of-Band: This does not require OMSA or the SCOM agent, but does require setting up SMASH discovery through the iDrac, a license from Dell, and the Dell Connections License Manager. Processing of data is done on the SCOM Management Server. I have another post on how to set this up in a single SCOM management server environment.
Inside each of those MPs are 2 monitoring levels.
- Scalable: Inventory and monitoring of component groups and also displays the presence of the iDrac. For Reports, only OpenManage Windows Event log is available.
- Detailed: Detailed inventory and monitoring of the following components: memory, processors, network interfaces, storage controllers, disks, volume, power, temperature, and BIOS information. For Reports, availability of BIOS configuration, firmware and driver versions, and RAID configuration reports.
There are other factors that can blur or move these theoretical limits up or down. Factors including whether the SCOM management servers are physical or virtual, specs of those physical/virtual machines, how much other monitoring is being done and the load on the SCOM servers, bandwidth, etc.
Please remember that these are not hard limits and are not official Dell documentation.
# of Dell servers supported per SCOM Management Server
| Scalable | Detailed | |
| In-Band (Agent-Based) | 1500 | 500 |
| Out-of-Band (Agent-Free) | 150 | 50 |
Your mileage may vary. Please test before rolling out into production.
Subscribe to:
Posts (Atom)